
So I found this old Raleigh off the ebay and made an impulse $50 dollar bid and left it at that. 2 days later, I found out I have won it so it’s actually not that bad for the price for an English bike.
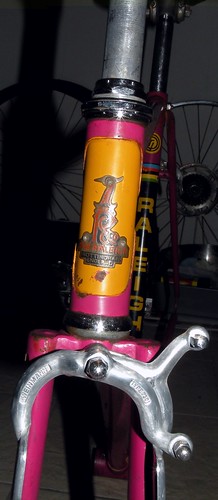
I had originally wanted to build it up as a fixie, however seeing its color scheme, heritage and some hard searching of its origins, I felt it was best option to try and restore this badboy to its former glory.
The bike is a 1975 Raleigh Flyer. Made in Nottingham UK. Pics are http://www.flickr.com/photos/vaeske/set ... 09/detail/
These are the parts that I’ve managed to find on it:
- Weimann AG Type 730 F + R alloy brakes and callipers
- Standard Drop bars i think
- GB Head Stem
- Huret Front Derailleur
- Huret Svelto Rear Derailleur
- Huret down tube gear leavers
- Unknown wheels and large flange hubs
- 3 pin detachable chainset, with cottered cranks and a fixed cup on other side of bottom bracket
- Interesting engraving on the crank arms (possible Raleigh cranks)
- BB Serial is SSH017
Bike’s condition wasn’t the worst I must admit. Rims, hubs and spokes are surprisingly in not bad condition with minimal rust. The frame is in okay condition, but I have started seeing some of the pink paint coating slowly coming off now. Cassettes and chain might very well need to be replaced.
Firstly thanks to this invaluable lesson from Mark Fields on Brown Vinegar Treatment (BVT), 2 litres of brown vinegar was purchased. In go the brakes, front and rear derailleurs, shift levers, crank arms and bits and bobs of nuts and bolts. I’m absolutely delighted, as some of those bolts have come back a treat. Not sure if i should be doing anything else with them eg. Polish them, (anyone have any pointers on what to get or what to use?) Any suggestions?
Hardest part to take apart was you guess it: Cottered cranks immediately followed by the fixed cup (which I’ve yet to remove). I’ve since broke a cheap Chinese made clamp from Bunnings and replaced it with a German one which removed the non chain side bolt, and another purchase of a vise to remove the one from the crank side (this one was a bitch!).
Now the question is: do I need to remove the fixed cup on the derailleur side to rebuild the BB? If that is possible, then I’ll stick with original parts, but if not then maybe it’s the better option to upgrade it with new BB and cranks.
Please note I am a bike newbie/home mechanic so anything i don’t understand please go easy on me.
Cheers Ethan
1975 Raleigh Flyer restoration project
-
vaeske

- Posts: 1013
- Joined: Thu May 05, 2011 9:22 am
- Location: Brisbane
- Contact:
-
ghettro

- Posts: 960
- Joined: Mon Mar 02, 2009 9:38 am
- Location: London, UK
Re: 1975 Raleigh Flyer restoration project
Heya,
nice to see someone building up an old Raleigh. Firstly, to remove cotters you should have either used a dedicated cotter press, or use a hammer with something supporting the crank underneath to the ground - an old pipe is ideal.
You should remove the drive side BB cup to clean and inspect it. On most bikes with English (also called BSA) threaded bottom brackets, the drive side cup is reverse threaded. Typically the cup is removed using a large wrench that is made specifically for the purpose, the cups usually have two flats to accommodate this. One thing to watch out for is that older Raleighs often have a proprietary BB threading that is not compatible with the standard English/BSA threading, so you will be limited in BB choices if you are considering changing the whole thing.
As for polishing, I've got some basic tips for polishing on my blog http://smutpedaller.blogspot.com/2010/0 ... g-101.html. Usually alloy parts are easier to restore as they don't tend to rust like steel based parts - alloy parts can be made to look almost as good as new with some elbow grease. Chrome plated parts (brass or steel) can be polished, but you have to be careful and usually once they have rusted and pitted you usually have to get them replated to make them look as good as new. Not usually worth the trouble as the chrome plated parts are usually heavier and lower end than the alloy parts of the same period.
-
vaeske
- Posts: 1013
- Joined: Thu May 05, 2011 9:22 am
- Location: Brisbane
- Contact:
Re: 1975 Raleigh Flyer restoration project
Okay, so the bike is now stripped of everything. I’m going to leave the frame as is because I like the color scheme and how it is, after all, it is from 1975 for goodness sake!
Thanks Ghettro for your polishing 101 tips. I'll make sure I get onto it this week.
Onto another matter, I’m having a little trouble with the fork and stem. I’ve taken the top screw off the stem and unscrewed the rings. I have some fork out already but can’t get the damn thing off. My intention is to clean the caps and rings on both and then polish the stem so I could put them all back together.
Anyone else care to assist here?
Cheers
Ethan
-
ghettro
- Posts: 960
- Joined: Mon Mar 02, 2009 9:38 am
- Location: London, UK
Re: 1975 Raleigh Flyer restoration project
The stem is typically held in by a wedge or a plug. You can usually loosen it by tapping the bolt whilst it's threaded into the wedge/plug.
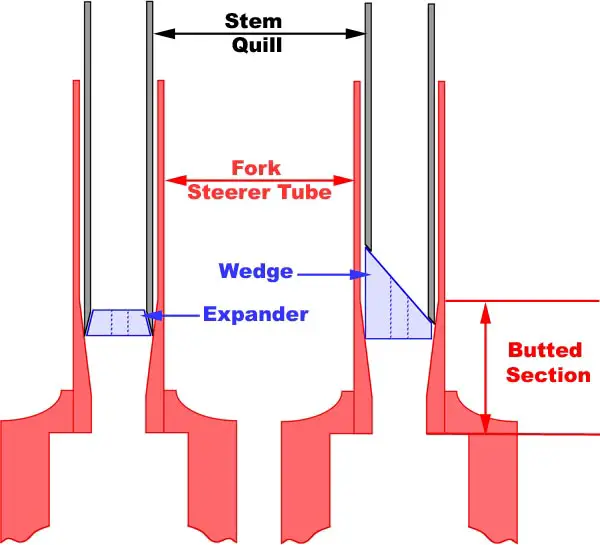
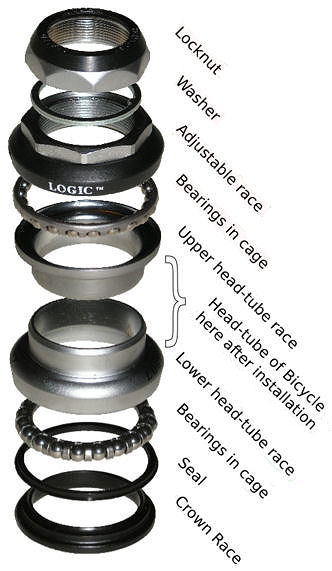
Sometimes the stem can be rusted into the steerer and will be difficult to remove even if the wedge is loosened. Try spraying some WD40 down there if this is a problem and rotate the back and forth whilst pulling up. Once the stem is out you should see the locknut on the top of the headset (you mentioned removing all the rings. Remove the locknut, any spacers and the adjustable race, once these are free the fork should drop out.
http://www.sheldonbrown.com/headsets.html
-
vaeske
- Posts: 1013
- Joined: Thu May 05, 2011 9:22 am
- Location: Brisbane
- Contact:
Re: 1975 Raleigh Flyer restoration project
okay, thanks for that gettro, but I'm still having trouble with it. i've knocked it a couple of times and so far it only comes out slightly and I cannot pull it apart. I've sprayed some RP7 into it and will try in a little bit.
I have not been able to removed the fixed cup either, I have a hcw-4 park tools spanner, but i'm unable to get a hold of the flats properly and try to undo the cup! i've tried spraying wd40, rp7 etc. nothing is getting this damn cup off! any suggestions?
Wheels are slightly rusted so I have started lubricating the nipples and will try to clean it up as much as i can. Would i be able to take everything off and re thread it into a crows next or something like that?``````
-
munga

- Posts: 7023
- Joined: Mon Jan 28, 2008 3:17 pm
- Location: wowe
- Contact:
Re: 1975 Raleigh Flyer restoration project
what suburb are you vaeske?
-
vaeske
- Posts: 1013
- Joined: Thu May 05, 2011 9:22 am
- Location: Brisbane
- Contact:
Re: 1975 Raleigh Flyer restoration project
Munga, bowen hills.
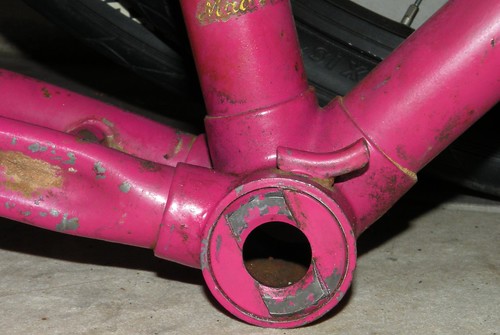
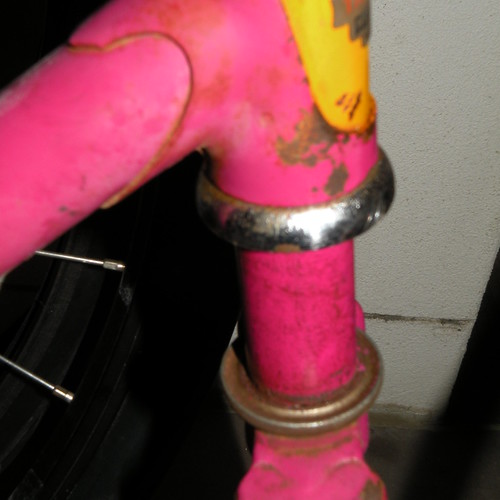
here it is. I can't get this open to rebuild the bottom bracket. the two flat areas wouldn't catch on from the hwc-4 wrench.
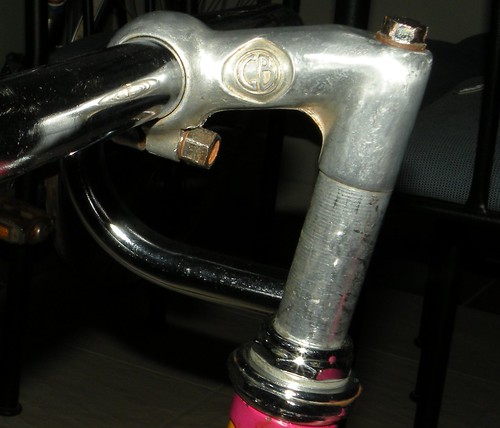
This fork wouldn't budge:
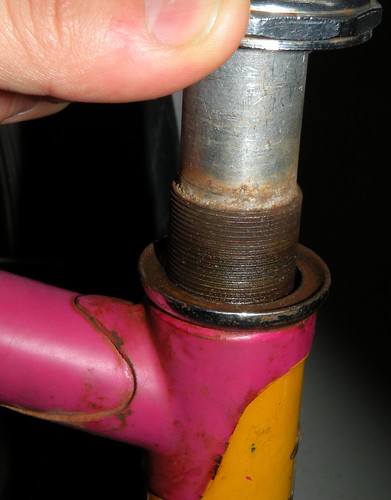
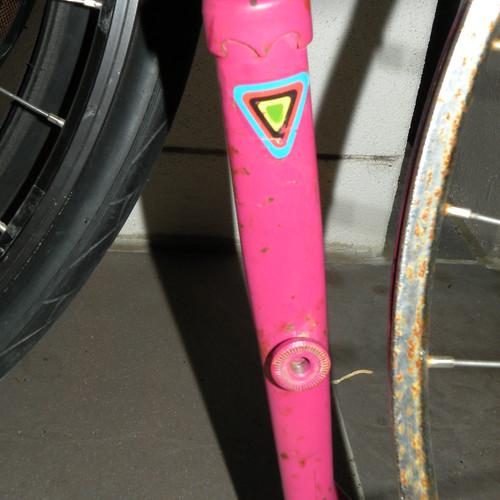
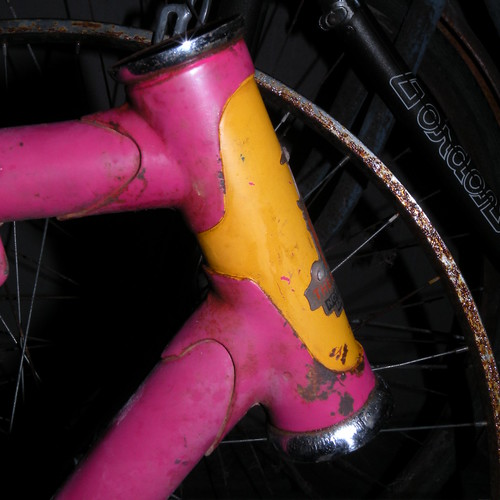
I don't actually know what this little hole on the fork is for:
here it is. I can't get this open to rebuild the bottom bracket. the two flat areas wouldn't catch on from the hwc-4 wrench.
This fork wouldn't budge:
I don't actually know what this little hole on the fork is for:
-
ghettro
- Posts: 960
- Joined: Mon Mar 02, 2009 9:38 am
- Location: London, UK
Re: 1975 Raleigh Flyer restoration project
- Firstly are you turning the fixed cup the right way? It should come out when you turn it clockwise. Otherwise those older english fixed cups can be a pain to remove
- Looks like your stem is corroded into your steerer. The problem is that you have an alloy stem in a steel steerer, rain and weather causes corrosion which expands in the tiny gap between the stem and the steerer and makes it sieze. This is really quite hard to remove. One way is to stick a front wheel in the fork, straddle the wheel and hold it with your legs then try to twist the stem using the handlebars for leverage whilst pulling up simultaneously. Once you can get over the static friction it's a lot easier to get it to move. Otherwise you can cut through the stem to remove the fork, however you are still stuck with the remainder of the stem in the steerer.
- That threaded bit on the fork is a dynamo light mount for the headlight.
-
WyvernRH

- Posts: 3190
- Joined: Tue Nov 06, 2007 6:41 pm
- Location: Newcastle NSW
Re: 1975 Raleigh Flyer restoration project
Being picky I know but that braze-on is a lamp bracket mount for the headlight lamp bracket. (normally an 'L' shaped bracket for the 'Prince of Darkness' Ever Ready lamp)ghettro wrote: That threaded bit on the fork is a dynamo light mount for the headlight.
Compulsory on production bikes in the UK for quite a long period of time (50's> 70's?)
Cheers
Richard
-
brokenbus
- Posts: 646
- Joined: Sat Mar 13, 2010 7:12 pm
- Location: Blackhead NSW
Re: 1975 Raleigh Flyer restoration project
To loosen the stem you could try clamping the forks in a bench vice (between some wood blocks and not too tight) and then twisting the bars to loosen it. This will save putting pressure on the fork legs. But dont overdo it either and spray abit of lube on it the night before. I just did 2 stuck stems last night like this.
Cheers
Nicko
Cheers
Nicko

-
rkelsen
- Posts: 5131
- Joined: Mon Apr 20, 2009 10:41 pm
Re: 1975 Raleigh Flyer restoration project
Isn't that a left hand cup in the right hand side of that BB?
-
vaeske
- Posts: 1013
- Joined: Thu May 05, 2011 9:22 am
- Location: Brisbane
- Contact:
Re: 1975 Raleigh Flyer restoration project
Brokenbus, ghettro, thanks for the advise on the fork saga, i'll try them both tonight, hopefully the RP7 lubricating spray i put in last night helps the cause.
In terms of the BB, I know I have to turn it clockwise and thats what i've been doing but even having the hwc-4 park tool wrench it keeps slipping off!
rkelson, that's what i initially thought, but then i was told that english bike built in that period was all made like that...
PS. Thanks Richard for the heads up on the light, looks like you'd be able to mount a bloody search light on that!
-
mark field

- Posts: 933
- Joined: Fri Dec 17, 2010 8:28 pm
Re: 1975 Raleigh Flyer restoration project
id start by putting the forks back on the frame properly not loose, as you may start to stuff the fork thread when your playing around, plus its just plain anoying. anyway if you can get a syringe and turn the forks upside down you should be able to squirt some hydrochloric acid down there to seep through the oxidisation, when you see it bleeding through and or more than likely bubbling at the end of the thread you should have weakened the oxidised area just enough to be able to get movement, when you can do that then your on your way, a bit of more hydrochloric acid will make it easier. The reason you use hydrochloric acid is that it LOVES eating anything alloy and its effects are instantaneous. wd 40 which is more or less just a lubricant / water dispersant used in same way wont do anything unless you already have a bit of movement between parts. Of course you need to be ultra mega super carefull when using hydrochloric acid and fistideous with cleanup afterwards. ive done it, took two goes and gave myself nice chemical burn when i flipped frame and forks upright and let everything run down my leg. ohh and i stuffed my new coverse low tops. but when i managed to get my act together, i had been sucessfull. allthough i didnt think it was worth all the effort in the end. 
steel is the real deal.
-
WyvernRH
- Posts: 3190
- Joined: Tue Nov 06, 2007 6:41 pm
- Location: Newcastle NSW
Re: 1975 Raleigh Flyer restoration project
Sadly you are right, that's cheapo Taiwan/Japan R/H cup and you are trying to undo it correctly (clockwise). If you are not going to re-paint I would just run my finger around the race on the inside of the cup and if it feels OK leave it in there. If you are going to re-paint then a little gentle heat with a torch and then dowsing with cold water might free it up.vaeske wrote:In terms of the BB, I know I have to turn it clockwise and thats what i've been doing but even having the hwc-4 park tool wrench it keeps slipping off!
rkelson, that's what i initially thought, but then i was told that english bike built in that period was all made like that...
Another method is to put a big bolt thru the bottom bracket, put your wrench on the flats, put a big washer over the wrench and then put a nut outside that to bolt the wrench to the cup. Be careful cos if it slips it can be painful and detrimental to the frame!
I do have a 'last chance' suggestion that I have used several times on old bikes with the even dumber 'no flats, two pinholes' type R/H cups that seemed common in the 30's. First get yourself a decent hacksaw blade say 28tpi for steel. Feed it thru the bottom bracket and thru the hole in the cup. Put the body of the hacksaw thru the frame above the bottom bracket and connect the blade to the hacksaw. You now have the hacksaw body threaded thru the frame and the blade thru the bottom bracket . CAREFULLY start cutting thru the cup in a downwards direction towards the base of the bottom bracket. Be careful to keep the blade level so you don't cut into the other side. When you get to the edge of the cup/inside of the bottom bracket go real slow and gently cut the last mm or so. You will leave a thin groove in the threads on the bottom bracket but that doesn't matter. Now if you are lucky a couple of taps on each side of the outside of the cup will compress it slightly (due to the slot you have cut in it), it will free off and it will unscrew. If you are unlucky you will have to repeat the exercise in an upwards direction to completely cut the cup in half and it will fall out unless it is totally rusted in.
Like I say, this is a 'last gasp' method and assumes a fair skill with a good quality hacksaw and the capability of securing the frame in a vice or somesuch while doing the cutting.
Only try it if you are confident in your ability with the tools.
I have seen this done with a Dremel cutting wheel but the potential for disaster with a power tool is massive
Cheers
Richard
-
HappyHumber

- Posts: 5072
- Joined: Wed Nov 14, 2007 11:48 pm
- Location: Perth, (S.o.R.) W.A.
Re: 1975 Raleigh Flyer restoration project
+1 to Richards Method. I've had a bit of success with that. Haven't had to try his other suggestions as yet though!WyvernRH wrote:....Another method is to put a big bolt thru the bottom bracket, put your wrench on the flats, put a big washer over the wrench and then put a nut outside that to bolt the wrench to the cup. Be careful cos if it slips it can be painful and detrimental to the frame!...vaeske wrote:In terms of the BB, I know I have to turn it clockwise and thats what i've been doing but even having the hwc-4 park tool wrench it keeps slipping off!
Sheldon Brown also explains it here : (pic clicks through to article)
Basically you'd be tightening the bolt & nut combo - and as it puts up more resistance the BB Cup should eventually capitulate. If you have a socket set with an extension you should be able to get additional leverage from the inside as well.
--
Hit me up via the BNA dm; I'll get an alert. If y'know, you know.
Hit me up via the BNA dm; I'll get an alert. If y'know, you know.
-
mark field
- Posts: 933
- Joined: Fri Dec 17, 2010 8:28 pm
Re: 1975 Raleigh Flyer restoration project
if you can, use a descent file and file the lugs so they are more pronounced then use a larger shifter to help with leverage (longer the handle the less effort required to undo, loosen, break ect) lay the frame on its side, wind in the shifter to make sure you are getting GOOD PURCHASE ON ALL SIDES, get a friend to stand on the shifter and the weight of your friend in conjunction with the larger amount of leverage and your enthusiasm should end with a positive result. apply liberal amounts of spirits or similar to friend for helping you- sizes range from nips, shots, middies, schooners, casks, flagons and so forth. have i missed any 
steel is the real deal.
-
vaeske
- Posts: 1013
- Joined: Thu May 05, 2011 9:22 am
- Location: Brisbane
- Contact:
Re: 1975 Raleigh Flyer restoration project
ghettro, you have saved me again! thanks for that. Put on the front wheel, turned it upside down and sprayed generous amounts of RP7. Sprayed some more onto the thread! Gave it about 5 mins and sat on the wheel and used the bars to twist as hard as I can.
Mark! hydrochloric acid?? Jesus, that sh#% is corrosive! i'll stay way from that. But Thank you for your advice!
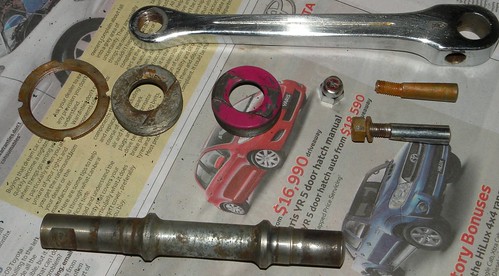
Anywho, here is is!

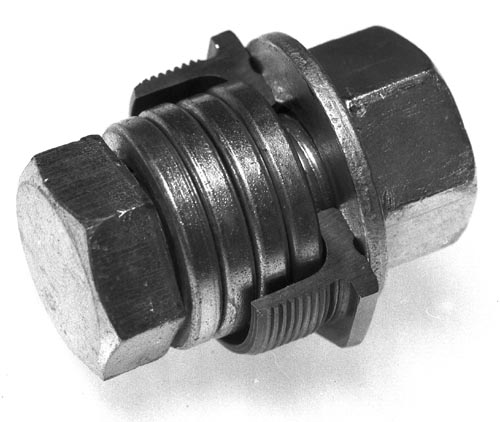
fork after plenty of RP7 and sweat lol

Here they all are: Lock Nut, Washer, Adjustable Race, Expander
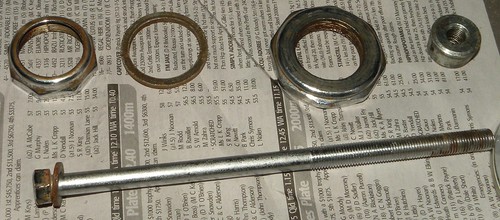
here is the upper and lower head tube race: both are in half decent condition. I'll leave them be.
Okay so, last but not least, BB. Not sure if I can use a pressure washer to clean it out and then rebuild it as is. thoughts? I'll hit bunnings this weekend to get the bolt, washers and nut.

Mark! hydrochloric acid?? Jesus, that sh#% is corrosive! i'll stay way from that. But Thank you for your advice!
Anywho, here is is!
fork after plenty of RP7 and sweat lol
Here they all are: Lock Nut, Washer, Adjustable Race, Expander
here is the upper and lower head tube race: both are in half decent condition. I'll leave them be.
Okay so, last but not least, BB. Not sure if I can use a pressure washer to clean it out and then rebuild it as is. thoughts? I'll hit bunnings this weekend to get the bolt, washers and nut.
-
vaeske
- Posts: 1013
- Joined: Thu May 05, 2011 9:22 am
- Location: Brisbane
- Contact:
Re: 1975 Raleigh Flyer restoration project
Okay, status update so far:
I've cleaned and sanded and polished the headset/stem, brakes f and r and put in new bearings for the fork.
BB Fixed cup is finally out (through the 5/8" bolt, two nuts and 4 washers and finally I get to clean it out. Components are below. My question is: Do I need different bearings compared to square tapered ones? The guy at the LBS (goldcross cycles, fortitude valley) said so. If so where would I be able to buy a pair. The other problem I have is the drive side cottered bolt is bent from using the vice on an awkward angle. Will I be able to just get a set from Ebay or LBS too?
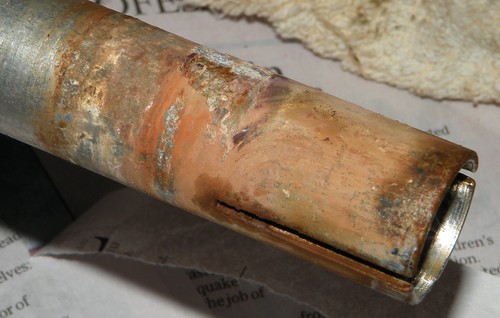
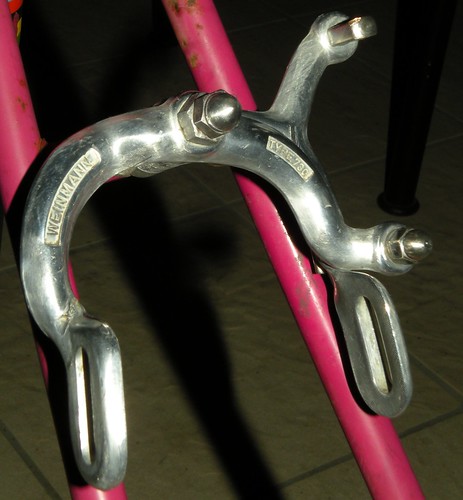
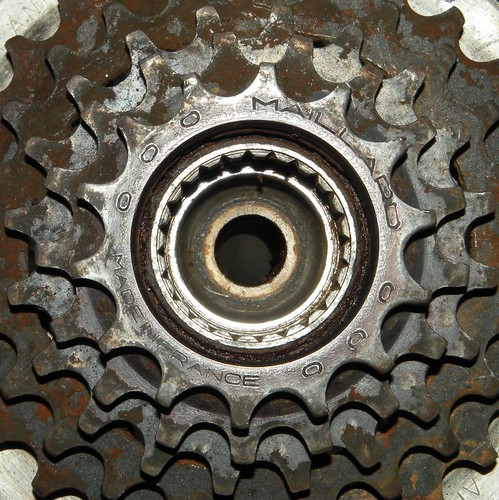
Lastly, here is a picture of the Maillard freewheel (I think) that I can't remove, I need to take this off and rebuild the rear wheel.
I have these listed BB tools from Park tools but none of these will work:
BBT-5/FR-11 Bottom Bracket and Freehub Lockring tool for Campagnolo®
BBT-9 Bottom Bracket for 16 notch external crankset system cups (SRAM, Shimano, FSA, Truvativ, Race Face, Zipp, etc)
BBT-22 Cartridge Bottom Bracket Tool (for 20 tooth internal splines, such as Shimano®, FSA®, etc.)
Could someone please help me out? Does anyone have a BB removal tool for this 24 splined cassette freewheel? I'd be happy to borrow or if you can direct me where I can buy one.
Thanks heaps!
I've cleaned and sanded and polished the headset/stem, brakes f and r and put in new bearings for the fork.
BB Fixed cup is finally out (through the 5/8" bolt, two nuts and 4 washers and finally I get to clean it out. Components are below. My question is: Do I need different bearings compared to square tapered ones? The guy at the LBS (goldcross cycles, fortitude valley) said so. If so where would I be able to buy a pair. The other problem I have is the drive side cottered bolt is bent from using the vice on an awkward angle. Will I be able to just get a set from Ebay or LBS too?
Lastly, here is a picture of the Maillard freewheel (I think) that I can't remove, I need to take this off and rebuild the rear wheel.
I have these listed BB tools from Park tools but none of these will work:
BBT-5/FR-11 Bottom Bracket and Freehub Lockring tool for Campagnolo®
BBT-9 Bottom Bracket for 16 notch external crankset system cups (SRAM, Shimano, FSA, Truvativ, Race Face, Zipp, etc)
BBT-22 Cartridge Bottom Bracket Tool (for 20 tooth internal splines, such as Shimano®, FSA®, etc.)
Could someone please help me out? Does anyone have a BB removal tool for this 24 splined cassette freewheel? I'd be happy to borrow or if you can direct me where I can buy one.
Thanks heaps!
-
spitfire
- Posts: 38
- Joined: Sat Nov 13, 2010 8:07 am
- Location: Melbourne
Re: 1975 Raleigh Flyer restoration project
I can tell you that my LBS (no help to you as I'm in VIC) has a very old maillard freewheel tool that he said has not been used in at least 20 years, before I needed it a couple of months ago.
So they are out there...
So they are out there...
-
elStado

- Posts: 2363
- Joined: Tue Mar 16, 2010 12:27 am
- Location: Syd, NSW
Re: 1975 Raleigh Flyer restoration project
Nice work. I've got a circa 1985 Raleigh Team Panasonic that I picked up from Gumtree in decent nick for $100 with the original intention to convert to a fixie, but then deciding against it after I did some research on the bike. Now in the process of putting a Campy Mirage gruppo on it and giving it a bit of a clean up and resto so I can use it as a vintage road bike. It has a nice colour scheme and should be a fun ride once done.
Nice to see what you've done with this Flyer too, look forward to seeing your progress!
Nice to see what you've done with this Flyer too, look forward to seeing your progress!
Check out my practical cycling and cycle touring website: VELOPHILE AUSTRALIA
-
David_G

- Posts: 790
- Joined: Wed Mar 09, 2011 1:01 pm
- Location: Frankston Victoria
Re: 1975 Raleigh Flyer restoration project
Here's my addition to the accumulated knowledge so far. The "Unknown thingamabob" is a headlight bracket. The light slid on and off it.
With all your efforts with the fork separation, my technique with those rusty situations is to apply the RP7/WD40 solutions over and over again, giving a light tap tap tap with something each time. Eventually the solution seeps down and frees up the rust. I've only done it on old cars, and I'm yet to start on my first bike reco. Got the bike, but I'm yet to start on it.
Great project, thanks for sharing.
I just love riding my bike!
-
LG
- Posts: 1879
- Joined: Sat Nov 08, 2008 10:46 am
- Location: Southeast Tasmania
Re: 1975 Raleigh Flyer restoration project
Don't have a tool, but I have dealt with a few of these maillard freewheels in the past. The best way to get it off is to follow the directions for removing a freewheel in this link http://www.sheldonbrown.com/freewheels.html#disassembly under "servicing freewheel bodies". You will need some tools though, 2 chain whips, probably a small hammer and a small punch to loosen the lock ring, as well as either a pipe wrench or decent vice.vaeske wrote:Lastly, here is a picture of the Maillard freewheel (I think) that I can't remove, I need to take this off and rebuild the rear wheel.
I have these listed BB tools from Park tools but none of these will work:
BBT-5/FR-11 Bottom Bracket and Freehub Lockring tool for Campagnolo®
BBT-9 Bottom Bracket for 16 notch external crankset system cups (SRAM, Shimano, FSA, Truvativ, Race Face, Zipp, etc)
BBT-22 Cartridge Bottom Bracket Tool (for 20 tooth internal splines, such as Shimano®, FSA®, etc.)
Could someone please help me out? Does anyone have a BB removal tool for this 24 splined cassette freewheel? I'd be happy to borrow or if you can direct me where I can buy one.
Thanks heaps!
Remove the outer cog, remove the lockring by tapping the small pin holes clockwise, once done the spinning part of the freewheel can be pulled off. When you do this about 50 loose bearings and some pawls will fall out and disappear in many diferent directions never to be seen again. You are then left with the inside section of the freewheel still screwed onto the wheel. Lock this in the vice and spin the wheel counter-clockwise, or try to grab it with a pipe wrench and turn the wrench counter-clockwise. Considerable force may be required. You "may" be able to resurrect the freewheel by re-assembling (very fiddly) if nothing breaks.
Much easier with the correct tool, but this method works.
LG = Low Gear
-
BLU_FZ!

- Posts: 410
- Joined: Sun Sep 27, 2009 10:17 am
- Location: Perth?
Re: 1975 Raleigh Flyer restoration project
Im keenly watching this build,i have my xmas 73 Raleigh Royale sitting in the shed.Its my "one day?" rebuild.Its well travelled,Malaysia,Singapore,NSW,NT,NSW,SA and finally Perth
"Him"-You do realize that you now own one of the rarest of all high end Nishikis ever produced?"Me"-But its still a Repco mate

-
vaeske
- Posts: 1013
- Joined: Thu May 05, 2011 9:22 am
- Location: Brisbane
- Contact:
Re: 1975 Raleigh Flyer restoration project
blue_fz - put the pressure on why don't ya? lol
LG - thanks for the tip! i'll try that this weekend.
elstado - i've been keeping an eye on yours too, don't you worry about that!
Okay, so I haven't made any progress yet with that freewheel, but:
- I have a spare Araya 27 X 1 1/4 wheel with a shimano 5 speed cassette spare so replacing a few spokes shouldn't be too hard. But then again putting on a jap part along with all the Huret doesn't make too much sense either. Why did Raleigh have to go to the Froggies for parts FFS! Damn the Frogs!
- BB bearings will be picked up tomorrow so with a little fiddling around should be able to put that back together. Plus spare cotter pin will also go in so that's the drive train complete.
-Oh I almost forgot, the BVT treatment did too well for my shifters... all the coating on the levers have started to come off. So i'm online again to look for some new levers.
Mrs was a little cranky tonight so i got to sand down the weimann brakes...not too shabby at all, but then again its not brand new. Pity the camera battery died, but i got 3 photos out of it. I'll attach them tomorrow morning.
ahhh turns out all those photos i took last night didn't do it justice.

cheers
ethan
LG - thanks for the tip! i'll try that this weekend.
elstado - i've been keeping an eye on yours too, don't you worry about that!
Okay, so I haven't made any progress yet with that freewheel, but:
- I have a spare Araya 27 X 1 1/4 wheel with a shimano 5 speed cassette spare so replacing a few spokes shouldn't be too hard. But then again putting on a jap part along with all the Huret doesn't make too much sense either. Why did Raleigh have to go to the Froggies for parts FFS! Damn the Frogs!
- BB bearings will be picked up tomorrow so with a little fiddling around should be able to put that back together. Plus spare cotter pin will also go in so that's the drive train complete.
-Oh I almost forgot, the BVT treatment did too well for my shifters... all the coating on the levers have started to come off. So i'm online again to look for some new levers.
Mrs was a little cranky tonight so i got to sand down the weimann brakes...not too shabby at all, but then again its not brand new. Pity the camera battery died, but i got 3 photos out of it. I'll attach them tomorrow morning.
ahhh turns out all those photos i took last night didn't do it justice.
cheers
ethan
-
mark field
- Posts: 933
- Joined: Fri Dec 17, 2010 8:28 pm
Re: 1975 Raleigh Flyer restoration project
cant wait to see the end result, no doubt you will be very satisfied when all done.
steel is the real deal.
Who is online
Users browsing this forum: No registered users