
thanks oldtimer...
yeah - i'll make sure a "reputable" LBS does this part. i am beginning to think that i will get a fair bit of this job done by professionals, but will in turn learn a lot and be able to do it myself eventually.
re: that top nut: when i tried to screw it on the new fork - it only tightened down about a cm...is that normal?
and also re: that top nut...it is not in as good condition...i am wondering if i could replace that bit with the top nut from newish-school headset? hmmm.
I has a project
-
Kid_Carbine

- Posts: 1300
- Joined: Tue Aug 14, 2007 11:35 pm
- Location: Southern Tablelands N.S.W.
There are five [sometimes six] pieces to the headset & these arewinona_rider wrote:update!
the forks, stem and bars arrived today.
HEADSET:
is it my understanding that the old school way of doing this was that the frame of the bike actually acted as quasi-cups for the races?
this means there are just four pieces to my headset. a race that goes around the fork at the bottom, a top race and a top cup, and finally a ring that kinda acts as a tightener/binder (?)....
Crown race [on the fork]
Bottom head lug race. [this fits into the lower head lug]
Top head lug race [this is identical to the lower one & fits into the top head lug]
Steer tube race. This is the threaded one.
Spacer washer [sometimes used, sometimes not]
Top nut. This acts as a finisher piece as well as a lock nut to secure the threaded race below it.
There is a proper tool for shortening the steer tube so hopefully the LBS will have one. It's basically a plate that screws down the steer tube & guides the hacksaw squarely across the tube. If the headset is assembled, then the thickness of this plate, when screwed down to the threaded race [or washer] should allow just the right amount of thread to protrude to allow the top nut to fit without bottoming out.
Carbine & SJH cycles, & Quicksilver BMX
Now that's AUSTRALIAN to the core.
Now that's AUSTRALIAN to the core.
-
winona_rider

- Posts: 1076
- Joined: Sun Dec 16, 2007 5:26 pm
- Location: Brisbane
-
winona_rider
- Posts: 1076
- Joined: Sun Dec 16, 2007 5:26 pm
- Location: Brisbane

i practiced putting some wheels on just to see what the "feel" of the bike would be... (seat tube is way too tiny but Mulger Bill is sending me a new one...awsm!)
it seems very, very low..... but strangely it wasn't uncomfortable...
front wheel is my trek's, rear wheel is the 27" tyreless rim that came with the bike....
the black spacer will be replaced for chrome ones when i can source them....
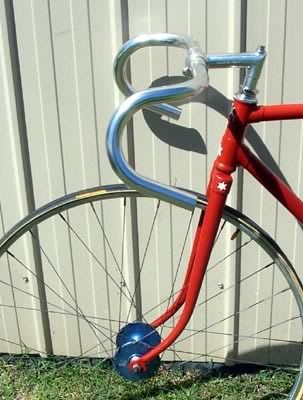
i am wondering if maybe i should get a taller stem? The steering tube on this frame is WAY tiny for the proportions of the frame. I am beginning to wonder if this really was a roadster... Kid Carbine - can you shed some light?? the seat tube seems tiny compared to the 57cm top tube...
ASIDE:
that 27" rim is gonna get cleaned up and turned into an objet d'art for the living room wall. LOL
-
winona_rider
- Posts: 1076
- Joined: Sun Dec 16, 2007 5:26 pm
- Location: Brisbane

-
stevendavid75
- Posts: 436
- Joined: Sun Dec 02, 2007 11:43 pm
- Location: melbourne
coming together nicely.
I was just thinking, If you can avoid cutting that fork at this stage that would be good and keep ypur eyes open for a slightly more period fork, which really shouldnt be too hard, than maybe just get it powder coated white.
If you get a chance check out the odd opp shop, tip or just ask around.
Even if you have to buy the whole bike for $15 or whatever
I say this as the fork you have is nice and prob has a long enough steerer tube for a future retro project, trust me finding good 700c 1' forks with a long steerer can get pretty tricky
I am not sure how too overcome the spacer issue, if you have all stem, it will stand out as well, unless you try to comprimise a bit and get a stem similar to the one you have with a gentle rise in it so you can maybe cut back on 2 or 3 spacers,
something like this
http://cgi.ebay.com/Kalloy-quill-riser- ... dZViewItem
or
http://cgi.ebay.com/TTT-3T-Quill-1-stem ... dZViewItem
anyway just an idea
Cheers and good luck
-
Mulger bill

- Super Mod

- Posts: 29060
- Joined: Sun Sep 24, 2006 2:41 pm
- Location: Sunbury Vic
-
winona_rider
- Posts: 1076
- Joined: Sun Dec 16, 2007 5:26 pm
- Location: Brisbane
yeah thanks SD!
- that looks like a good option. at this stage i am gonna wait until i ride it to see how it handles...then decide on adjustments and i am totally c ommitted to making it awesome enough to show off on fixedgeargallery
as for the final fit - it will be a different story when i feel my soles on the cold, hard, brutalness of pedals fixed to my new alien 165mm cranks (feeling quite anthemic atm)
LOL
looks like velocity rims and the cranks will be here within 5 or 6 days.
woah! The cogs and freewheel arrived today - and ordered chain last night from Cell (just a cheapo BMX chain to test things out).
could be riding it by end of next week. scary.
-
Kid_Carbine
- Posts: 1300
- Joined: Tue Aug 14, 2007 11:35 pm
- Location: Southern Tablelands N.S.W.
The steer tube on the frame that you refer to is actually the head tube. The steer tube is the threaded one on the fork.winona_rider wrote: i practiced putting some wheels on just to see what the "feel" of the bike would be... (seat tube is way too tiny but Mulger Bill is sending me a new one...awsm!)
it seems very, very low..... but strangely it wasn't uncomfortable...
front wheel is my trek's, rear wheel is the 27" tyreless rim that came with the bike....
the black spacer will be replaced for chrome ones when i can source them....
i am wondering if maybe i should get a taller stem? The steering tube on this frame is WAY tiny for the proportions of the frame. I am beginning to wonder if this really was a roadster... Kid Carbine - can you shed some light?? the seat tube seems tiny compared to the 57cm top tube...
ASIDE:
that 27" rim is gonna get cleaned up and turned into an objet d'art for the living room wall. LOL
The further away from the seat you get, the shorter the head tube gets by virtue of the triangulation of the top & down tubes. Looks fine to me because these bikes had a nice comfy, long wheelbase when compared to a modern path racer. [track bike]
The head stem looks short because you have a three inch stack of spacers. If the headset's top nut was screwed up against the top race, you would see more of the stem.
I agree that some shopping-about may produce a more suitable fork than this one.
Interesting to observe the clearances between the tyre & downtube at the front & the tyre & seat tube at the back [use a little imagination]
Remember that this frame would have been made originally for 28" wheels with a nice fat 1-3/8" or 1-1/2" tyre, & they were far from being a tight fit in the frame, so a 700C in the back with a tiny tyre is definately not going to rub on anything.
The laid back seat tube angle & long wheelbase is a dead giveaway to the designed-in stability that these frames had back then.
You say that the seat 'tube' is way too tiny, so I assume that the seat post that you have is too big. If the correct seat pin is smaller than 26.4mm [No.3 size] then it would probably have originally been a No.2 size seatpin, which would probably be about right for a pressed lug frame.
Commonly, the No.3 size was for Deluxe roadsters & Sport bikes, No.4 would be for track bikes & racers, with the hard to find No.5 seat pin is used in serious race frames with that new fangled 531 Double Butted tubing.
The original wheels would have had 40 spokes in the rear & 32 in the front as this was the standard of the day. Later on they moved 4 spokes from the rear to the front to make the wheels 36/36.
The original spacing of the rear frame tips would likely have been 4-5/16" [109.538mm] so 110mm spacing will be fine for a fixed wheel or single speed freewheel.
Hopefully this is of some help.
KC.
Carbine & SJH cycles, & Quicksilver BMX
Now that's AUSTRALIAN to the core.
Now that's AUSTRALIAN to the core.
-
winona_rider
- Posts: 1076
- Joined: Sun Dec 16, 2007 5:26 pm
- Location: Brisbane
-
oldtimer
- Posts: 75
- Joined: Sat Oct 13, 2007 2:16 pm
-
winona_rider
- Posts: 1076
- Joined: Sun Dec 16, 2007 5:26 pm
- Location: Brisbane
-
Kid_Carbine
- Posts: 1300
- Joined: Tue Aug 14, 2007 11:35 pm
- Location: Southern Tablelands N.S.W.
Mmmmm, blue anodised Harden Bacon Slicer hubs.
After consultation with Alexander Von Tutschek in the UK [he's a Harden guru] it would seem that these just might be the only blue anodised examples in existance. No coloured examples are known to exist in the UK at this time.
They may have been done when the Airlite Continental hubs became available in a range of colours, ... including blue.
Looking good.
Carbine & SJH cycles, & Quicksilver BMX
Now that's AUSTRALIAN to the core.
Now that's AUSTRALIAN to the core.
-
winona_rider
- Posts: 1076
- Joined: Sun Dec 16, 2007 5:26 pm
- Location: Brisbane
update!

brakes and hoods and seat post came from mulger bill (thanx shaun!).
soaked the hoods in degreaser solution overnight, then scrubbed with scourer, then soaked another night in ordinary washing up liquid and scrubbed more. came up pretty good!
velocity rims arrived a few days ago and I whacked on my old bontrager tyres (ex-trek). saddle is ex-trek too.

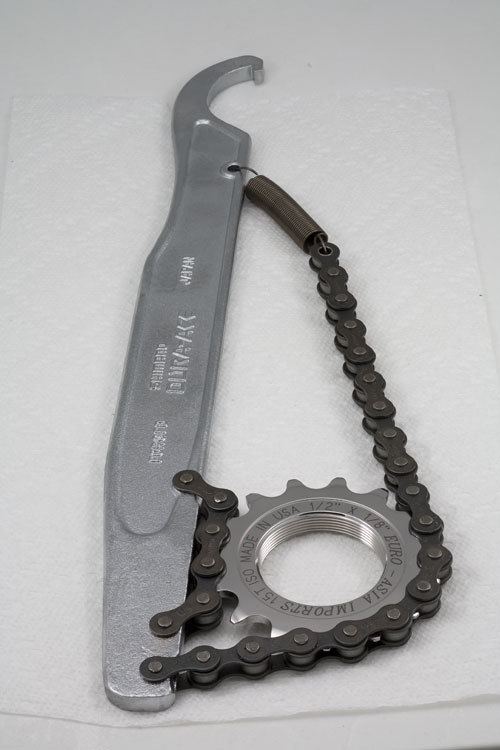
and now this is probbaly a question i should pose in the fixed gear forum, but which side of the flip-flop should the single cog go, and which side should the freewheel go....and do both need thread lockers?

as you can see one side of the hub (the left in pic above) has a step in the thread...(which is kinda obscured by the spocket...soz)
also in the picture above you can see my pretty woeful skillz at frame spacing... will get the string out and check the evenness eventually!
brakes and hoods and seat post came from mulger bill (thanx shaun!).
soaked the hoods in degreaser solution overnight, then scrubbed with scourer, then soaked another night in ordinary washing up liquid and scrubbed more. came up pretty good!
velocity rims arrived a few days ago and I whacked on my old bontrager tyres (ex-trek). saddle is ex-trek too.
and now this is probbaly a question i should pose in the fixed gear forum, but which side of the flip-flop should the single cog go, and which side should the freewheel go....and do both need thread lockers?
as you can see one side of the hub (the left in pic above) has a step in the thread...(which is kinda obscured by the spocket...soz)
also in the picture above you can see my pretty woeful skillz at frame spacing... will get the string out and check the evenness eventually!
-
ukalipt

- Posts: 195
- Joined: Fri Dec 28, 2007 8:39 pm
- Location: right here
- Contact:
nice big toe! lol
basically the single cog goes on the side with two threads. first the cog for thread one. then the locknut on the second thread. the single cog should have the "extended threaded side" inward toward the hub. lightly grease on both! tighten up cog as hard as you can with a chain whip. then place the lock nut on and tighten it up as much as you can with a BB lock ring tightener. take it for a ride and accelerate as hard as you can. you may find it feels as though it is slipping - it is really just tightening up the cog even more*.
best if you use the brakes to stop at this point. and backwards force will probably loosen off the cog.
now retighten the lockring - it should/will screw on more and that should be now all set.
for the freewheel side - it is the single threaded side. you can just hand tighten up the freewheel as the pressure force when accelerating will tighten it up more each time.
*Don't make the mistake i did in thinking the cranks were not tightened enough due to the cog tightening [slipping] and over tighten them on the spindle.
damn . it is really looking like a nice bike! the chrome parts are going to make it PING in the sun.
i like to pedal
-
winona_rider
- Posts: 1076
- Joined: Sun Dec 16, 2007 5:26 pm
- Location: Brisbane
thanks dude!
opportunity knocks fr my big toe!
yes! she will shine!
plan is:
1) the fender fiesta red or as close as i can get to it
2) a white triple stripe pattern (on the seat tube) i saw on a 5 star malvern hanging on the wall at ridgeways cycles - photos to come - also with tiny black borders on each stripe (will look very old school)
3) no decals, no logos (just the stripes)
4) white bar tape, white cables (already purchased)
5) white frame pump. unsure where to get this... have seen black ones new (perhaps i could paint one white? will investigate)
6) white saddle...still looking.
7) the 2 stars on the head tube painted white.
werd
-
Kid_Carbine
- Posts: 1300
- Joined: Tue Aug 14, 2007 11:35 pm
- Location: Southern Tablelands N.S.W.
As Ukalipt said, the fixed sprocket goes on the double thread side just exactly the way he describes it.
The reason for the lock ring is easy enough to understand. With normal riding, the sprocket is tightened onto the thread, but with reverse pressure on the pedals, such as braking or downhill riding, the sprocket wants to undo, so a lockring with a left hand thread [reverse direction] is used. If the sprocket starts to undo, it also rotates the lockring in the same direction [relative to the hub], but because it is threaded the other way, it actually tightens the lockring onto the sprocket & prevents it from coming off.
The freewheel, on the other hand, has driving forces in only one direction, ... the tightening direction, since it simply freewheels in the opposite rotational direction, so no chance of it coming loose & no need for a locknut.
Simple really when you think about it.
It's looking pretty sharp & I noticed that the front wheel is pretty close to the frame while the rear has no clearance issues at all.
Carbine & SJH cycles, & Quicksilver BMX
Now that's AUSTRALIAN to the core.
Now that's AUSTRALIAN to the core.
-
winona_rider
- Posts: 1076
- Joined: Sun Dec 16, 2007 5:26 pm
- Location: Brisbane


-
Mulger bill
- Super Mod
- Posts: 29060
- Joined: Sun Sep 24, 2006 2:41 pm
- Location: Sunbury Vic
-
Kid_Carbine
- Posts: 1300
- Joined: Tue Aug 14, 2007 11:35 pm
- Location: Southern Tablelands N.S.W.
I usually run the stringline through the actual axle slots & loop each end around the head tube, making sure that the line is taut. That way I am checking the alignment of the outside face of the actual dropout/fork end.
Since the two fork ends are the same thickness as each other, & this is the part where the wheel actually references to, then this is the part that must be in alignment.
Naturally one would assume that if the part just near the fork ends is square, then everything else is square, .... right?
Never assume.
Carbine & SJH cycles, & Quicksilver BMX
Now that's AUSTRALIAN to the core.
Now that's AUSTRALIAN to the core.
-
winona_rider
- Posts: 1076
- Joined: Sun Dec 16, 2007 5:26 pm
- Location: Brisbane
re: frame pump...
the frame pump bosses are 39cm apart from tip to tip. but this equates to about 15.3 inches or maybe 15.5" from the pump's perspective (cause it will need to be bigger to fit into the housings.....obviously! he he)
anyway...so i have seen this
and wondered if you all thought this could be made to fit... and maybe i am asking how it might be made to fit????
the frame pump will be 99-100% for show...it doesn't need to be functional. (aside: is this indulgence against the fixie philosophy? I might argue I have the bosses - so the bling is necessary.)
i have seen very few white frame pumps around...so i am thinking this might be an option. and yeah - the label will be scratched off...
what do y'all think?
-
Kid_Carbine
- Posts: 1300
- Joined: Tue Aug 14, 2007 11:35 pm
- Location: Southern Tablelands N.S.W.
This is a frame fit pump, designed to be used in frames without pump pegs, so what you need is a garden variety, plain old ordinary pump. Particularly if it's just an ornament & you have no plans to actually use it.
Alternately, since you are going to paint it, you can have the pegs removed & use a suitable framefit pump if you want. It needs only an oxy torch with a heating tip. With the flame applied to the peg alone, it will soften the brass that holds the peg to the frame & off it comes. A little finishing with a file & abrasive tape & she'll be ready for paint removal & repainting.
Alternately, since you are going to paint it, you can have the pegs removed & use a suitable framefit pump if you want. It needs only an oxy torch with a heating tip. With the flame applied to the peg alone, it will soften the brass that holds the peg to the frame & off it comes. A little finishing with a file & abrasive tape & she'll be ready for paint removal & repainting.
Carbine & SJH cycles, & Quicksilver BMX
Now that's AUSTRALIAN to the core.
Now that's AUSTRALIAN to the core.
-
winona_rider
- Posts: 1076
- Joined: Sun Dec 16, 2007 5:26 pm
- Location: Brisbane
took it for a ride today!
woah!
the riding position is a bit awkward - but i have no trouble getting power to the cranks. it's fast! made all the usual mistakes, coasting, taking my feet off the pedals blah. but it was fun!
the redundant brake lever rattles - will have to fix this too (no pun intended!)
pictures when she is 100% finished!
-
ukalipt
- Posts: 195
- Joined: Fri Dec 28, 2007 8:39 pm
- Location: right here
- Contact:
nice to hear you enjoying it. it does take a while to get your head around fixed. i have to watch it when i have been for a big ride on my MTB then jump on the fixed. i was nearly thrown over the bars one day, i went to coast along, i was nearly thrown to the coast.
can't wait to see it finished
can't wait to see it finished
i like to pedal
-
stevendavid75
- Posts: 436
- Joined: Sun Dec 02, 2007 11:43 pm
- Location: melbourne
just saw this and thought u might be interested
http://cgi.ebay.com.au/Vintage-MALVERN- ... dZViewItem
http://cgi.ebay.com.au/Vintage-MALVERN- ... dZViewItem
Who is online
Users browsing this forum: No registered users