Page 1 of 3
Need help with various queries for project *IMG HEAVY*
Posted: Fri Nov 26, 2010 5:41 pm
by elStado
Hi guys, I am in the process of stripping down the old roadie I am working on so I can get it painted next week.
Just have a few issues/questions on certain things I was stumped on in the process and thought I should ask here before breaking something. I have done soe research, watched a few vids and read some thread and also did a forum search, but there were bits missing that I didn't understand.
1. Removing the crank arms.
I haven't been able to remove them. There was a dust cap which unscrewed, then there was a bolt which I removed with socket wrench.


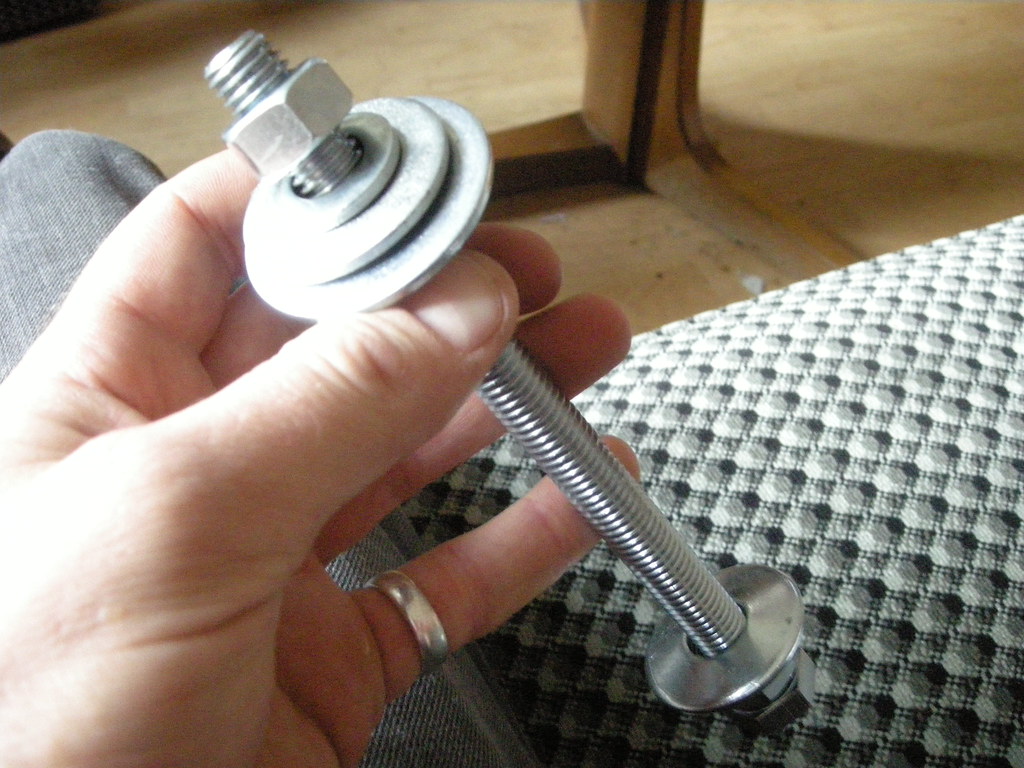
Now I am not sure how to get it off. I have a toolkit with a part that I believe is the crank puller, it says it is Shimano compatible on the box, but I am not sure if it is compatible with all cranks?

I tried screwing it onto the cranks thread and it did fit, from what I can see I need to attach it to the crank and then use a spanner on the silver bit to push the thread through which will pop the crank arm off? I tried doing this but there was quite a bit of resistance so I thought I would stop and check before accidentally breaking something.
Also not sure what the extra cap for the tool is for (seen in the pic to the left), it clips onto the head but it doesn't fit into the crank if it is attached. Not sure if this is just to fit other types of cranks or something?
More to come.
Re: Need help with various queries for project *IMG HEAVY*
Posted: Fri Nov 26, 2010 5:43 pm
by elStado
2. Removing the front forks.
I used a wrench and a spanner to use the couner force to unscrew the top bit (pictures in hand), but I still can't figure out how I remove the bottom bit to be able to remove the whole fork? I've never taken a fork out before so it's all pretty new. Bike is a bit crusty as well as you can see so I am not sure how much extra force it might need to get it off/loose. I don't want to bend the forks though trying to get it off.


Re: Need help with various queries for project *IMG HEAVY*
Posted: Fri Nov 26, 2010 5:55 pm
by elStado
3. Removing braze-ons.
Common topic I know, from the google searches I did most said that using a dremel or angle-grinder would do the job. I'm not so worried about how to remove them. But I do have concerns about the structural integrity of removing them, I don't want to hit a pot hole and have the down tube snap in half because I grinded off the shifter braze on...


Will these be safe to remove? I am planning to go SS or fixed, so I won't need them. However I was considering leaving them, on despite their appearance/redundancy, so the bike could be easily converted back to a 10-speed if desired (I'm looking to get a new rear wheel with flip-flop hub so I can keep the current rear wheel with freewheel and gears intact). Should I leave them on or remove them? I'm not a hipster, as much as I wish I was

, so I don't have a huge aesthetic issue with leaving them.
Re: Need help with various queries for project *IMG HEAVY*
Posted: Fri Nov 26, 2010 6:04 pm
by rkelsen
elStado wrote:But I do have concerns about the structural integrity of removing them, I don't want to hit a pot hole and have the down tube snap in half because I grinded off the shifter braze on...
Don't remove them. If you don't do it properly, you
can structurally weaken the tubes. Especially if they are butted, which I suspect they are.
It'll give you (or perhaps a future owner) more options later on.
Regarding the crank arms:
Unscrew the black nut completely from the tool and screw it into the crank arm. Make sure that it is fully seated into the crank. It should go in all the way by hand. Be very careful to not cross thread it.
You don't need the little pop-in cap. That's for Octalink cranks.
Screw the bolt of the removal tool into the nut which you have installed into the crank, and go as tight as you can by hand. Then, turn the wrench 1/4 turn forward, then back off. Then go 1/2 turn forward, then back off. Then 3/4 of a turn forward and back off. Proceed like this, advancing 1/4 of a turn each time until the arm comes off.
I hope this helps.
Re: Need help with various queries for project *IMG HEAVY*
Posted: Fri Nov 26, 2010 6:05 pm
by Baalzamon
elStado wrote:Hi guys, I am in the process of stripping down the old roadie I am working on so I can get it painted next week.
Just have a few issues/questions on certain things I was stumped on in the process and thought I should ask here before breaking something. I have done soe research, watched a few vids and read some thread and also did a forum search, but there were bits missing that I didn't understand.
1. Removing the crank arms.
I haven't been able to remove them. There was a dust cap which unscrewed, then there was a bolt which I removed with socket wrench.
Now I am not sure how to get it off. I have a toolkit with a part that I believe is the crank puller, it says it is Shimano compatible on the box, but I am not sure if it is compatible with all cranks?
I tried screwing it onto the cranks thread and it did fit, from what I can see I need to attach it to the crank and then use a spanner on the silver bit to push the thread through which will pop the crank arm off? I tried doing this but there was quite a bit of resistance so I thought I would stop and check before accidentally breaking something.
Also not sure what the extra cap for the tool is for (seen in the pic to the left), it clips onto the head but it doesn't fit into the crank if it is attached. Not sure if this is just to fit other types of cranks or something?
More to come.
Yup that is a square taper bottom bracket and you have the right adapter for it. I had an all in one tool for it and I had the same problem. Went on then it got stuck and I couldn't move it anymore. Ended up getting a rubber mallet and hitting the tool a few times. After a few hits the tool span freely and I just got back to turning it and off it came

Re: Need help with various queries for project *IMG HEAVY*
Posted: Fri Nov 26, 2010 6:22 pm
by elStado
rkelsen wrote:
Don't remove them. If you don't do it properly, you can structurally weaken the tubes. Especially if they are butted, which I suspect they are.
It'll give you (or perhaps a future owner) more options later on.
Exactly what I was thinking. I think I'll leave them on to allow for extra flexibility and to negate the risk of damaging the structural integrity of the frame.
Regarding the crank arms:
Unscrew the black nut completely from the tool and screw it into the crank arm. Make sure that it is fully seated into the crank. It should go in all the way by hand. Be very careful to not cross thread it.
You don't need the little pop-in cap. That's for Octalink cranks.
Screw the bolt of the removal tool into the nut which you have installed into the crank, and go as tight as you can by hand. Then, turn the wrench 1/4 turn forward, then back off. Then go 1/2 turn forward, then back off. Then 3/4 of a turn forward and back off. Proceed like this, advancing 1/4 of a turn each time until the arm comes off.
Ok great so I was on the right track. Now I can give it another go knowing that I am not buggering it up.
Thanks go to you and Baalza!
Re: Need help with various queries for project *IMG HEAVY*
Posted: Fri Nov 26, 2010 8:09 pm
by Rek
For the cranks, make sure the inner part of the crank puller is retracted so the outer part gets enough threads into the crankarm - you don't want to have it lightly engaged, then rip the threads out of the crank.
For the headset, it's a locknut arrangement. Pull off the washer, then support the fork blades while you unscrew the upper cup (the threaded section is part of the fork).
Re: Need help with various queries for project *IMG HEAVY*
Posted: Fri Nov 26, 2010 9:00 pm
by elStado
Rek wrote:For the cranks, make sure the inner part of the crank puller is retracted so the outer part gets enough threads into the crankarm - you don't want to have it lightly engaged, then rip the threads out of the crank.
Yeah I thought that would be the case. It's not threaded all the way in the photo to show it better. I'll make sure it's nice and secure.
For the headset, it's a locknut arrangement. Pull off the washer, then support the fork blades while you unscrew the upper cup (the threaded section is part of the fork).
OK I'll give it another go tomorrow morning. My house is west facing so after 1pm the courtyard is in the baking heat till 7pm. Have to do everything in the mornings.
Re: Need help with various queries for project *IMG HEAVY*
Posted: Mon Nov 29, 2010 8:08 pm
by elStado
OK guys, thanks to your help I managed tp get off the cranks and the front forks with only a couple of minor dramas that were quickly resolved.
The bike is pretty much ready to be painted, however there is one last thing I think I need to remove, but I am not sure how.

These are the chrome caps on the head tube where the ball bearings sit into. They seem to be separate from the main frame, but I am not sure how to remove them other than brute force by knocking them out from the inside using a flathead screwdriver and a hammer...? I tried unscrewing them or loosening them hoping they could be pulled out from the tube, but I had no luck they weren't going anywhere.

I thought I would ask before taking a hammer to anything and potentially causing unnecessary damage.
Re: Need help with various queries for project *IMG HEAVY*
Posted: Mon Nov 29, 2010 9:52 pm
by LG
These bearing races are pressed in, not screwed. You can gently tap each side with a screwdriver to remove, but ensure you work your way around the circumference so they come out reasonably evenly. There is a specific tool for this job which pushes the races out evenly, but careful screwdriver tapping will work.
Re: Need help with various queries for project *IMG HEAVY*
Posted: Mon Nov 29, 2010 10:14 pm
by Chaderotti
Regarding the braze-ons if it were me I would have just grinded them down until a bit of the braze on was left. It wouldn't be completely ground off but just kind of out of the way? I don't see how that could affect it structurally.
But then rkelsen mentioned that they're butted, and I don't know hot butting works. Thought everything was simply welded together.
Re: Need help with various queries for project *IMG HEAVY*
Posted: Mon Nov 29, 2010 10:25 pm
by elStado
Chaderotti wrote:Regarding the braze-ons if it were me I would have just grinded them down until a bit of the braze on was left. It wouldn't be completely ground off but just kind of out of the way? I don't see how that could affect it structurally.
But then rkelsen mentioned that they're butted, and I don't know hot butting works. Thought everything was simply welded together.
Yeah I thought about that, but as I mentioned before leaving the braze-ons on allows flexibility to convert the bike back to a geared system down the track if I want.
Re: Need help with various queries for project *IMG HEAVY*
Posted: Mon Nov 29, 2010 10:33 pm
by rkelsen
Chaderotti wrote:It wouldn't be completely ground off but just kind of out of the way? I don't see how that could affect it structurally.
A slip of the file is all it takes to remove too much metal and make a tube significantly weaker. The thinner sections of butted Japanese tubing of this age can be as thin as 0.6mm.
With metal that thin, personally, I wouldn't be confident.
From the sig of someone else here, "It's only original once."
Re: Need help with various queries for project *IMG HEAVY*
Posted: Mon Nov 29, 2010 10:49 pm
by nickobec
elStado wrote:I thought I would ask before taking a hammer to anything and potentially causing unnecessary damage.
I would not use a hammer and screwdriver to remove the cups, especially if you want to recycle the headset.
I use to use a rubber mallet and wooden drift (read piece of wood) to remove cups successfully.
Until I found an old bit of PVC pipe that just fitted down the steer tube.
Cut a cross in one end, about 2cm deep. then slid it down the steerer tube, while sliding up a broken broom handle that was just a bit wider than the inner diameter of the PVC pipe. This forces the end of the PVC pipe to expand. A few goods whacks with the rubber mallet and the cup should be free, removed broom handle, then PVC pipe turned frame over and repeat the process,
Re: Need help with various queries for project *IMG HEAVY*
Posted: Mon Nov 29, 2010 11:12 pm
by elStado
nickobec wrote:
I would not use a hammer and screwdriver to remove the cups, especially if you want to recycle the headset.
I use to use a rubber mallet and wooden drift (read piece of wood) to remove cups successfully.
Until I found an old bit of PVC pipe that just fitted down the steer tube.
Cut a cross in one end, about 2cm deep. then slid it down the steerer tube, while sliding up a broken broom handle that was just a bit wider than the inner diameter of the PVC pipe. This forces the end of the PVC pipe to expand. A few goods whacks with the rubber mallet and the cup should be free, removed broom handle, then PVC pipe turned frame over and repeat the process,
Good idea. I do want to reuse all the parts so if I can avoid damaging anything that would be good.
However I don't have anything around the house that will do that job, so I might just give it a go with what I have on hand and just be gentle with it.
I would take it to my LBS to see if they could do it for me, but it's a bit bulky to take on the bike.
Re: Need help with various queries for project *IMG HEAVY*
Posted: Mon Nov 29, 2010 11:46 pm
by il padrone
However it is possible and quite safe to remove the cups with a screwdriver and hammer, as long as you are careful about it, as LG detailed. I've done this several times to a number of bikes, and re-installed them with no ill-effects.
To re-install you can use a hammer and two slabs of hardwood. Get someone to hold the frame. Put a hardwood slab at the bottom, cup on it, frame, other cup and another slad of hardwood. Gentle taps at first to get the cups into the frame, then gradually hit it harder to move them in (checking that they are going in straight) and finlly some hard hits to seat them down fully.
Re: Need help with various queries for project *IMG HEAVY*
Posted: Tue Nov 30, 2010 12:25 am
by elStado
il padrone wrote:However it is possible and quite safe to remove the cups with a screwdriver and hammer, as long as you are careful about it, as LG detailed. I've done this several times to a number of bikes, and re-installed them with no ill-effects.
To re-install you can use a hammer and two slabs of hardwood. Get someone to hold the frame. Put a hardwood slab at the bottom, cup on it, frame, other cup and another slad of hardwood. Gentle taps at first to get the cups into the frame, then gradually hit it harder to move them in (checking that they are going in straight) and finlly some hard hits to seat them down fully.
Funny I was just talking to my GF on the phone telling her about how I was going to re-install the cups and I said I would do exactly what you suggested.
Seems like the best way to get it in evenly and with spread out pressure to avoid damaging or bending anything.
Re: Need help with various queries for project *IMG HEAVY*
Posted: Tue Nov 30, 2010 9:39 am
by familyguy
nickobec wrote:elStado wrote:I thought I would ask before taking a hammer to anything and potentially causing unnecessary damage.
I would not use a hammer and screwdriver to remove the cups, especially if you want to recycle the headset.
I use to use a rubber mallet and wooden drift (read piece of wood) to remove cups successfully.
Until I found an old bit of PVC pipe that just fitted down the steer tube.
Cut a cross in one end, about 2cm deep. then slid it down the steerer tube, while sliding up a broken broom handle that was just a bit wider than the inner diameter of the PVC pipe. This forces the end of the PVC pipe to expand. A few goods whacks with the rubber mallet and the cup should be free, removed broom handle, then PVC pipe turned frame over and repeat the process,
As someone said on another forum...Park Tool make an overpriced tool for every job:

Jim
Re: Need help with various queries for project *IMG HEAVY*
Posted: Tue Nov 30, 2010 9:45 am
by rkelsen
il padrone wrote:To re-install you can use a hammer and two slabs of hardwood. Get someone to hold the frame. Put a hardwood slab at the bottom, cup on it, frame, other cup and another slad of hardwood. Gentle taps at first to get the cups into the frame, then gradually hit it harder to move them in (checking that they are going in straight) and finlly some hard hits to seat them down fully.
That's fine for a steel headset. I'd be a bit more careful with an alloy one...
Re: Need help with various queries for project *IMG HEAVY*
Posted: Tue Nov 30, 2010 5:09 pm
by WyvernRH
rkelsen wrote:il padrone wrote:To re-install you can use a hammer and two slabs of hardwood. Get someone to hold the frame. Put a hardwood slab at the bottom, cup on it, frame, other cup and another slad of hardwood. Gentle taps at first to get the cups into the frame, then gradually hit it harder to move them in (checking that they are going in straight) and finlly some hard hits to seat them down fully.
That's fine for a steel headset. I'd be a bit more careful with an alloy one...
Not totally necessary but a good idea is to get a bike shop (or get the tool yourself) to mill the top and bottom faces of the headtube to remove all paint, crap etc and ensure they are square. If you are using a taper roller headset then the milling is vital or your expensive headset will wear out really quick.
A cheap headset press can be made up out of a big piece of threaded stud or a big bolt, two big washers and two hex nuts but I generally go with the 'Il Padrone' method.
Cheers
Richard
Re: Need help with various queries for project *IMG HEAVY*
Posted: Tue Nov 30, 2010 8:09 pm
by nickobec
WyvernRH wrote:A cheap headset press can be made up out of a big piece of threaded stud or a big bolt, two big washers and two hex nuts but I generally go with the 'Il Padrone' method.
That is my headset press, a threaded stud, two big washers and two hex nuts. I think it cost me about $3 to make and works a treat. Makes it so easy to install headsets.
elStado wrote:I would take it to my LBS to see if they could do it for me, but it's a bit bulky to take on the bike.
I have done it more than once (at least six times this year), taken frames to/from work/LBS (it is only round corner from work), which involves minimum 2km ride. Only problem I had was getting out of lift with one bike and frame with forks across my back.
Biggest challenge was getting two rolling wrecks home from the station, riding one, which was an adventure in itself (too big, loose cone nuts on front wheel, 20 year old brake pads and rusted cables), while guiding the other bike which had two flat tires and no seat.
Re: Need help with various queries for project *IMG HEAVY*
Posted: Tue Nov 30, 2010 9:53 pm
by elStado
nickobec wrote:WyvernRH wrote:A cheap headset press can be made up out of a big piece of threaded stud or a big bolt, two big washers and two hex nuts but I generally go with the 'Il Padrone' method.
That is my headset press, a threaded stud, two big washers and two hex nuts. I think it cost me about $3 to make and works a treat. Makes it so easy to install headsets.
Can anyone provide images to explain further? I honestly have no idea what you are trying to explain here.
ED: Just had a chat with Google and it reckons this is what I should be thinking of:
http://farm4.static.flickr.com/3395/348 ... c9b3_b.jpg
I have done it more than once (at least six times this year), taken frames to/from work/LBS (it is only round corner from work), which involves minimum 2km ride. Only problem I had was getting out of lift with one bike and frame with forks across my back.
Yeah my LBS is only 2km away too. How did you attach the frame to yourself?
Frames are remarkably small and light when they are stripped to bare basics.
Re: Need help with various queries for project *IMG HEAVY*
Posted: Wed Dec 01, 2010 1:31 am
by nickobec
That could be mine.
elStado wrote:
Yeah my LBS is only 2km away too. How did you attach the frame to yourself?
Frames are remarkably small and light when they are stripped to bare basics.
Techniques vary, but the main triangle over my head, steerer tube over my shoulder. Usually have a Crumpler Courier bag over other shoulder and use the third leg (strap) to hold frame in place. Does make getting out of the saddle interesting, so I usually avoid the busy roundabout and short sharp climb after and take the longer way home.
Can't remember how I did it the one time with the forks attached. The other times either no forks or forks in bubble wrap zip tied to frame.
Re: Need help with various queries for project *IMG HEAVY*
Posted: Wed Dec 01, 2010 2:54 pm
by elStado
nickobec wrote:
That could be mine.
Could you give me a breakdown of the bits I would need and sizes? Just so I can write a basic list to take with me to the hardware store so I get everything.
Also, I managed to pop out the cup using a screwdriver and hammer with the bike frame clamped securely in the work stand. It took about 5 minutes for each cup as I was sure to take my time and not warp/bend the cups by uneveningly knocking them. I also put a sheet on the ground so when they popped out they wouldn't get damaged on the brick floor.
I have one last question (for now) before I get the frame and forks sandblasted and powdercoated.
The fork also has a bearing race, but I am not sure if this is supposed to come off, or even how I would get it off. It seems quite stuck in and there's no way to tap it out like the other ones from what I can see.

Thoughts?
Re: Need help with various queries for project *IMG HEAVY*
Posted: Wed Dec 01, 2010 4:34 pm
by LG
It's also pressed on. Tap it out just like the other bearing races.
I should have mentioned earlier, a screwdriver isn't the best tool as it has a pretty sharp edge and can mark the press fittings on the bearing races if hit too hard. These older steel bearing races are very hard though, and take a fair bit to damage them. I usually use a long hi-tension steel bolt which has a nice square edge on the head and seems to work quite well with the races (same bolt used for bashing cotter pins).