Page 1 of 2
A clamp for your new LED torches
Posted: Mon May 26, 2008 7:30 pm
by Kalgrm
With the current spate of threads about using the latest generation of LED torches as bike lights, I thought I'd share my mounting solution with you guys.
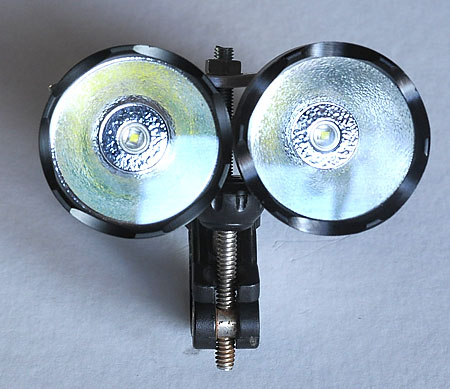
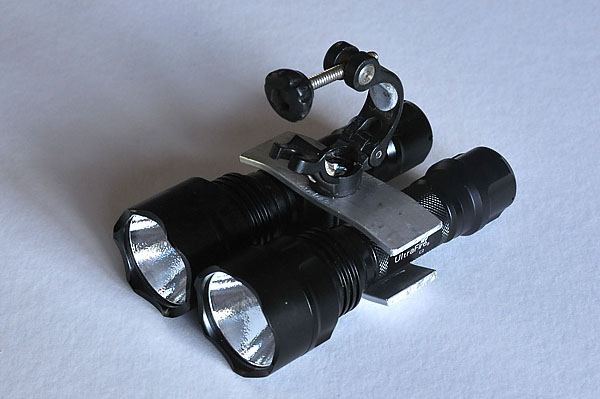
Firstly, I've purchased three of
these torches to be used as bike lights. Two are to be used mounted on the bike while the other one is a spare light to be carried in case I get caught after dark without my normal lights (it's a spare to be carried around). I needed a secure way to mount the two on the bike, since the supplied
mounting blocks won't fit where I need them to be mounted and still let my cranks turn (that's another story).
With that in mind, I made up the following mount using a couple of strips of aluminium, a bolt and nut and a clamp from my VistaLite set (which these torches replace).
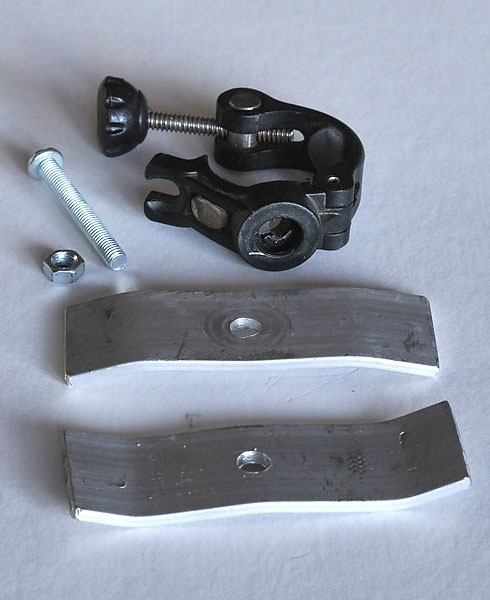
I bent the outside 10mm of the strips of Al using a pair of vice grips to provide a secure mounting plate. The bend in the middle came about when I tightened up the nut on the bolt.
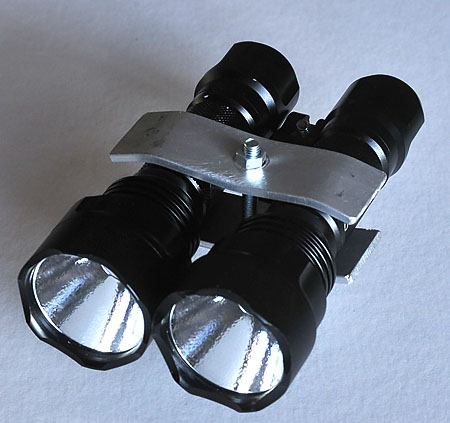
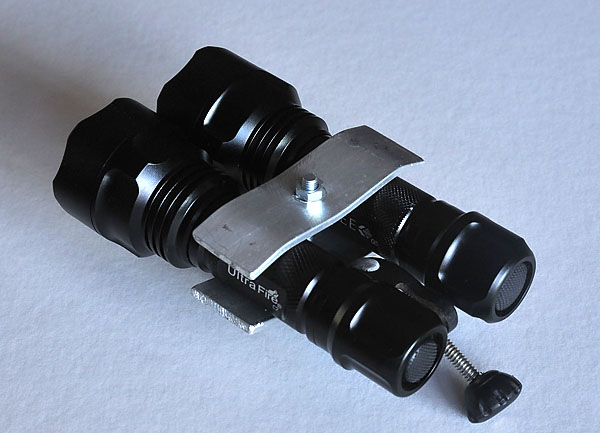
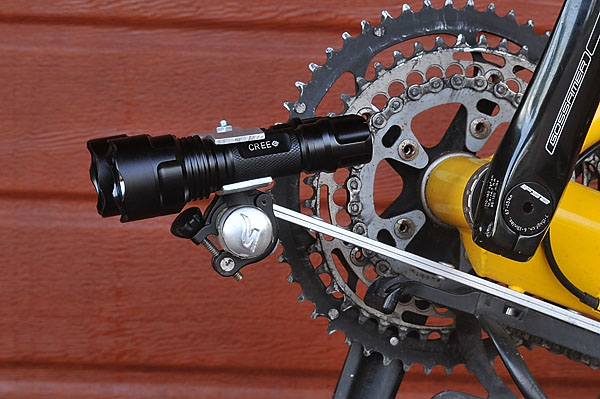
What you end up with after assembly is what you see below.
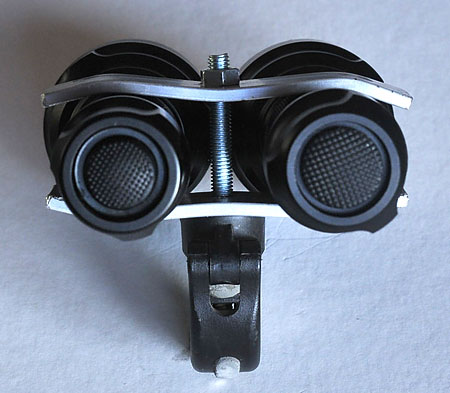
And finally, when the torches are mounted on the bike:
Cheers,
Graeme
Posted: Mon May 26, 2008 7:36 pm
by Pushy
Nice work Graeme, some inner tube recycliing over those strips for grip and protects the finisf of the torch me thinks.
Les
Posted: Mon May 26, 2008 7:40 pm
by Kalgrm
Yep, that will happen after I've made my battery pack and hooked up the wires. I made this in about 10 minutes before going out on Friday evening for a ride. I wanted to see it this would work even with the batteries in the torches (I'm going to use foam-core instead of dowel to keep the weight down.)
Cheers,
Graeme
Posted: Tue May 27, 2008 12:10 am
by Pushy
Kalgrm wrote: (I'm going to use foam-core instead of dowel to keep the weight down.)
Cheers,
Graeme

Serious? How does Balsa from a model shop compare to foam core, there may be a few more grams there

And you could drill holes in the aluminium strips too

Les
Posted: Tue May 27, 2008 12:19 am
by Kalgrm
Serious, but not for the reason you think.
With the weight of the torches out on that cantilever, they bounce around a bit. I don't want to be flicking them around whenever I hit a bump, so reducing the internal weight is an easy way to help reduce the effect.
I'll send you a PM showing the construction.
Cheers,
Graeme
Posted: Tue May 27, 2008 10:20 am
by mikesbytes
Where did you get the screw thing that looks like it would mount on a handlebar?
Posted: Tue May 27, 2008 10:26 am
by janus77
Just out of interest, is it more difficult to spot holes in the road etc when riding a recumbent compared to a regular bike? I mean I'm usually on the lookout for pot holes and cracks to avoid, is it more difficult to see these and avoid them on a bent?
**those lights are mounted on a recumbent right?**
Posted: Tue May 27, 2008 10:46 am
by biftek
was looking for torch mounts too on dealextreme
i brought the one mention awhile ago , but it doesn't seem to secure
recently came across this one
http://www.dealextreme.com/details.dx/sku.13004
Posted: Tue May 27, 2008 11:18 am
by Kalgrm
mikesbytes wrote:Where did you get the screw thing that looks like it would mount on a handlebar?
The clamp is recycled from a set of VistaLites.
janus77 wrote:Just out of interest, is it more difficult to spot holes in the road etc when riding a recumbent compared to a regular bike? I mean I'm usually on the lookout for pot holes and cracks to avoid, is it more difficult to see these and avoid them on a bent?
**those lights are mounted on a recumbent right?**
Yes, that's a recumbent. I suppose it can be more difficult to spot holes, but you quickly learn vigilance. Having the lights mounted low helps to cast shadows which make the obstacles more visible.
I've heard they are not terribly good. Quite flimsy and prone to breaking. They might have beefed them up since then though.
Cheers,
Graeme
Posted: Tue May 27, 2008 5:00 pm
by clack3rz
mikesbytes wrote:Where did you get the screw thing that looks like it would mount on a handlebar?
I use one of
these for my cree light. It's not the strongest looking mount, but I haven't had it break yet

It's good in that I can angle and swivel the light depending on what mode I have it on.
Posted: Tue May 27, 2008 6:26 pm
by HappyHumber
Great idea & excellent photos, Graeme. I'm lucky enough to have an old Vistalite clamp like that myself for when my dealextreme package arrives. even though I ordered a couple of the
mounts you originally mentioned in one of the other thread- I was having reservations about just them and 'laccy bands
You blokes are saving me a lot of $$ as well as any thought or personal innovation on my own part

Don't forget - plagiarism is a form of flattery
cheers, Kym
Posted: Tue May 27, 2008 9:45 pm
by Mulger bill
Nice bit o' work there MacGyver

Shaun
Didyer see how grubby that chain was???
Posted: Tue May 27, 2008 10:41 pm
by Pushy
Mulger bill wrote:
Didyer see how grubby that chain was???
Saw it in the flesh this morning Shaun, he had washed and polished it.
Posted: Tue May 27, 2008 11:31 pm
by Kalgrm
Mulger bill wrote: Didyer see how grubby that chain was???
Yeah, and it took me about 30 minutes to clean the bloody thing this morning! Two and a half chains in that baby.
Took the lights out tonight on a 3 hour mountain bike ride around the local single track. Everything went flawlessly - the mount seems to be rock-solid. Who's a happy chappy? I am!
Cheers,
Graeme
Posted: Wed May 28, 2008 4:57 pm
by Mulger bill
Singletrack eh, impressive
How even is the beam spread in the real world?
Shaun
Posted: Wed May 28, 2008 5:35 pm
by Kalgrm
I'd say the beam spread is not "ideal", in that it's quite narrow. But it's so bright that the spill is enough to see by. I quite like it that way - I get a great view of obstacles long before I reach them, which lets me choose my line more effectively.
It seems my alignment of the two torches is too good! I don't get any spread across the path - just a strong light out in front. It wasn't a problem last night, and I also had my HID on my helmet (ineffectual as it is now, by comparison with these things). I reckon I'll put a little piece of neoprene between the cones of the torches next time I hit the single track, just to spread the light sideways a bit.
Cheers,
Graeme
Posted: Wed May 28, 2008 5:39 pm
by Mulger bill
Outpowering a HID, wow. Enough spill for peripheral vision.
Now you've got me thinking... maybe Ayups need rethinking hmmm.
Shaun
Posted: Wed May 28, 2008 6:11 pm
by Kalgrm
Two of the riders last night had Ayups (each had a bar mounted and a helmet mounted set) so I got a good look side-by-side with my torches. I don't know what width beams they had on their lights, but once again, these torches outshone them. Not bad when you consider the cost difference, too!
I should point out my HID is a low end one (if such a thing exists). It's a Trail Tech 10w system and the globe could be fading (don't know if this happens or not ....). But I'm also rethinking my helmet mounted HID now, after seeing first hand the set-up Pushy has on his helmet. A pair of the smaller CREE LED torches modified as per his method looked lighter than my HID and probably as bright or better.
Cheers,
Graeme
Posted: Wed May 28, 2008 6:15 pm
by Kalgrm
PS - the Ayups did look very cute!
Posted: Thu May 29, 2008 6:35 pm
by Mulger bill
OK.....
Had a look, gonna have to have anotherlook at these other threads you mentioned, my MacGyver ran off and hid behind the pituitary gland during the first read

Ah well, got until tax time.
Shaun
Posted: Thu May 29, 2008 7:27 pm
by Kalgrm
If all you do is buy the torches, batteries and charger, you'll still be in front. The torches work fine without any modification. Pushy's efforts only extend the run time of the battery so that he doesn't need to swap batteries over during a ride. If you don't mind that minor inconvenience, you don't need to MacGyver anything up. Just get the rubber mount, cable-tie the torch into place for security and you're riding into the sunset (and beyond) on the first night.
My torches ran for three hours on Tuesday night and still seemed as bright at the end of the ride as they were at the start. I had a spare battery with me, but I never pulled it out of the pack.
Cheers,
Graeme
Posted: Thu May 29, 2008 8:28 pm
by Mulger bill
Thanks Graeme, 3 hrs burn would be fine from a charge, what sort of recharge time... bah, search, read and shut up
Shaun
Posted: Thu May 29, 2008 9:54 pm
by Kalgrm
Happy to answer:
About 5 hours to fully charge the batteries. Each battery costs $5 and you buy two per pack. Just buy 2 packs and you'll be able to have two on charge and two with you (~6 hours of night riding if you use only one torch at a time). The charger is ~$13. Grand total of one torch, one mount, one charger and 4 batteries comes to AUD$64 including postage. Take $10 off if you only get 2 batteries. Add $30 if you buy a second torch and mount.
I like both the price and the versatility of the system (oh, and the blinding brightness!
)
Cheers,
Graeme
Posted: Fri May 30, 2008 12:32 pm
by clack3rz
Yup +1 for the torches.....
I bought one of
these and mounted it on the handlebars with one of
these.
I bought a set of
these batteries and
this charger, also using
this adapter.
All up around $50 and arrived in 1 and half weeks.
Initially I bought it because of the strobe option (and hi-med-lo), but the hi and strobe are very bright (the strobe is annoyingly bright and very distracting - possibly the same for drivers), so strobe is not an option used for me.
I do use the hi when I hit patches of road where the are no or broken street lights, then flick it back to med.
I find the med setting is enough for me to see and to been seen.
This gives me enough run-time for a morning ride (usually still going strong after 1.5 hrs).
I still carry a spare just in case, or if I decided to ride further. I then charge them when I get back and they're ready for the next ride.
I did find that this light uses PWM (Pulse Width Mode) when in med-low modes which can cause havoc with wireless sensors, so be mindful of this.
Just a matter of allowing a bit of space b/w the computer/sensors and the light.
I'd still like to get Ay Ups! but the budget isn't forgiving enough and this set-up does me fine for now.
Maybe Santa might bring me a set if I'm good this year
Posted: Fri May 30, 2008 1:29 pm
by HappyHumber
dammit... I wish my parcel would hurry up & arrive!!