Simplex TDF Gear Instruction Leaflet

User avatar
WyvernRH
Posts: 3186
Joined: Tue Nov 06, 2007 6:41 pm
Location: Newcastle NSW

Simplex TDF Gear Instruction Leaflet

Postby WyvernRH » Sun Aug 10, 2008 8:44 pm

As promised the scans of the 4 page Simplex TDF leaflet, hopefully in the right order :D
Image
Image
Image
Image

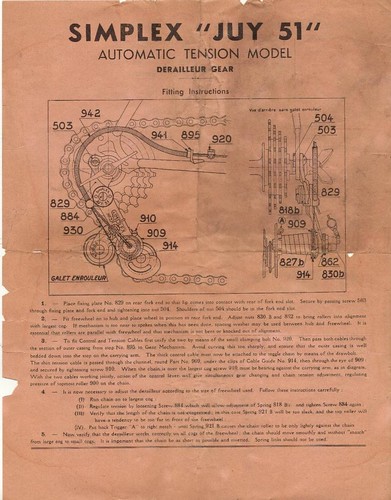
Hope this is useful, I also have the Juy51 instruction leaflet if anyone wants pictures of that one.

Cheers
Richard

User avatar
WyvernRH
Posts: 3186
Joined: Tue Nov 06, 2007 6:41 pm
Location: Newcastle NSW

How to adjust it

Postby WyvernRH » Sun Aug 10, 2008 8:53 pm

I missd out this link to a really good page on Adjusting Simplex pull-chains
http://classiclightweights.co.uk/simple ... tment.html

Cheers

Richard

User avatar
WyvernRH
Posts: 3186
Joined: Tue Nov 06, 2007 6:41 pm
Location: Newcastle NSW

More Simples stuff

Postby WyvernRH » Sun Aug 10, 2008 9:13 pm

This might interest folk as well, although it does refer to the Juy51 model, not the TdF model
Image
Image

Cheers

Richard

User avatar
Kid_Carbine
Posts: 1300
Joined: Tue Aug 14, 2007 11:35 pm
Location: Southern Tablelands N.S.W.

Postby Kid_Carbine » Sun Aug 10, 2008 11:02 pm

Well, since my SJH runs the Italian made version of the Simplex Tour de France derailleur, mine being the 'model Competition' version & am gratefull that these documents have been made available as mine is obviously configured the wrong way.

In my defence, I thought I might check with a couple of authorities on the subject of cycling in the 50's.
The first was a cycle shop proprietor who first worked in his fathers shop as a boy back in the 1950's. He owns the place now & it's still in business at the same location.

I asked him about the different arrangement & he replied that he had not seen such an arrangement before, nor heard of it & they sold & installed these derailleurs new.

Next was an 83 year old framebuilder who had raced twice in "the Goulburn" in the 50's & who has built more frames, & assembled more bikes than I could ride in a lifetime. I described to him the correct arrangement using my bike to illustrate the positioning.
He too had never seen or heard of this before, so there must have been a lot of incorrectly set up Simplex TdF derailleurs in this country.

Lastly, I went to the Classic Lightweights site to see a lovely 1956 Bates BAR owned by no less a cycling authority that Alexander Von Tutscheck.

This machine is also equiped with a Simplex TdF five speed derailleur, as is mine & it too is set up in the wrong way.
That I should make the same error as these three cycling icons makes me feel that I am at least in good company.

Using these instructions, I am now setting up my workstand & rectifying the error.

Image Image

This one owned by Peter Underwood clearly shows the correct arrangement.

Image
Last edited by Kid_Carbine on Tue Aug 12, 2008 12:54 pm, edited 1 time in total.
Carbine & SJH cycles, & Quicksilver BMX
Now that's AUSTRALIAN to the core.

User avatar
Kid_Carbine
Posts: 1300
Joined: Tue Aug 14, 2007 11:35 pm
Location: Southern Tablelands N.S.W.

Postby Kid_Carbine » Mon Aug 11, 2008 1:02 am

Well rectification work has now been completed & I must confess, the shift is even more crisp than before & the problem that I had with the chain occasionally running off the tensioner pulley is now a thing of the past.

My 15 to 23 tooth Simplex block is severely taxing the derailleur's capacity & a spread of just one more tooth would see me scrambling for another block.

Here's a couple of pictures of the corrected instalation.

Firstly, this is the workroom. Nice & warm in there.
The newly built wheels were an absolute joy to ride & the green Airlite Continentals give it a little extra charm.

Image

Little chainwheel to little sprocket. ................ Big to big. Note the positions of the tensioner arm

Image Image

If the shift quality on the stand can be duplicated on the road, then I have a newfound respect for these old derailleurs.

A big debt of gratitude to WyvernRH for letting me in on the secret & fixing the niggling shift problems that I had.
Carbine & SJH cycles, & Quicksilver BMX
Now that's AUSTRALIAN to the core.

fixie
Posts: 283
Joined: Tue Jun 17, 2008 9:08 pm

Postby fixie » Mon Aug 11, 2008 8:53 pm

You have performed a great service Richard. I had read a comment on how these gears were incorrectly set up and I was surprised.

I would appreciate the equivelant if you have it for the Juy 51. I have one of these but the info on the set up of the cables and the lever arrangement is confused and conflicting. If you have one of those installation/set up leaflets I really would appreciate seeing it.
Thanks
John

User avatar
WyvernRH
Posts: 3186
Joined: Tue Nov 06, 2007 6:41 pm
Location: Newcastle NSW

JUY51 scans and stuff

Postby WyvernRH » Tue Aug 12, 2008 3:36 pm

Kid, as you say you are not alone! They do work (just) in either configuration, but better the right way. Look on the Classic Rendezvous site under Simplex. They may know exactly how many holes of what diameter are drilled in 1955 Campag idler pulleys but it seems the Simplex TdF defeated them. I was only saved from the error cos the first one I had was bought from good old Vic Lyons in Vauxhall, London who put me straight on how it should be set up.
Interestingly that Simplex on the Bates does not look like a 'pure' Simplex TdF. Note the longer cage with the out-turning lower lip on the outside cage plate. I'm not sure you could set that one up in the 'correct' position. I have seen 'bastardised' Simplex gears that look very much like the one in the picture where someone has bolted a newer, longer cage off of a later gear onto an older Simplex arm to give it more capacity and make it work the 'proper' way around :o This was in the days when no-one threw anything away if you could fix it :)

Fixie, I will scan the JUY51 sheets in ASAP, these date to the early 50's model. Note that there actually were several ways of setting these gears up over the years. One involving two complete cables, double cable stops and the use of a double lever on the right of the down tube. Another with an ordinary single r/h lever and cable with a shorter second cable clipped to the main cable after the cable stop on the rear stay so they moved together to adjust the chain tension on the gear 'automajically' as you changed gear. Of course, being Simplex there were several variations on both methods over the years :shock:
Good old Simplex the Shimano of the 50's 8)

Cheers
Richard

fixie
Posts: 283
Joined: Tue Jun 17, 2008 9:08 pm

Postby fixie » Tue Aug 12, 2008 11:02 pm

Thanks WyvernRH. No wonder I am confused. My Juy51 should have two wires coming out of the single outer cable I think, but I cannot find how the two wires are joined before the lever as I was intuitively sure that they operated from one lever. I know that the Juy 543 has two separate inners and outers and a double cable stop on the chain stay and I thought a double lever on the down tube, a large and small one on the same side. I think mine(Juy 51) is an early 50's one because it has metal jockey wheels with ball bearings, and the later ones were plastic toothed with plain bearings.

Look forward to seeing what you can turn up.
John

User avatar
Kid_Carbine
Posts: 1300
Joined: Tue Aug 14, 2007 11:35 pm
Location: Southern Tablelands N.S.W.

Postby Kid_Carbine » Wed Aug 13, 2008 5:18 pm

To add interest to it all, I have a new JUY-52 twin cable derailleur on my desk. I'm guessing that it's the 'new & improved' version of the JUY-51, so I too will be most interested to see the instructions.
Carbine & SJH cycles, & Quicksilver BMX
Now that's AUSTRALIAN to the core.

User avatar
WyvernRH
Posts: 3186
Joined: Tue Nov 06, 2007 6:41 pm
Location: Newcastle NSW

Postby WyvernRH » Wed Aug 13, 2008 8:19 pm

Kid_Carbine wrote:To add interest to it all, I have a new JUY-52 twin cable derailleur on my desk. I'm guessing that it's the 'new & improved' version of the JUY-51, so I too will be most interested to see the instructions.
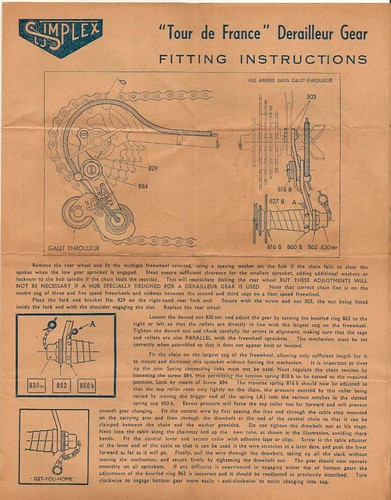
Sorry Kid, this leaflet is for the early 4 speed version with the short second cable. Apparently a 5 speed version was available as well for which they supplied a different instruction sheet. Well actually it was identical except for the picture :o

Fixie - hope this helps! I will add that personally I don't think this works any better than the TdF model but it is a bugger to set up....

This is the leaflet that comes in the box so its a bit more concise than the TdF leaflet which I understand was a shop technical/publicity handout.

Image
Image

Cheers

Richard

fixie
Posts: 283
Joined: Tue Jun 17, 2008 9:08 pm

Postby fixie » Wed Aug 13, 2008 9:58 pm

Thank you WyvernRH. Exactly what i wanted to see. All is clear now. I am unsure of the benfit of the tension cable, but i think that it means that there is sufficient tension when on the small sprockets/rings without excessive tension when on the big ones which can sometimes be felt as chain drag. It may also have allowed for a wider range of tooth difference between top and bottom.

I think the specific improvement in this model was the change of the pivot point for the jockey cage which was moved from the bottom jockey wheel to the middle of the cage. When these gears are set up correctly, they do change very slickly.

I think that the main difference between the 3 speed, 4 speed and 5 speed versions is the length of the bush that holds jockey cage. Note that the cage sides are marked for the version in use.

User avatar
Kid_Carbine
Posts: 1300
Joined: Tue Aug 14, 2007 11:35 pm
Location: Southern Tablelands N.S.W.

Postby Kid_Carbine » Thu Aug 14, 2008 6:19 pm

A closer examination of my JUY-52 shows that it's still marked as a TdF model
It is none the less a twin cable unit & has ball bearing rollers.
Carbine & SJH cycles, & Quicksilver BMX
Now that's AUSTRALIAN to the core.

User avatar
WyvernRH
Posts: 3186
Joined: Tue Nov 06, 2007 6:41 pm
Location: Newcastle NSW

Postby WyvernRH » Fri Aug 15, 2008 12:16 pm

fixie wrote: I think that the main difference between the 3 speed, 4 speed and 5 speed versions is the length of the bush that holds jockey cage. Note that the cage sides are marked for the version in use.
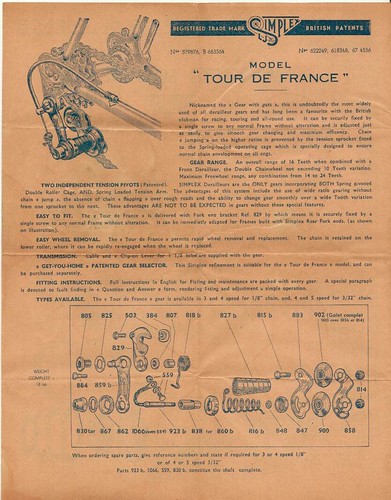
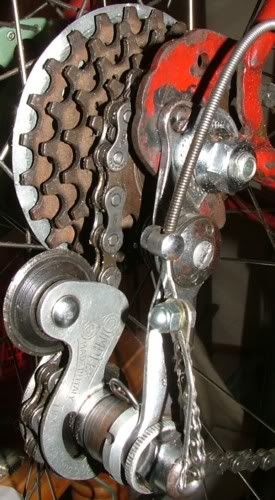
I think you are right there, but beware! If you have a used example it was not unknown for a rider to 'upgrade' a gear by buying the longer bush and installing it in their gear. So even if it says "4 vit" it might actually work across 5 speeds.
You could buy spares in those days, I have a Simplex service box from the 50's and even in its depleted state the amount of small parts is amazing!

Cheers

Richard

fixie
Posts: 283
Joined: Tue Jun 17, 2008 9:08 pm

Simplex T de F Gear

Postby fixie » Tue Aug 19, 2008 12:00 am

Does anybody know what gauge cable to use for the tensioner and changer cables? Is the tensioner even a cable? The diagrams always show a thick and a thin wire. How do you get two wires through a single outer?

User avatar
WyvernRH
Posts: 3186
Joined: Tue Nov 06, 2007 6:41 pm
Location: Newcastle NSW

Re: Simplex T de F Gear

Postby WyvernRH » Wed Aug 20, 2008 8:28 pm

fixie wrote:Does anybody know what gauge cable to use for the tensioner and changer cables? Is the tensioner even a cable? The diagrams always show a thick and a thin wire. How do you get two wires through a single outer?
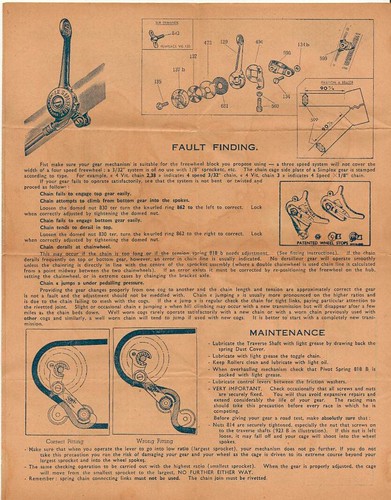
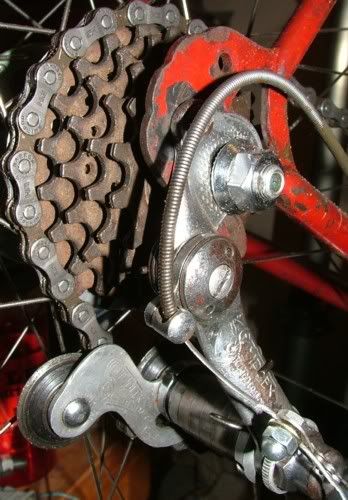
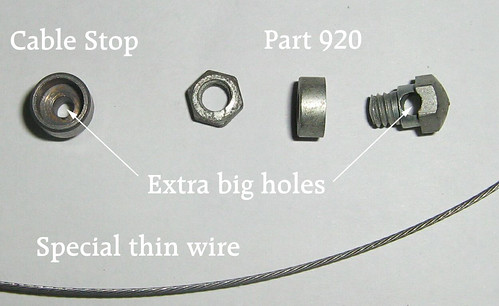
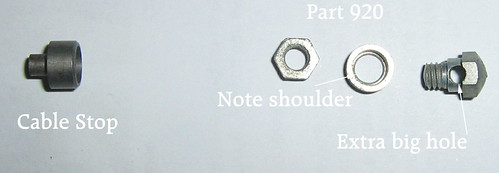
Fixie, Here are some photos and notes that might help. I have never set this one up but I did have an old wreck back in the UK that had a 'well used' Juy 51 fitted so all opinions stated here are based on my experiences trying to fix the JUY51 on the wreck, the instruction sheet and what I remember of the detailed instructions that I got from old Vic when I bought it off him :P .
The first picture is a view of every thing I got in the box from Vic. The main gear cable and all the outers had been scavenged over the years for other gears. Note the very thin extra cable with the special cable stop and a clamp that I am sure is the mysterious part 920.
Image

The detail views show the trick I think. The extra cable is very fine guage and the hole in the special cable stop is extra large. The part 920 is a special clamp with a large hole to accomadate a normal cable and the thin cable. Note the stepped coller to securely locate the cables. If you don't have this assembly I reckon any old motorcycle guage solderless nipple type clamp would do tho'.
Image
Image

As I understand it both cables go through one outer from the cable stop to the gear and move together at the same rate. Vic said that this was not ideal, in UK weather at least, as unless it was kept well oiled the friction increased as it gummed up over time.

Hope this helps!

Cheers

Richard

PS also in the picture are a 3 speed, 4 speed and 5 speed central barrel for the TdF type gear. As you can see they are easily interchangable!

biksal
Posts: 5
Joined: Fri Jan 17, 2020 3:08 pm

Re: Simplex TDF Gear Instruction Leaflet

Postby biksal » Fri Jan 17, 2020 3:13 pm

I have two bikes with Simplex "Tour de France" rear derailleurs in need of adjustment. Your scanned images of the original Simplex instructions are exactly what I need to adjust my derailleurs. Problem is... I cannot read the instructions on screen. Could you tell me how to view these scans in a way that I can read them?

User avatar
WyvernRH
Posts: 3186
Joined: Tue Nov 06, 2007 6:41 pm
Location: Newcastle NSW

Re: Simplex TDF Gear Instruction Leaflet

Postby WyvernRH » Fri Jan 17, 2020 9:29 pm

In retrospect, not the highest quality scans. However just right clicking on them and selecting 'View Image' renders them pretty readable on my monitor. You might also want to visit http://www.classiclightweights.co.uk/si ... tment.html

Richard

User avatar
Clydesdale Scot
Posts: 2254
Joined: Tue Mar 03, 2009 12:55 pm
Location: Adelaide, SA

Re: Simplex TDF Gear Instruction Leaflet

Postby Clydesdale Scot » Sat Jan 18, 2020 7:39 am

this and another should be accessible from this folder in my Dropbox

Now what bikes are they on?
very interested to see them.
Time for a new thread to detail them.

Philip

biksal
Posts: 5
Joined: Fri Jan 17, 2020 3:08 pm

Re: Simplex TDF Gear Instruction Leaflet

Postby biksal » Sat Jan 18, 2020 10:30 am

Richard and Phillip,

Thank you for helping me view the scans and for providing the pdf's. The first bike (a Durkopp from early to mid 50's) has a 3 speed freewheel and a single chainring. I am confident I can get that one to work with some time thrown at it. The second bike (a 1958 Griffon) is another story. It has a 4 speed freewheel with double chainrings. The problem here is that I am quite sure that the rear derailleur is a 3 speed version and there is no way for it to cover the 4 sprockets of the freewheel. Looks like I'll have to procure a 4 (or 5) speed version of the Simplex TDF rear derailleur to make that bike work.

User avatar
Clydesdale Scot
Posts: 2254
Joined: Tue Mar 03, 2009 12:55 pm
Location: Adelaide, SA

Re: Simplex TDF Gear Instruction Leaflet

Postby Clydesdale Scot » Sat Jan 18, 2020 7:10 pm

are there any markings on either of the derailleurs?
Often they are there and they indicate 3, 4, or 5 speed and the intended chain width 1/8" or 3/32"

biksal
Posts: 5
Joined: Fri Jan 17, 2020 3:08 pm

Re: Simplex TDF Gear Instruction Leaflet

Postby biksal » Sun Jan 19, 2020 7:02 am

The cage on the Durkopp derailleur is marked as 3 speed. Yesterday, I spent way too many hours trying to make this 3 speed work. Not much luck. I can get it to shift, but it is incredibly hard to get it into the small sprocket. I feel like the lever is going to break off from all the effort.

Also, I've decided that chain length is super critical but haven't figured out how to determine that perfect length. The chain always seems too tight when on the large sprocket and too loose when on the small sprocket.

The derailleur on the Griffon has no marking but I am sure it is a three speed by measuring the total travel of the cage.

User avatar
Clydesdale Scot
Posts: 2254
Joined: Tue Mar 03, 2009 12:55 pm
Location: Adelaide, SA

Re: Simplex TDF Gear Instruction Leaflet

Postby Clydesdale Scot » Sun Jan 19, 2020 7:25 am

from Classic Lightweights
"I use the Shimano (wash my mouth out) method of selecting chain length in the first place. This is to put the chain around the largest sprocket and chainring and then add two links. Be prepared though to do further alterations. Sometimes I set it up with an old length of chain until the length is correct and then cut the new one to match."
link to this was given by Richard above.
That is what I used.
The key is to get the chain line right, get this right first.

It does take more effort as the adjusting screws found on later derailleurs, are noticably absent.

and what size freewheel are you using?

biksal
Posts: 5
Joined: Fri Jan 17, 2020 3:08 pm

Re: Simplex TDF Gear Instruction Leaflet

Postby biksal » Sun Jan 19, 2020 11:30 pm

Guys,

I had already run across the article suggesting the "Shimano" method of determining chain length. This is what I used on the 3 speed (16-18-20 teeth) Durkopp but I'm still not sure if I've got it right.

My next step is to remove the derailleur, disassemble it, check for worn or binding parts, lube and replace.

Along with chain length, I'm figuring out that the correct combination of of adjustment between both of the springs is critical. Too much or too little pressure relative to each other might be a problem.

Potential shifting issues with the 4 speed (16-19-22-24 teeth) Griffon will have to wait until I source a proper 4 speed derailleur.

Tom

biksal
Posts: 5
Joined: Fri Jan 17, 2020 3:08 pm

Re: Simplex TDF Gear Instruction Leaflet

Postby biksal » Mon Jan 20, 2020 8:16 am

Back again with a shifting update,

I rate things poor, fair, good, and excellent.

As of today, I have nudged the shifting quality of the 3 speed Durkopp from poor to fair. This was accomplished by a teardown, cleaning, and lubrication of the derailleur. In addition, I find that having the tension set quite light on the wind-up of the jockey wheels is beneficial to easier shifting. This results in less chain wrap, which might be problematic out on the road, but at least on the stand it works better.

It will be a while before I can test it on the road as we just got eight inches of snow and the outside temperature is in the low 20's.

I have a NOS 4 speed TDF derailleur on it's way for the Griffon. That set-up should go a bit smoother based on what I've learned with the 3 speed.

Tom

Who is online

Users browsing this forum: No registered users