Project: Hub gear drop bar conversion

User avatar
MattyK
Posts: 3257
Joined: Fri Oct 01, 2010 1:07 pm
Location: Melbourne

Project: Hub gear drop bar conversion

Postby MattyK » Sat Jan 11, 2014 6:09 pm

Just in case anyone is interested, I'm in the process of converting my bike to a drop bar.
(I'm documenting this and not out there doing it right now because I'm waiting for a new front brake to turn up in the post, one that suits a drop lever)

Why? well, I'm up and down some hills on my regular ride (daily commute), so some different hand positions will be nice. And, just because :mrgreen:

Here's the unwitting recipient, an Avanti Blade 8 from 2007 (not the 5 year old). It runs a Shimano Nexus-8 hub gear (an older version one, SG-8R20). I've already done a front fork swap and disc brake conversion, and a suite of commuter-y additions.
Image

Being a flat-bar, the (effective) top-tube length is greater than a typical frame of that size, about 600mm; I estimate I should be on about a 58 cm frame under normal circumstances. Since the stem needs replacing anyway (due to a change of handlebar diameter) I went for an 80mm stem (existing one is 110mm).

The levers are Versa VRS-8, which are a modified Microshift lever; different cable pull for the hub gear and the left lever is gutted as it doesn't need to do anything except brake.
The only other real options are the Jtek bar-end shifter, and Shimano's own Di2 hub-gear components, but I'm not quite ready (able) to cough up for that!

Feeling them, the upshift lever (the big one, reverse of a derailleur cable pull) requires a decent swing to click to the next gear; this wasn't really news to me as it has been commented on by others. The downshift (cable release) lever just requires a quick tap of the knuckle; great for dumping several gears at once.

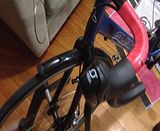
Here are the bars being built up:
Image

Image

Image

Bars are Deda RHM-01, nice shape and very cheap.

The levers come supplied with the shifter inner cable, which I believe uses a Campy-size head (not a Shimano sized one). I had to add an outer shifter cable (full length) to the shopping list.
Brake cables are a Clarks kit; nothing particularly special about them apart from being stainless and low cost. Pondered compressionless cables but they aren't very cheap in the required (full) lengths.

I've got an Avid BB7 Road brake on order (existing one is the MTB version of the same). I also pondered a TRP Hylex brake on the front end (Mmm, hydro!) but the hood shape is quite different. Again, not quite up for getting Shimano hydro road brake Di2 levers, which aren't even on the market yet...

The rear brake is a Tektro RX5 (mini-V with 85mm arms, similar to a cyclocross sized v-brake) so it should be fine in combination with the new levers. I have an adjustable noodle to install, as I would otherwise lose cable adjustment with the new levers.

Next step is learning how to tape the bars, though I might leave this until I have the front brake and can mount the stem on the frame instead of working with it on my lap/bench. And maybe after confirming that all my brake cabling is good...


More soon I hope!

User avatar
MattyK
Posts: 3257
Joined: Fri Oct 01, 2010 1:07 pm
Location: Melbourne

Re: Project: Hub gear drop bar conversion

Postby MattyK » Sun Jan 12, 2014 7:32 pm

Took a couple of steps back on the bars today. I'm still waiting for the front brake so I can't do much more until that arrives.

One step was to strip off the tape in the pics above and ensure the ferrules on the brake cables were properly seated; one of them wasn't quite home and I was worried about it slipping in use. So I'll wait to seat the cables when the bars and brakes are installed and pull on the lever as hard as possible, then tape the cables in position and do the bar tape.

The other thing I did was pull the chain off the bike to remove some very nasty chain lube that had gone very tacky, and to pull out the rear hub to find the source of some drag.

Cleaned the chain up in some kerosene. With the chain off I found there was a nasty clunk in the bottom bracket when spinning the cranks, so a new one and some tools will be on order. And the sprocket is pretty notched out so maybe one of those too :)

The internals of the hub were looking great, really clean after I stripped it maybe a year ago(?) and lubed it with automatic transmission fluid. Not much sign of the source of the drag, I think it was stickiness between the seals behind the sprocket. Anyway after a clean down and reassembly it feels much better and the sprocket backspins much more easily. I also tweaked the cone adjustment so the whole wheel turns a bit more easily too.

The only issue I could find in the hub was some pitting on the smaller (left side) bearing on a couple of the balls (sorry no pics, the pits would be a bit small to see without a macro lens). Those may have to wait until I can do a full hub replacement (eg upgrade to the triple-roller-clutch version of the hub, and a new rear rim if it wears out the brake track completely)

User avatar
find_bruce
Moderator
Moderator
Posts: 10599
Joined: Mon May 09, 2011 8:42 pm
Location: Sydney

Re: Project: Hub gear drop bar conversion

Postby find_bruce » Mon Jan 13, 2014 6:00 am

Nice to see a project coming together, even if you are stalled for a few parts.

I opened my Alfine for the first time after 2 years & was impressed the condition. ATF bath, grease on the seals etc & back together for another 5-10k
Anything you can do, I can do slower

User avatar
MattyK
Posts: 3257
Joined: Fri Oct 01, 2010 1:07 pm
Location: Melbourne

Re: Project: Hub gear drop bar conversion

Postby MattyK » Mon Jan 13, 2014 9:20 am

New UN55 bottom bracket on order from c r c (free shipping weekend ftw), and a crank puller and BB tool. Went for a 107mm BB (original was 110mm) because the sprocket I'm using has about 2mm less dish than the original one. Should get my chainline within about half a mm.

New sprocket on order from Moruya Bicycles too.

User avatar
MattyK
Posts: 3257
Joined: Fri Oct 01, 2010 1:07 pm
Location: Melbourne

Re: Project: Hub gear drop bar conversion

Postby MattyK » Wed Jan 15, 2014 2:32 pm

BB7 Road brake just turned up at the office :)

Image

Image

Interesting things to note (in comparison to the MTB version I've previously fitted):
* An inline barrel adjuster is provided, with instructions that it is needed to take up cable slack with road levers. I figured you would just remove slack when clamping the cable, but makes sense if you can't achieve that. Still, would be nicer without (or if there was one mounted on the caliper itself)

Image

* The instructions (Rev E, copyright 2013) say to tighten the mounting bolts while pulling on the lever to clamp it in place. And no mention of any pre-adjusting of the pad position. This is different to all the stuff I've read/seen online (including an old Avid video, and their older instructions here), which say to to clamp the pads into rotor using the pad adjustment knobs, and then tighten the mounting bolts.

User avatar
simonn
Posts: 3763
Joined: Thu Jan 31, 2008 11:46 am
Location: Sydney

Re: Project: Hub gear drop bar conversion

Postby simonn » Wed Jan 15, 2014 3:10 pm

MattyK wrote: * The instructions (Rev E, copyright 2013) say to tighten the mounting bolts while pulling on the lever to clamp it in place. And no mention of any pre-adjusting of the pad position. This is different to all the stuff I've read/seen online (including an old Avid video, and their older instructions here), which say to to clamp the pads into rotor using the pad adjustment knobs, and then tighten the mounting bolts.
FWIW (which is not much, I'm just a stinkin' cyclist posting to t'interwebs), my BB5 Roads worked much better once I used the pad adjust (and a business between the pad and disc on the non-adjustible side as per http://www.ecovelo.info/2011/04/15/a-fo ... sc-brakes/" onclick="window.open(this.href);return false;) rather than the lever.

User avatar
MattyK
Posts: 3257
Joined: Fri Oct 01, 2010 1:07 pm
Location: Melbourne

Re: Project: Hub gear drop bar conversion

Postby MattyK » Wed Jan 15, 2014 11:43 pm

Out with the old...
Image

And in with the new.
Image

Image

Image

I found the easiest instructions for aligning the caliper are at this site:
http://howtosetuptheavidbb7.weebly.com/ ... d-bb7.html" onclick="window.open(this.href);return false;
Namely this bit:
Use the pad adjustment knobs to back out the pads all the way. Now turn the inner pad adjuster all the way in as far as it will go (though don't force it). Then back out again by 10 clicks.

Now turn the outer adjuster in until the caliper is locked against the brake disc. Tighten the caliper mounting bolts. The caliper will now be centred properly. If you have Avid Speed Dial levers you should now adjust the brake lever reach (always do this BEFORE you tighten the cable pinch bolt on the caliper). Now pull the cable tight and secure it with the cable pinch bolt. Now back out both the pad adjustment knobs all the way.

Pull on the brake lever to make sure that there is no slack. There should be no play at all in the lever. As soon as you start to pull there should be movement on the caliper arm. If there is play then you will need to pull the cable through a bit more and re-tighten it. You shouldn't need to use the tension adjustment on the lever itself.

Now turn the inner pad adjuster inwards 4 clicks and pull the lever a couple of times and spin the wheel. Keep repeating this until you can hear rubbing on the disc. Now back out the adjuster one click at a time until no rubbing can be heard. Then back out by another two clicks for clearance (though some people prefer to leave only one click distance).

Now repeat those steps for the outside pad adjuster.
I have no concerns about using the Road brake with the current flat bar levers, as the levers (Tektro RX1) are designed to work with mini-V brakes, not full-length MTB V-brakes. I've been happy with the performance of the BB7 MTN brake, though in combination with these levers there was still some sponginess (offset by oodles of power, the bike could be pulled up rapidly with one finger).

The only thing I will have to remember before the bottom of the first hill tomorrow is that the pads still need bedding in! Takes quite a few stops to get them working well as I recall...

User avatar
MattyK
Posts: 3257
Joined: Fri Oct 01, 2010 1:07 pm
Location: Melbourne

Re: Project: Hub gear drop bar conversion

Postby MattyK » Thu Jan 16, 2014 9:14 am

First run with the new brake; didn't die. Bedded in pretty quickly though it still has some more bedding to do - the ride to work is mostly uphill.

Lever feel is good, nice and firm, power should increase a bit as it beds in more. There are still some noises from the brake, though they are different noises to the older brake. It sounds like a fluttering/buzzing as each slot in the rotor passes.

Happy with it nonetheless. (It would be nicer in a different colour, but the BB7RS version is notably more expensive for minimal advantages)

User avatar
MattyK
Posts: 3257
Joined: Fri Oct 01, 2010 1:07 pm
Location: Melbourne

Re: Project: Hub gear drop bar conversion

Postby MattyK » Fri Jan 17, 2014 10:29 am

Alright, got stuck into it last night, figured it would take a couple of hours.

Image

About 4 hours later (circa 1:30am) it was finally done...

Off came the old bars and cables. Broke one of the shifter cable retaining clips in the process; hope the LBS has them, but I can live without one of them.
Image

Checked the headset bearings. Top bearing was a little gunky but not bad after wiping clean.
Image

Bottom bearing was actually quite good and clean, just a little grime in the hard to reach places. Mudguards are good like that :)
Image

Rebuilt the bearings with lots of grease and dropped the frame back on to the forks.

Bars on for the first time:
Image

Pop! Bright spoke reflectors and reflective tyres:
Image

User avatar
MattyK
Posts: 3257
Joined: Fri Oct 01, 2010 1:07 pm
Location: Melbourne

Re: Project: Hub gear drop bar conversion

Postby MattyK » Fri Jan 17, 2014 10:47 am

Took ages to decide whether to run inside or outside the fork. Running inside is a little neater, though the cable line into the caliper isn't so straight. This way involves cutting the cable shorter than running outside the fork, so there was no turning back!

Measured twice (thee times? ten times?), cut twice until the cable sat nicely between the guard and the fork.

Wired it up and pumped the brake repeatedly to pull any slack/loose parts out of the system. Then taped the cable down as shown.

Image

I didn't install the barrel adjuster as mentioned in a previous post, kinda because I forgot and couldn't be bothered going back and doing it again.

With the pads as close to the rotor as I could get them without rubbing, the lever was still pulling close to the bars. I don't like this, I like them to bite early. This effect is due to the cable preload (or lack of) and the actuator cam profile (it's a little flat initially before it starts driving the outer pad inwards). So in lieu of a barrel adjuster, I unclamped the cable at the actuator arm, pretensioned the arm a little and re-clamped it until it felt good. No rotor rubbing, and great bite. (Video below if you click it)

Image
Last edited by MattyK on Fri Jan 17, 2014 5:26 pm, edited 1 time in total.

User avatar
MattyK
Posts: 3257
Joined: Fri Oct 01, 2010 1:07 pm
Location: Melbourne

Re: Project: Hub gear drop bar conversion

Postby MattyK » Fri Jan 17, 2014 12:03 pm

The rear brake install was similar, except I also bought an adjustable noodle so cable slack can be tweaked.

Image

Using left-front/right-rear brake setup allows clean cable loops around the head tube. Before cutting the cables, I made sure the bars could turn through their full range. Even with this the cable path was neat and close to the steerer.
Image

Image

User avatar
MattyK
Posts: 3257
Joined: Fri Oct 01, 2010 1:07 pm
Location: Melbourne

Re: Project: Hub gear drop bar conversion

Postby MattyK » Fri Jan 17, 2014 12:15 pm

The shifter cable was the final piece; as you can see it is an external cable that exits like an older or lower-end Shimano cable, in a slightly downward direction.

There was the option to run the cable to either the inside or the outside of the head tube. Again, I chose to go around the outside, which is not really how the frame stops are positioned on the downtube (same side as the shifter), but I prefer the more open arc of going round the outside, and I don't like cables rubbing on the head tube. It is a reasonably big arc though...

The shifters come with an barrel adjuster (a Jagwire unit). They also come with the inner cable, because it's a non-standard small head. I had to source for myself the outer cable, which being full length means you need to buy a 2 metre length of it. I reused the ferrules from the original cable.

Like the rear brake cable, I made sure that the bars could still turn in a full arc before setting the cable length (but otherwise the cable length is minimised). Another pic of the cable routing:

Image

At the hub end, a nut device attaches to the cable, which engages with the shift mechanism on the hub. A new nut is provided, but I reused the original because it was in good condition and looked a bit better quality. The nut needs to be set (centre distance) 101mm from the end of the cable (with the shifter in 1st). Out with the vernier caliper, and repeated checking and rechecking and I got it pretty accurate.

With the cable hooked in place, I tested the shifter (more about that in a review later). But the cable setup was spot on, and in 4th gear the yellow marks on the hub lined up perfectly, I didn't even need to adjust the cable).

User avatar
MattyK
Posts: 3257
Joined: Fri Oct 01, 2010 1:07 pm
Location: Melbourne

Re: Project: Hub gear drop bar conversion

Postby MattyK » Fri Jan 17, 2014 12:19 pm

So with the hardware sorted, the last step was to tape the bars. I've never done this before, but with a bit of online research and video watching, it looked easy enough.

I used Planet X cork gel tape (low cost mostly), there was plenty of length (maybe I could have overlapped more), though the tape pieces for finishing it are quite short (only about 1.5 turns around the bar). One of these is already lifting a bit, so I will have to find some black electrical tape (or maybe use my red tape for contrast?)

One point to note in the picture below is that the stem has an open back, so you can see the steerer shaft through it. No biggie, just a cosmetic detail.
Image

Image

And then it was bed time!

User avatar
MattyK
Posts: 3257
Joined: Fri Oct 01, 2010 1:07 pm
Location: Melbourne

Re: Project: Hub gear drop bar conversion

Postby MattyK » Fri Jan 17, 2014 1:08 pm

This morning was time for the first test ride on my commute to work.

(Disclaimers: the only time I've ridden a drop bar bike in the last ~20 years was about a year ago, it was my brother's, and it was only about a 2 hour ride. I have one bike (this one) and live in a blissful bubble of ignorance that it's actually any good. So I have few to zero points of reference on which to base my experiences. Also I have only just eyeballed and guessed the setup like handlebar position so it could no doubt be improved)

Too hot again in Melbourne (4th day in a row over 40C for posterity) to really put in the power or try to go fast, but I was more worried about staying upright.

Image

So thoughts? It's still very early days, so I'm only just getting used to it. It feels a bit like when I first got my bike, you have to go through a learning process before actions become automatic.

I'll break it down by system.
Bar Ergonomics
The hoods feel great. Great access to the levers and well shaped.
On the drops puts me very low. Note that I have the stem in the downward orientation, whereas my flatbar stem was pointing up, so there is extra drop there. I'm yet to hit some proper downhills, I'll do that tonight and see if I still like it or whether I flip it back.
On the drops the brake levers are accessible, but the shifters, particularly the smaller downshifter (in the upper position), are difficult to access. I might try rotating the bars forward a bit.

Brakes
Excellent power, good feel from both ends. Easy to use from the hoods. The front is still bedding in so I only expect it to get better.

More power, particularly on the rear, than I had with the flat bar levers (I think the new, clean noodle might be helping here).
I have to set the rear pads quite close to the rim to make the brakes engage early in the lever stroke as I like it, but I don't have to deal with mud and I doubt I put out enough power to flex the frame/wheels much.

Shifters
Mostly positive. There is a satisfyingly solid click as each gear engages.

It's been said before in other reviews: the upshift lever (the big one that pulls the cable) needs a long push to actuate it - maybe 40-45° of rotation, but fortunately I have long fingers. There is at least 10° of movement before it even feels like it is pulling on the cable. The actuation is however very light, just a one-finger operation, but it is a slower action than with the twist shifter.

The gears for the most part engage cleanly, however I have missed a few upshifts between 4th and 5th. This is when the primary reduction gear clutch of the Nexus-8 hub engages, and it does so momentarily before the détente on the shifter. So you hear it clunk (which is the clutch in the hub) and if you release the lever it then falls back to 4th. You need to make sure you push it a fraction more until the shifter clicks in to place. Some cable adjustment might address this.

The downshift lever (cable release) is fantastic, you can tap-tap-tap it and dump gears very rapidly, though not quite as rapidly as with the twist shifter. Great for when you're stopped, because of course the hub gear can shift when you're not moving.

I find this latter aspect really good, and I can imagine that with an Alfine-11 hub and the Versa VRS-11 shifters it wouldn't be anywhere near as pleasant because the shift actuation is reversed; you would have to crank the big cable-pull lever repeatedly to get back to a lower gear.

I have been concerned a little about the lack of a gear indicator (it's not like you can look at the chain and tell), but no big deal so far. In motion I've gotten used to the different sounds the hub makes in each gear to know which one I'm in, so it is only at a standstill that you have no indication of the gear. Worst case though you can quickly dump it back to first, then upshift a couple of times to the starting gear of choice. Time will tell more on this.

Handling
Again, this will no doubt become more familiar with time, but it is quite a different experience riding on the hoods or drops. The steering is more more side-to-side than push-pull, and your body weight is more forward on the front end too. So, nothing negative to say - as I said before, blissful ignorance :D The bike is still tracking quite well though, it's certainly no twitchy race bike (like my brother's).

The bars are 46cm according to Deda, though this is outside-outside distance not centre to centre, so should be equivalent to a 44 cm C-C bar. They are generously wide; I could possibly have gone narrower.

Well, that's all for now, any questions please ask! Hope this was informative for you.

Happy trails!
Image

User avatar
silentbutdeadly
Posts: 2294
Joined: Fri Apr 09, 2010 9:52 am
Location: Somewhere flat...

Re: Project: Hub gear drop bar conversion

Postby silentbutdeadly » Fri Jan 17, 2014 1:21 pm

Nifty! Outstanding commuter.

Your stem is definitely too low unless you are a true aero roadie (which you clearly are not). Whilst flipping the current stem is a start, my personal belief is that you should try a 16 degree stem rather than the 7 or 10 degree unit you have. I'd also have gone with a shallower drop and a greater flare in the bars...something like the Zipp Service Course bars suited for CX or a Salsa Cowbell. They cost more but the short drop and flared ends make them...comfy.
Ours is not to reason why...merely to point and giggle

User avatar
MattyK
Posts: 3257
Joined: Fri Oct 01, 2010 1:07 pm
Location: Melbourne

Re: Project: Hub gear drop bar conversion

Postby MattyK » Fri Jan 17, 2014 1:46 pm

Thanks for the feedback. Those bars are about the shortest reach (75mm) and shallowest drop (130mm) you can get. The do flare out somewhat, it's hard to tell in wide-angle photos.

The stem is a 7-degree piece (x 80mm), chosen mostly on the basis of low cost and availability in short length.

Also I have to add: a proper cable cutter is a must-have tool! Can't believe I've done without one til now.

User avatar
MattyK
Posts: 3257
Joined: Fri Oct 01, 2010 1:07 pm
Location: Melbourne

Re: Project: Hub gear drop bar conversion

Postby MattyK » Fri Jan 17, 2014 11:43 pm

Image

I decided to flip the stem tonight (after the photo above), the downward position was fine for my short commute but I can see it being a neck and back strainer on longer rides. The bars were about 90mm below the seat height, flipping the stem raises them about 20mm.

If you look at some of the pics above you can see the front brake cable was already tight, so moving up wasn't going to be easy. It involved stripping back some of the bar tape on the left lever. However this also created a place to mount my bell, which wouldn't fit over the 31.8mm middle section of the bars, so it worked out nicely. I finished the tape with my red electrical tape because a) I had it on hand and b) it breaks up all the black on the front end.

Cockpit shot:
Image

And a demo of the shifters. Shifting at a standstill is of course perfectly safe with a hub gear .

warthog1
Posts: 14397
Joined: Wed Jul 25, 2012 4:40 pm
Location: Bendigo

Re: Project: Hub gear drop bar conversion

Postby warthog1 » Sat Jan 18, 2014 9:09 am

That was a good read, thanks Matt.
That is an about average roadie bar drop. The drops are there for sprinting and high power efforts. Most people spend more time on the hoods.

In the second shot in your above post, a rough guesstimate for correct reach, is how much front hub you can see in front of the bar tops when riding in the drops.
You should be able to see somewhere around half the hub in front of the bars.
Just a rough guide that someone told me once and seems to work for me. :)
Dogs are the best people :wink:

User avatar
MattyK
Posts: 3257
Joined: Fri Oct 01, 2010 1:07 pm
Location: Melbourne

Re: Project: Hub gear drop bar conversion

Postby MattyK » Sat Jan 18, 2014 9:58 am

Thanks. The cockpit photo is just from somewhere vaguely above the bars, not an accurate head position. But I'll see where it ends up and hopefully be out on a slow ride today (kids in the trailer!)

User avatar
find_bruce
Moderator
Moderator
Posts: 10599
Joined: Mon May 09, 2011 8:42 pm
Location: Sydney

Re: Project: Hub gear drop bar conversion

Postby find_bruce » Sat Jan 18, 2014 7:11 pm

I am curious Matty - why did you want to achieve by going to drop bars & do you think you have got there?
Anything you can do, I can do slower

User avatar
MattyK
Posts: 3257
Joined: Fri Oct 01, 2010 1:07 pm
Location: Melbourne

Re: Project: Hub gear drop bar conversion

Postby MattyK » Sat Jan 18, 2014 7:46 pm

Basically for the reasons that everyone lists for drop bars: more hand positions for different conditions or moods, the option of tucking down on the drops or being up on the flats, and if I'm lucky maybe a fraction of extra speed (dreamin'...)

Plus it was a fun project (I'm a tinkerer) and I'm not in a position to buy a complete second bike.

Have I achieved the result I want? Time will tell on that one, too soon to say whether it was a good decision or otherwise, but I'm certainly not unhappy with it :)

User avatar
MattyK
Posts: 3257
Joined: Fri Oct 01, 2010 1:07 pm
Location: Melbourne

Re: Project: Hub gear drop bar conversion

Postby MattyK » Sun Jan 19, 2014 9:46 pm

Out for a ride with the wife and kids today; all really good with the new bars and shifters. I gave the shifter cable a little tweak last night and it didn't miss a shift all ride. The ergonomics with the upper tilt on the stem felt really good.

Having the forward grip/body position on the hoods was great when hauling the trailer up a couple of hills at about 50 rpm. (My gearing is 44T / 20T on the chainring and sprocket, which is great for my commute, but gives a relatively tall first gear - about 39" - that doesn't suit pulling an extra 50kg of kids and trailer...)

I even managed to get on the drops down the hills, not that it makes much difference when towing a parachute. The brakes performed excellently with the extra load.

A new 16T sprocket turned up in the mail; the old one is getting a little chewed out. $16 shipped from Moruya Bicycles; I'll put it on when the new bottom bracket turns up (hopefully next week). Heading down to Torquay next weekend so hopefully will get a chance to try some longer rides.

User avatar
MattyK
Posts: 3257
Joined: Fri Oct 01, 2010 1:07 pm
Location: Melbourne

Re: Project: Hub gear drop bar conversion

Postby MattyK » Tue Jan 21, 2014 11:58 am

warthog1 wrote:...a rough guesstimate for correct reach, is how much front hub you can see in front of the bar tops when riding in the drops.
You should be able to see somewhere around half the hub in front of the bars.
Just a rough guide that someone told me once and seems to work for me. :)
I'm seeing the front hub fully clear in front of the bars whilst on the hoods. Not feeling at all cramped though.

With the flat bar and a 110mm stem, the bars and hub were in line with my head. But my hands are out further forward now on the hoods...

warthog1
Posts: 14397
Joined: Wed Jul 25, 2012 4:40 pm
Location: Bendigo

Re: Project: Hub gear drop bar conversion

Postby warthog1 » Tue Jan 21, 2014 4:50 pm

If you are comfortable and not banging knees on elbows or otherwise cramped all good.
I'd probably try a 10 mm longer stem if that was what I was seeing in the drops. I have a selection of stem lengths from my experiments with position on 3 bikes so it doesn't cost anything.
I still occasionally stuff around with my position now. After suffering some nether region chafing recently I have just moved my saddle forward on the rails about 5mm and it seems a bit better.
I can't remember how much hub I can see in front of the bars but I'm comfortable. It's only a rough guide.
Dogs are the best people :wink:

User avatar
MattyK
Posts: 3257
Joined: Fri Oct 01, 2010 1:07 pm
Location: Melbourne

Re: Project: Hub gear drop bar conversion

Postby MattyK » Mon Sep 29, 2014 4:20 pm

Update: the shifter cable suddenly bound up on the commute this morning. The day that all the local bike shops are closed... So I'll be riding home in 5th, yay singlespeed! Since installation that's about 2500km. Bit disappointed in that, as the flat bar shifter cable ran perfectly for several years.

There is obvious fraying of the inner just as the cable enters the shifter, and it's not running smoothly through the outer housing. The lever and the hub both seem to be working fine.

The cable is of course not a standard Shimano type one, it has a smaller head (Campagnolo type I believe). Hopefully in stock at a local shop, would rather not wait for shipping.

Who is online

Users browsing this forum: No registered users