Home baked bent

User avatar
Freddyflatfoot
Posts: 237
Joined: Mon Jun 30, 2008 8:50 am
Location: Ballarat, Victoria
Contact:

Postby Freddyflatfoot » Thu Nov 27, 2008 4:19 pm

If you want to persevere with the mesh and eyelets, you can try this - make a hem on each side, like Poiter suggested, and then add the eyelets, make the width wide enough to go over the sides, and then use elastic rope across the back of the seat to tension and tie it off.
I used this method on my first trike, and seems to be working quite well! Trike has over 3800k's clocked up.
Here's a pic, but the trike has been modified somewhat. I had to add some extra material, as the material shortened when I tensioned it, so it might pay to make it longer than what you need.
Image

Ok here's a more up to date pic.

Image
Cheers!
Rob
---------------------------------------------------
Homebuilt trike, with electric assist
26"/20" trike, "Goanna"
SWB recumbent, 700C/451 , "Kookaburra", homebuilt.
FWD project (Cyclone).
Optima Raptor

User avatar
vic
Posts: 130
Joined: Tue Mar 18, 2008 8:24 pm
Location: Bowning (Yass) NSW

Postby vic » Fri Nov 28, 2008 9:09 pm

[/quote]Thought you would have recognised the Red Lizard as you have ridden it.
Athol says "Hullo"[/quote]

Ah...but of course! Didn't make the connection, and of course I was too busy watching the road flash by and not the bike!
You know, it is this very bike that made me change my preference from a tadpole to a two wheeler. When I discovered how eeeeaaaasy it was to ride, I realised I didn't have to go to the trouble of stub axles and ackerman dohickies. Return greetings to Athol. :D

User avatar
Uba Tracker
Posts: 265
Joined: Sun Jan 13, 2008 9:50 pm
Location: Toowoomba, Qld

Postby Uba Tracker » Sat Nov 29, 2008 8:29 am

Hi Vic, nice job on the build mate I particularly like the flat attitude of the handle bars that's a very 'natural' position. These pics show how Bacchetta fix the mesh onto their Recurve seat frame, the anti slip pocket at the top of the mesh is an idea that you want to 'borrow'. The wires that run inside the pockets are 10 gauge or 3.25mm. they could easily be 2.5mm if a high tensile wire was used though.
Image
Image
Image
Image

cheers

Harry
A bad day's riding beats a good day's work everytime

User avatar
vic
Posts: 130
Joined: Tue Mar 18, 2008 8:24 pm
Location: Bowning (Yass) NSW

Postby vic » Sat Nov 29, 2008 1:57 pm

Harry, thanks for the feedback, and the idea on how to stop the mesh from slipping. I'll try that. Your job looks very profesh!!
Freddy, thanks for that, having had two goes with the eyelets and finding them pulling out, despite my sewing reinforcement, I might go with Poiter's idea. You are obviously better at it than me.

Have got the cable ties, and will have a go this weekend. Pics to come.

Much appreciated to all for the ideas and pics so far. :P

User avatar
vic
Posts: 130
Joined: Tue Mar 18, 2008 8:24 pm
Location: Bowning (Yass) NSW

Postby vic » Sat Nov 29, 2008 5:56 pm

Poiter, when you say:
"Sew a seam/hem down both sides about 20mm in and open at each end.
Turn under and sew the loose edge. "

Can you explain what that means? My interpretation is that I end up with 2 tunnels on each side to put the brake cable through. Is that right?

User avatar
vic
Posts: 130
Joined: Tue Mar 18, 2008 8:24 pm
Location: Bowning (Yass) NSW

Postby vic » Sat Nov 29, 2008 6:32 pm

Poiter, this is sort of what I interpret, is that right? It seems to create two tunnels each side. Image

User avatar
vic
Posts: 130
Joined: Tue Mar 18, 2008 8:24 pm
Location: Bowning (Yass) NSW

Postby vic » Sun Nov 30, 2008 8:22 pm

I removed the cable steering system today, thinking it wouldn't take me long to install a rod. After many hours and two major attempts, I found it harder than I expected. I'm having trouble getting the travel and clearing the pedals/legs. I'd really appreciate some coaching on this, maybe some close up pics? I'm so hanging out to get it on the road. Thanks!

User avatar
Poiter
Posts: 246
Joined: Wed Mar 26, 2008 7:18 pm
Location: Canberra

Mesh seats

Postby Poiter » Sun Nov 30, 2008 9:14 pm

Vic

By turning under, I mean to sew one line of stitching in from the edge and then fold the loose edge under and then sew another line of stitching. So there will be a pair of tram tracks along each edge.
When I sew a new seat mesh, I follow this routine.
- edge to length turn under and stitch again.
- a wide seam here is good to eiminate pressure points
- so top and bottom edges now sewn
- then work out width and add say 50mm each side for cut
- fold over the 50mm each side
- sew in from edge at say 25-30mm all the way from top edge to bottom
- turn under the extra 20-25mm then sew all the top to bottom to pick up teh turned under edge.
- you should then have open ended seams down each side about into which the brake cable outer or whatever can be threaded

Hope that makes seme sense.

Pete

John Lewis
Posts: 1391
Joined: Tue Oct 02, 2007 7:12 pm
Location: Albany. 400km South of Perth

Postby John Lewis » Mon Dec 01, 2008 2:08 pm

Hi vic,

This is my Euromesh clone seat but you should be able to see the seams here. I fold over and stitch then fold that bit in half and stitch. There are 4 layers. The rod or cable outer goes up the middle so there are 2 layers around it.

I used eyelets on one seat and they pulled. this current method is far better and won't pull out.

John Lewis

Image
Image
Image

John Lewis
Posts: 1391
Joined: Tue Oct 02, 2007 7:12 pm
Location: Albany. 400km South of Perth

Postby John Lewis » Mon Dec 01, 2008 2:30 pm

vic wrote:I removed the cable steering system today, thinking it wouldn't take me long to install a rod. After many hours and two major attempts, I found it harder than I expected. I'm having trouble getting the travel and clearing the pedals/legs. I'd really appreciate some coaching on this, maybe some close up pics? I'm so hanging out to get it on the road. Thanks!
Vic my wolf has rod steering. The tab is out about 50mm from centre on the handlebar end and likewise at the fork. The fork tab is welded on just below the crown race. Sticks out straight sideways. I have so much turn it's almost 90 degrees.
You may get some idea here. I'll take a couple of piccies and post shortly.
John Lewis

http://www.atomiczombie.com/videos/dwmod1/dwmod1.htm

John Lewis
Posts: 1391
Joined: Tue Oct 02, 2007 7:12 pm
Location: Albany. 400km South of Perth

Steering rod pics

Postby John Lewis » Mon Dec 01, 2008 3:50 pm

Here are some shots of my steering setup.
Image

Image

Image

Image

John Lewis

User avatar
vic
Posts: 130
Joined: Tue Mar 18, 2008 8:24 pm
Location: Bowning (Yass) NSW

Postby vic » Mon Dec 01, 2008 5:50 pm

John, thanks so much for going to the effort of posting the pics. You have given me food for thought for Mk2.
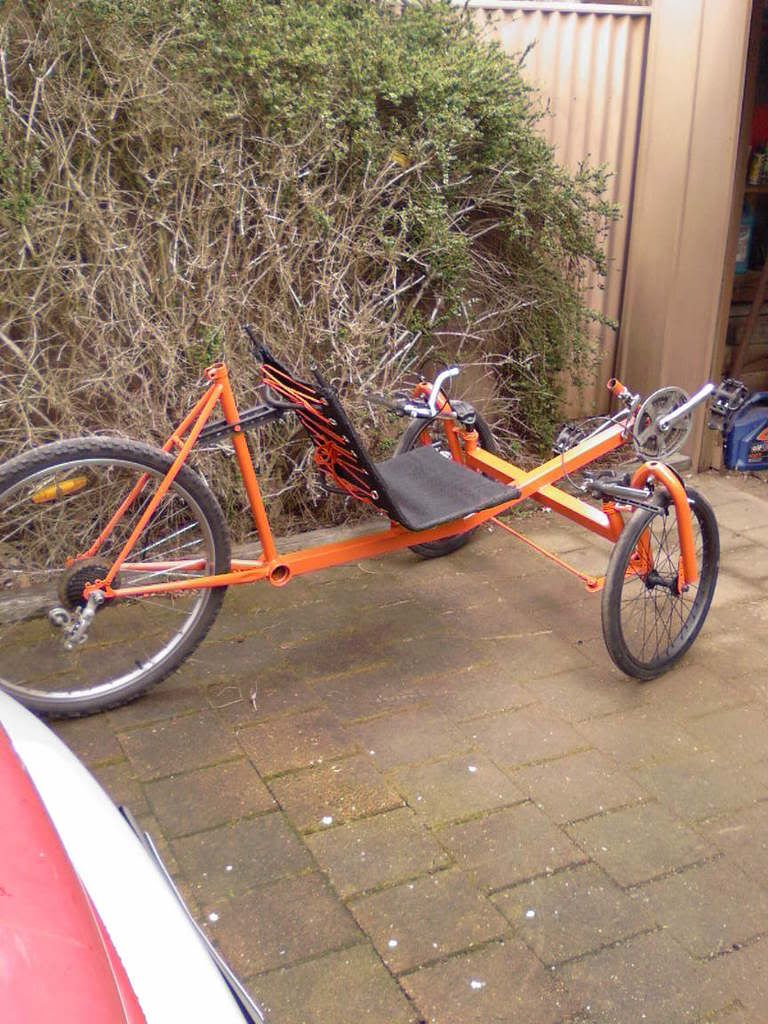
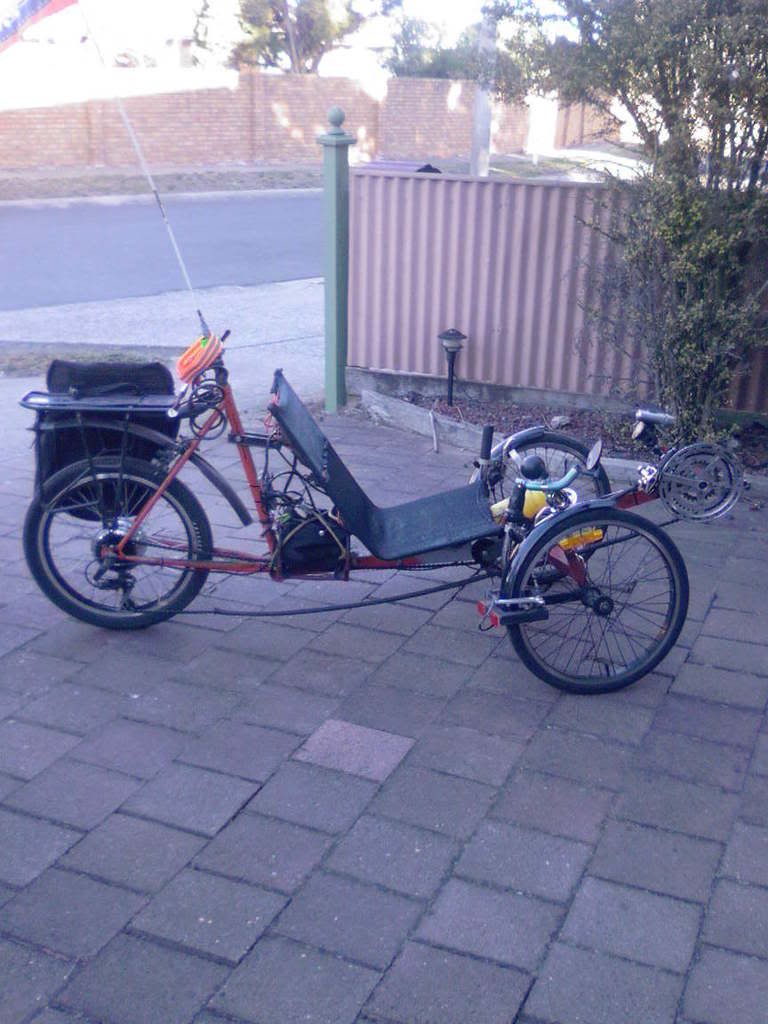
Due to the fact I used street bike parts, it limited the clearance between the frame and the pedals, so my turning circle isn't great. However, I can still do a U turn albeit a bigger than preferable size. Your website is most informative. Thanks again.

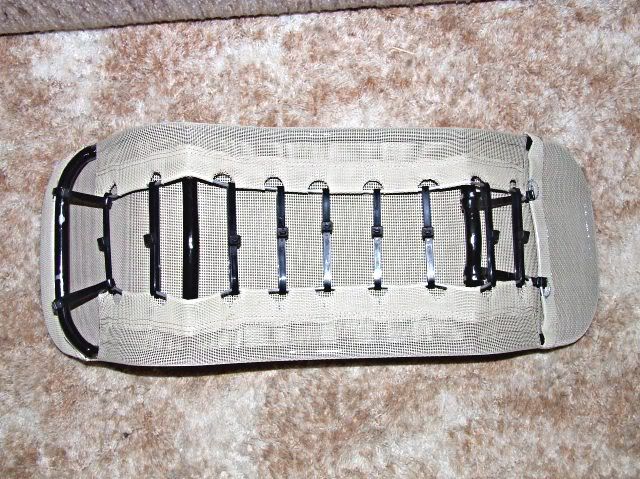
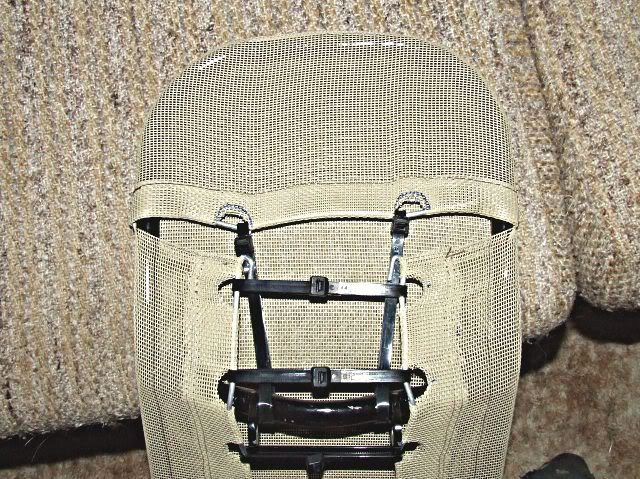
Peter, thanks for your instructions, they were much clearer. And the seat works a treat!!
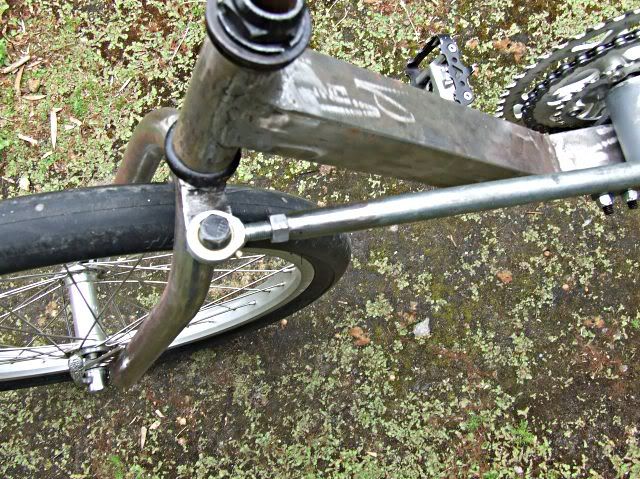
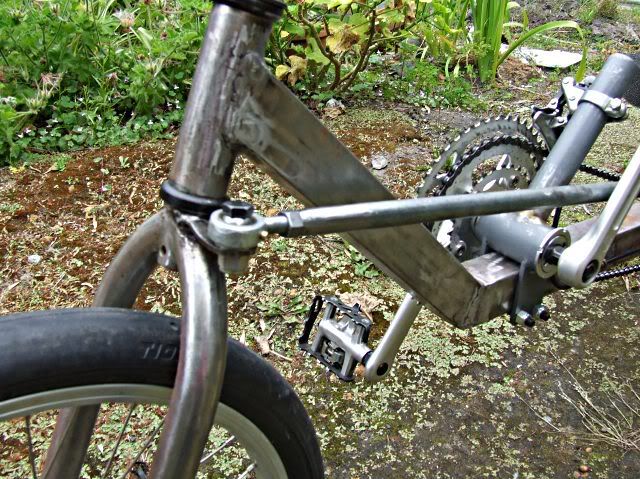
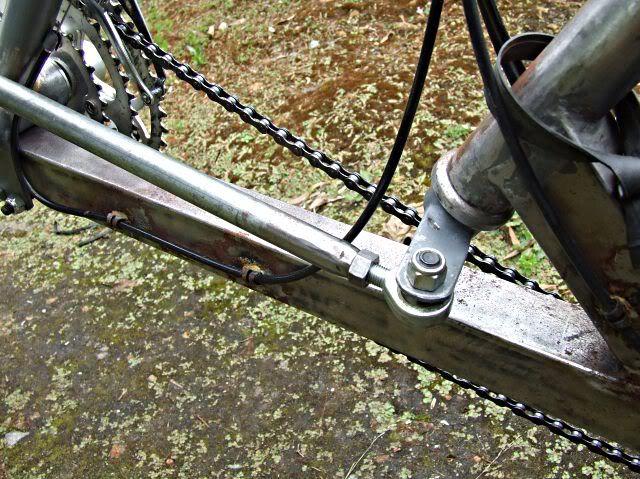
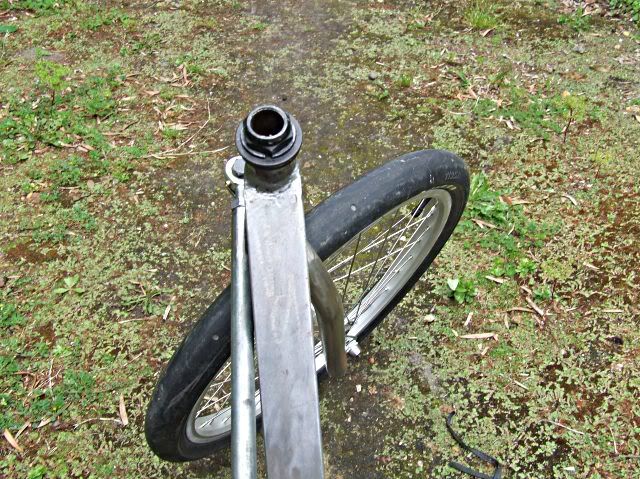
Here's a few pics:
Image
Do you like the kneecapper?
Image
Image
I tried to include one of the seat, but for some reason the image is highly pixelated. It was taken at the same time as the other three, so can't explain. Will have another go later in the week.

It needs a few refinements, like front brakes, tie rod ends.
Speaking of which can anyone tell me where I can get a couple of tie rod ends?
Thanks!

User avatar
Freddyflatfoot
Posts: 237
Joined: Mon Jun 30, 2008 8:50 am
Location: Ballarat, Victoria
Contact:

Postby Freddyflatfoot » Mon Dec 01, 2008 6:41 pm

I usually get my rod ends from the local bearing supplies.
Cheers!
Rob
---------------------------------------------------
Homebuilt trike, with electric assist
26"/20" trike, "Goanna"
SWB recumbent, 700C/451 , "Kookaburra", homebuilt.
FWD project (Cyclone).
Optima Raptor

John Lewis
Posts: 1391
Joined: Tue Oct 02, 2007 7:12 pm
Location: Albany. 400km South of Perth

Rod end substitute

Postby John Lewis » Mon Dec 01, 2008 8:27 pm

Vic,
Have a look at this site.
http://www.packratworkshop.com/trike1.htm

Scroll down and you will find a home brew rod end substitute that might save some $$. Don't know how it would be long term but worth a try.

I, like Freddy, get them from the local bearing place.

John Lewis

User avatar
vic
Posts: 130
Joined: Tue Mar 18, 2008 8:24 pm
Location: Bowning (Yass) NSW

Postby vic » Tue Dec 02, 2008 8:00 pm

Thanks for that guys. I'll buy a couple. With the money I saved on scrounging for the rest (apart from the mesh for the seat), I'm happy to fork out for the real items, and not concern myself about the quality of my welding for such a crucial item. Cheers.

User avatar
vic
Posts: 130
Joined: Tue Mar 18, 2008 8:24 pm
Location: Bowning (Yass) NSW

Postby vic » Tue Dec 02, 2008 8:08 pm

Ok, here's a thumbnail of the seat. Don't bother clicking it, as it will only pixelate on full size. Maddeningly, it comes up fine on my explorer. Oh well, hope this gives you an idea. It looks soooo much better, is more comfortable, and more durable than the previous one. Thanks to everyone for your support and advice. I'm having a ball riding it. Cheers

Image

User avatar
vic
Posts: 130
Joined: Tue Mar 18, 2008 8:24 pm
Location: Bowning (Yass) NSW

Postby vic » Wed Dec 03, 2008 1:29 pm

vic wrote:Thanks for that guys. I'll buy a couple. With the money I saved on scrounging for the rest (apart from the mesh for the seat), I'm happy to fork out for the real items, and not concern myself about the quality of my welding for such a crucial item. Cheers.
I take it back. :oops: I naively went to the local bearing suppliers. The guy was very patient with a non techno savvy guy like me, and told me I could have the rod ends first thing in the morning...for $75 for both!!!
Given so far that the the bike has cost me for the price of welding rods and the seat mesh, I baulked.

The helpful man offered me the cheaper Asian version for $40 for both, however, it was likely they could become available in the new year!!!

I went to the local Junk Shop and found a folding golf club buggy with...laterally directional rod ends!! Not as swish as the real thing, but for $5 for the whole thing, I think I'll have a go at putting something together. Cheers.

User avatar
Freddyflatfoot
Posts: 237
Joined: Mon Jun 30, 2008 8:50 am
Location: Ballarat, Victoria
Contact:

Rod ends?

Postby Freddyflatfoot » Wed Dec 03, 2008 1:46 pm

Hope the ones from the buggy work out for you.
Bummer on the price though, $75?, what a rip-off!
I'm pretty sure all the ones I have bought were all less than $20 ea.
Cheers!
Rob
---------------------------------------------------
Homebuilt trike, with electric assist
26"/20" trike, "Goanna"
SWB recumbent, 700C/451 , "Kookaburra", homebuilt.
FWD project (Cyclone).
Optima Raptor

John Lewis
Posts: 1391
Joined: Tue Oct 02, 2007 7:12 pm
Location: Albany. 400km South of Perth

Postby John Lewis » Thu Dec 04, 2008 9:28 pm

vic wrote:
vic wrote:Thanks for that guys. I'll buy a couple. With the money I saved on scrounging for the rest (apart from the mesh for the seat), I'm happy to fork out for the real items, and not concern myself about the quality of my welding for such a crucial item. Cheers.
I take it back. :oops: I naively went to the local bearing suppliers. The guy was very patient with a non techno savvy guy like me, and told me I could have the rod ends first thing in the morning...for $75 for both!!!

Hi Vic,

Greenspeed have them in 1/4 or 5/16 unf for $15 each in latest catalog.

John Lewis

User avatar
vic
Posts: 130
Joined: Tue Mar 18, 2008 8:24 pm
Location: Bowning (Yass) NSW

Postby vic » Thu Dec 04, 2008 9:34 pm

Ok John, thanks for that. I did go to their website, but must have missed it. I'll follow that up. :)

User avatar
vic
Posts: 130
Joined: Tue Mar 18, 2008 8:24 pm
Location: Bowning (Yass) NSW

Postby vic » Thu Dec 04, 2008 9:55 pm

John, just had a look at their 08-09 catalogue. Can't seem to find any reference to rod ends there. Could you post a link please?

User avatar
chuckchunder
Posts: 404
Joined: Sun Mar 09, 2008 12:18 pm

Postby chuckchunder » Fri Dec 05, 2008 7:55 am

vic wrote:John, just had a look at their 08-09 catalogue. Can't seem to find any reference to rod ends there. Could you post a link please?
John's referring to their "parts" pricelist you can download from here

rod-ends are listed after "Axles, Kingpins etc" at the top of Page 2

cheers

glen
"We have thousands of miles of cycling infrastructure, we just need to get the cars off them....." US advocate

User avatar
toolonglegs
Posts: 15463
Joined: Fri Jun 29, 2007 7:49 pm
Location: Somewhere with padded walls and really big hills!

Postby toolonglegs » Fri Dec 05, 2008 8:04 am

Vic..tip for your welding.
Preparation is the most important part of welding...clean all the paint off and sand back really well before you start welding.You can see on the downtube where you have just welded straight onto the paint.
Still looks like you are having fun!.

User avatar
vic
Posts: 130
Joined: Tue Mar 18, 2008 8:24 pm
Location: Bowning (Yass) NSW

Postby vic » Fri Dec 05, 2008 8:05 am

I had been to that page. I clicked on your link. After axles and kingpins is the brake category. I just can't seem to find the rod ends. I can't see any parts called that, or priced at $15. Even using the 'find' tool on firefox doesn't show rod ends. Am I blind? :?

User avatar
vic
Posts: 130
Joined: Tue Mar 18, 2008 8:24 pm
Location: Bowning (Yass) NSW

Postby vic » Fri Dec 05, 2008 8:10 am

toolonglegs wrote:Vic..tip for your welding.
Preparation is the most important part of welding...clean all the paint off and sand back really well before you start welding.You can see on the downtube where you have just welded straight onto the paint.
Still looks like you are having fun!.
Thanks for that. I was sanding back the starting point of welding. I found that the heat of the welding would burn off the paint as I approached it. But you are right, it makes sense to have all of the paint and grease off before welding. I will keep that in mind next time. And you are right, I was having a ball!

Who is online

Users browsing this forum: No registered users