
I'm going to document my bike build here. I've built most of it already so this will mostly be recollection. I've got a few pictures of the process along the way and I'll try and remember any tips or tricks that helped me through.
The planning of the build has been going for a while in http://www.bicycles.net.au/forums/viewt ... =9&t=55414, so have a look there for the thought process that went into the build decisions I made. But a quick recap is I wanted a new drop bar commuter running Campy and disc brakes, to replace my existing Cell SS-300 flat bar.
I am glad I've spent 6 months and over 2000kms on a $900 flat bar as it gave me chance to ride a decent bike and work out what I wanted before dropping much more money on this build.
First step...install headset and forks!
Campagnolo Athena with Discs Commuter Build
-
Reman
- Posts: 242
- Joined: Mon May 28, 2012 8:15 pm
- Location: Inner West, Sydney
-
Reman
- Posts: 242
- Joined: Mon May 28, 2012 8:15 pm
- Location: Inner West, Sydney
Re: Campagnolo Athena with Discs Commuter Build
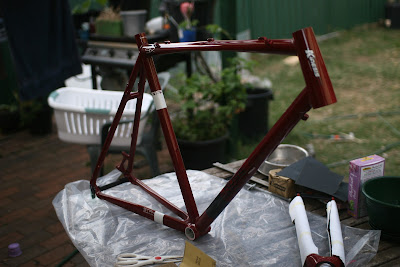
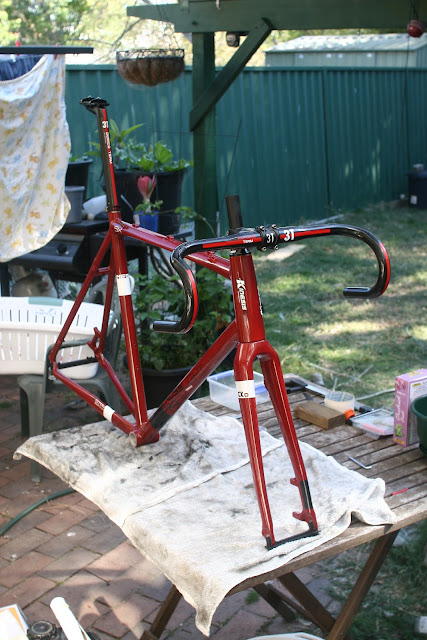
Here is the frame, a Kinesis Crosslight Pro6
Started with some frame prep, I bought some wet/dry 120 and 400 paper to use to face the bottom bracket, top and bottom of head tube and the disc calliper tabs. I started with the 120 and wrapped it around a 2x1 off cut. The 120 is pretty rough and took the layer of paint off pretty quick so I went pretty slowly and gently. Once finished the faces were clear of paint but still a little scratchy. Taking to it with the 400 smoothed it out nicely.
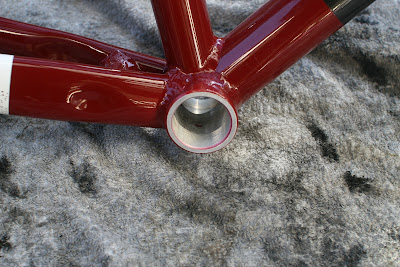

The headset is a 1 1/8" to 1 1/2" threadless from FSA that came with the frame. Having done some research I bought a 200mm bolt and some washers to make a DIY headset press, thinking I could use some more timber off cuts to press the actual bearings in. Turns out the headset is actually a drop in, so no pressing required!
Only problem was the crown race still need to be seated. I had a square tube off cut which matched the diameter of the bottom of the steerer tube, only problem was that at about 10cm long it was about 15cm shorter than the length of the steerer tube. Couldn't be bothered waiting so I thought it would be ok if I just whacked on the corners with my hammer and keep it square it would be fine. I cut some cardboard "washers" to go between the square tubing and the crown race to soften the blow and started hammering away. I started getting a bit worried when I was increasing the amount of force but eventually the race started slipping down the last centimetre to the top of the forks. It went down a little unevenly but it got there in the end!
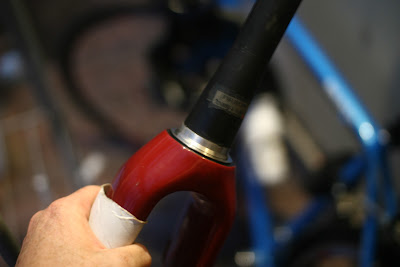
It was pretty tricky holding the fork, bottom bearing, top bearing, split clip, top cover and stem altogether whilst tightening the stem to get it all to stick together. Had to make sure the fork was tight up against the bottom of the head tube because when the split clip is inserted into the top bearing it doesn't move very easily on the carbon steerer tube.
Added the handle bars and seat post and called it a night.

Result so far...
Started with some frame prep, I bought some wet/dry 120 and 400 paper to use to face the bottom bracket, top and bottom of head tube and the disc calliper tabs. I started with the 120 and wrapped it around a 2x1 off cut. The 120 is pretty rough and took the layer of paint off pretty quick so I went pretty slowly and gently. Once finished the faces were clear of paint but still a little scratchy. Taking to it with the 400 smoothed it out nicely.
The headset is a 1 1/8" to 1 1/2" threadless from FSA that came with the frame. Having done some research I bought a 200mm bolt and some washers to make a DIY headset press, thinking I could use some more timber off cuts to press the actual bearings in. Turns out the headset is actually a drop in, so no pressing required!
Only problem was the crown race still need to be seated. I had a square tube off cut which matched the diameter of the bottom of the steerer tube, only problem was that at about 10cm long it was about 15cm shorter than the length of the steerer tube. Couldn't be bothered waiting so I thought it would be ok if I just whacked on the corners with my hammer and keep it square it would be fine. I cut some cardboard "washers" to go between the square tubing and the crown race to soften the blow and started hammering away. I started getting a bit worried when I was increasing the amount of force but eventually the race started slipping down the last centimetre to the top of the forks. It went down a little unevenly but it got there in the end!
It was pretty tricky holding the fork, bottom bearing, top bearing, split clip, top cover and stem altogether whilst tightening the stem to get it all to stick together. Had to make sure the fork was tight up against the bottom of the head tube because when the split clip is inserted into the top bearing it doesn't move very easily on the carbon steerer tube.
Added the handle bars and seat post and called it a night.
Result so far...
-
JustJames

- Posts: 501
- Joined: Sun Feb 06, 2011 1:50 am
Re: Campagnolo Athena with Discs Commuter Build
Bravo!
Watching with interest...
Watching with interest...
My bike blog. Long on rumination, rambling and opinion. Why let facts ruin everything?
http://pedallingcharm.wordpress.com/" onclick="window.open(this.href);return false;
http://pedallingcharm.wordpress.com/" onclick="window.open(this.href);return false;
-
simonn

- Posts: 3763
- Joined: Thu Jan 31, 2008 11:46 am
- Location: Sydney
Re: Campagnolo Athena with Discs Commuter Build
Which rear hub? Campy with disc.... would like.
-
MichaelB

- Posts: 14849
- Joined: Tue Feb 20, 2007 9:29 am
- Location: Adelaide, South Australia
Re: Campagnolo Athena with Discs Commuter Build
Reds match well 
looking good so far !!
looking good so far !!
-
Jean

- Posts: 1752
- Joined: Wed Feb 27, 2008 9:26 am
- Location: Canberra
Re: Campagnolo Athena with Discs Commuter Build
-
Ozkaban
- Posts: 1101
- Joined: Wed Sep 07, 2011 1:18 pm
- Location: Sydney
Re: Campagnolo Athena with Discs Commuter Build
Loving the build. Where did you buy the frame from?
-
Reman
- Posts: 242
- Joined: Mon May 28, 2012 8:15 pm
- Location: Inner West, Sydney
Re: Campagnolo Athena with Discs Commuter Build
Hubs are from BikeHubStore, they were a special order with the standard freehub swapped to Campy.simonn wrote:Which rear hub? Campy with disc.... would like.
If you didnt want to build your own it looks like there is a Fulcrum conversion kit which doesnt look too bad.
-
Reman
- Posts: 242
- Joined: Mon May 28, 2012 8:15 pm
- Location: Inner West, Sydney
Re: Campagnolo Athena with Discs Commuter Build
Frame was from Shiny Bikes in the UK, got it here for a smidge under $600 all up. Picked up most of the group set from them as well as the prices were excellent.Ozkaban wrote:Loving the build. Where did you buy the frame from?
-
Reman
- Posts: 242
- Joined: Mon May 28, 2012 8:15 pm
- Location: Inner West, Sydney
Re: Campagnolo Athena with Discs Commuter Build
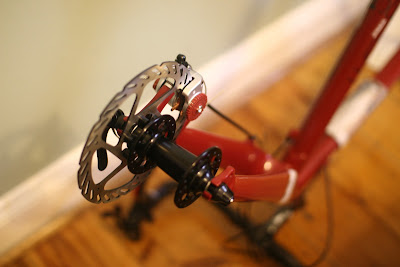
Because I could, I decided I would get the hubs out and put them in to see how they looked. The quick release skewers are the ones I got from BHS and it doesn't take much turning of the nut to go from easy to too-hard to close.
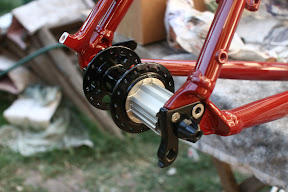
The BHS hubs are cartridge bearings as opposed to all my other hubs, which are cup-and-cone. So I don't believe there is any adjustments you can make, also hard to tell if they need more grease, if anyone has any tips I would love to hear. I always find it interesting how little the hubs freely spin by themselves, but as soon as you add a rim and spokes they will turn forever!
Ok, back to the build.
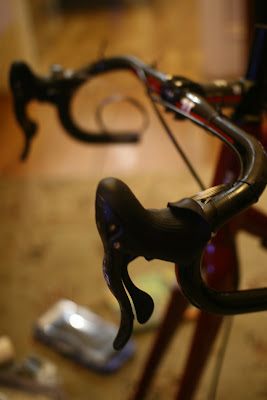
Next to go on were the Campy Chorus levers, I've never really ridden a drop bar before but pulling them out and having a feel I think they will be excellent. I definitely think the thumb lever is a great way to go and I think it more closely mimics the actions of flat bar shifters.
Having read online the horrors people have had with threading the cables through the levers I was saved the job with the gear cables already pre-threaded! No losing little o-rings, no hours spent trying to make it come out the right little passage (front of bar or back of bar). But this brings me to another discovery, the levers come with a full set of cables! I went and bought a brand new set of Campy Ultrashift cables and I didn't even need them (or so I thought).
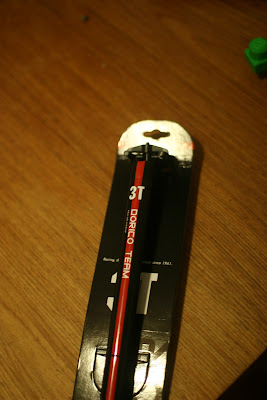
There is a BikeRadar article on installing Campy levers and this was invaluable, I suggest that anyone who is going to install them should have a read. Part of that article shows someone with a tape measure measuring the distance from the end of the drop bars to the lever clamp, so you can get them even on both sides, pretty sensible. The 3T bars I got, Rotundo Team, were one step ahead and already have markings on the back, making the even positioning of the levers very easy.
The biggest problem though is that the clamp is stupid! You have to roll back the rubber outer to access a T25 torx bolt to undo the clamp then again to do it up to 10Nm. The natural thing is to roll the rubber from the clamp back towards the front, which you feel like you are going to rip as you wrestle it over the thumb levers.
If you keep rolling that forward you expose the torx bolt. The problem is that then the rubber outer blocks access to the torx bolt and you can only get at it at an angle. I stripped one torx bit and a fair bit of the torx bolt head trying to get it up to the specced torque. Re-reading the BikeRadar article it says to roll the rubber from the front to back. Thought I would give it a try, low and behold once you wrestle it off the other way you can get to the torx screw pretty much head on.
On a personal note, torx screws suck so bady, they are way too easy to strip before getting to the spec'd torque. The rear derailleur had the same problem as the levers. Why Campy, why!?!?!
(imagine you can't see brake cables )
)
The BHS hubs are cartridge bearings as opposed to all my other hubs, which are cup-and-cone. So I don't believe there is any adjustments you can make, also hard to tell if they need more grease, if anyone has any tips I would love to hear. I always find it interesting how little the hubs freely spin by themselves, but as soon as you add a rim and spokes they will turn forever!
Ok, back to the build.
Next to go on were the Campy Chorus levers, I've never really ridden a drop bar before but pulling them out and having a feel I think they will be excellent. I definitely think the thumb lever is a great way to go and I think it more closely mimics the actions of flat bar shifters.
Having read online the horrors people have had with threading the cables through the levers I was saved the job with the gear cables already pre-threaded! No losing little o-rings, no hours spent trying to make it come out the right little passage (front of bar or back of bar). But this brings me to another discovery, the levers come with a full set of cables! I went and bought a brand new set of Campy Ultrashift cables and I didn't even need them (or so I thought).
There is a BikeRadar article on installing Campy levers and this was invaluable, I suggest that anyone who is going to install them should have a read. Part of that article shows someone with a tape measure measuring the distance from the end of the drop bars to the lever clamp, so you can get them even on both sides, pretty sensible. The 3T bars I got, Rotundo Team, were one step ahead and already have markings on the back, making the even positioning of the levers very easy.
The biggest problem though is that the clamp is stupid! You have to roll back the rubber outer to access a T25 torx bolt to undo the clamp then again to do it up to 10Nm. The natural thing is to roll the rubber from the clamp back towards the front, which you feel like you are going to rip as you wrestle it over the thumb levers.
If you keep rolling that forward you expose the torx bolt. The problem is that then the rubber outer blocks access to the torx bolt and you can only get at it at an angle. I stripped one torx bit and a fair bit of the torx bolt head trying to get it up to the specced torque. Re-reading the BikeRadar article it says to roll the rubber from the front to back. Thought I would give it a try, low and behold once you wrestle it off the other way you can get to the torx screw pretty much head on.
On a personal note, torx screws suck so bady, they are way too easy to strip before getting to the spec'd torque. The rear derailleur had the same problem as the levers. Why Campy, why!?!?!
(imagine you can't see brake cables
-
Reman
- Posts: 242
- Joined: Mon May 28, 2012 8:15 pm
- Location: Inner West, Sydney
Re: Campagnolo Athena with Discs Commuter Build
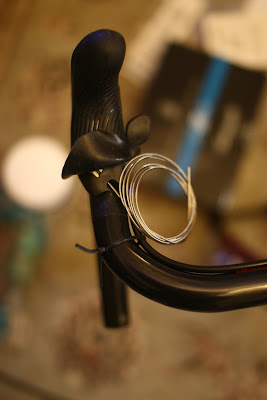
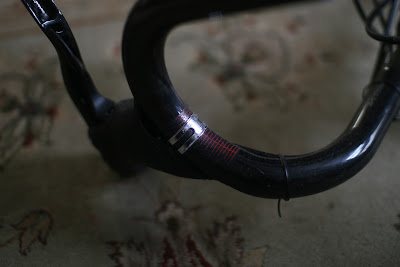
As an addendum to the previous post, I've taken some pictures to illustrate access to the lever torx screw and the markings on the back of the bars.
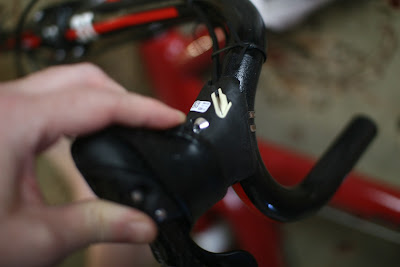
Here is what it looks like when you roll the lever hood from the bars back, you can see it's very difficult to access to screw straight on, the rolled up hood gets in the way and forces you to come in at an angle. Trying to get even close to the recommended torque is an exercise in futility.
However if you roll the hood from the front towards the bars you can get nice clear access to the screw.

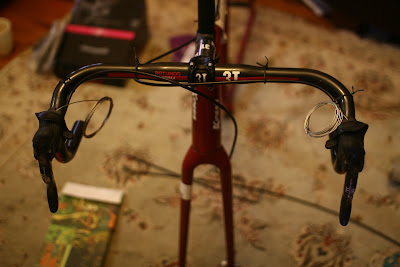
The other thing I mentioned was the markings on the back of the 3T bar to assist with getting the levers level with each other, extremely useful.
Here is what it looks like when you roll the lever hood from the bars back, you can see it's very difficult to access to screw straight on, the rolled up hood gets in the way and forces you to come in at an angle. Trying to get even close to the recommended torque is an exercise in futility.
However if you roll the hood from the front towards the bars you can get nice clear access to the screw.
The other thing I mentioned was the markings on the back of the 3T bar to assist with getting the levers level with each other, extremely useful.
-
ldrcycles

- Posts: 9594
- Joined: Thu Oct 28, 2010 3:19 pm
- Location: Kin Kin, Queensland
Re: Campagnolo Athena with Discs Commuter Build
That looks GOOOODReman wrote:
And i hate Torx bolts too
-
AndrewBurns
- Posts: 996
- Joined: Sun Oct 09, 2011 2:36 pm
Re: Campagnolo Athena with Discs Commuter Build
Fantastic looking frame, bars and seatpost combo I have to say. It's gong to be a wonderful ride I think!
-
Reman
- Posts: 242
- Joined: Mon May 28, 2012 8:15 pm
- Location: Inner West, Sydney
Re: Campagnolo Athena with Discs Commuter Build
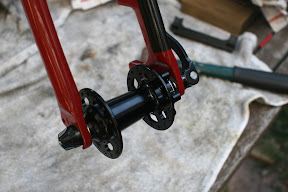
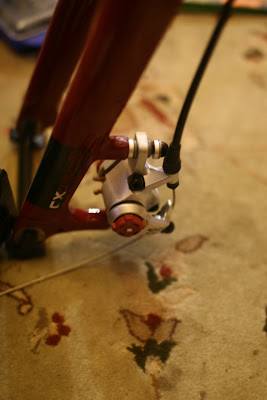
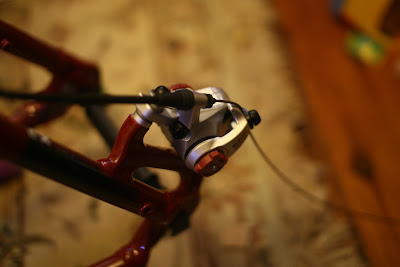
Next up was installing the brake cables and the Avid BB7s. Started off with the front brakes cos I thought that would be easier.
Began with the callipers, the BB7s come with the 0mm offset side-mount already attached. The frame has post-mount, the callipers can be screwed directly into the frame, so didn't need them and took them off. I took the screw and all the washers off to give them a good grease before putting them on the bike. The washers are sort-of ball and socket, similar to v-brake blocks and allow a straight alignment with the rotors. Attached the callipers to the bike, leaving them loose.
You insert the brake cable into the shifters from the front after pulling the brake lever in. It's actually quite tricky trying to thread it through, it took me a good 2 or 3 minutes of jiggling it around inside the shifter housing where you can't really see. You jiggle and jiggle and suddenly it hits the right hole and it threads through and comes out the back of the shifter.
On a normal road bike with canti brakes the front brake outer doesn't have to go very far, but for a disk the outer goes all the way from the lever to the boot on the disc brake lever. There was a length of brake cable outer that was pretty close, slightly too long but I thought I would wait to cut it until I was much more sure of the length. Easier to shorten, impossible to lengthen!
Ferrules aren't required at either end of the brake outer. The slide directly into the back of the shifter and at the other end they go directly into the rubber boot on the brake lever arm.
To hold the outer in place temporarily I used some cable ties. The forks (and frame) take hydraulic brake cables as well and have cable guides that you can tie the cable too. From pics online of other bikes it looks like you should be able to get some plastic "c" clips to hold the cable on, but I couldn't find anything at any of the online stores so it looks like plastic zip ties will need to be used.
Then it was time for the rear brake, JustJames if you are reading you will probably know what happened next
Threaded the rear brake cable, ran it over the frame and it managed to make it about 1/2 way down the seat stay Duh, canti road bikes only need the cable to reach that far! Also, as they also tend to be stopped along the frame there was no outer long enough to go all the way from the levers to the calliper. Next day headed to Clarence St Cyclery where they were able to fix me up with 2m of cable and housing. So all was good with the brakes.
I added to rotors to the hubs then set about setting up the pads. The instructions that come with the BB7s are pretty easy to follow. You turn the inner and outer red adjuster dials to clamp the rotor, this sets the pads parallel to the rotor. Then the screws attaching the calliper to the frame are done up tight. Then you back off the pads using the adjuster dials until they don't rub on the rotor, voila discs setup, super easy!
Began with the callipers, the BB7s come with the 0mm offset side-mount already attached. The frame has post-mount, the callipers can be screwed directly into the frame, so didn't need them and took them off. I took the screw and all the washers off to give them a good grease before putting them on the bike. The washers are sort-of ball and socket, similar to v-brake blocks and allow a straight alignment with the rotors. Attached the callipers to the bike, leaving them loose.
You insert the brake cable into the shifters from the front after pulling the brake lever in. It's actually quite tricky trying to thread it through, it took me a good 2 or 3 minutes of jiggling it around inside the shifter housing where you can't really see. You jiggle and jiggle and suddenly it hits the right hole and it threads through and comes out the back of the shifter.
On a normal road bike with canti brakes the front brake outer doesn't have to go very far, but for a disk the outer goes all the way from the lever to the boot on the disc brake lever. There was a length of brake cable outer that was pretty close, slightly too long but I thought I would wait to cut it until I was much more sure of the length. Easier to shorten, impossible to lengthen!
Ferrules aren't required at either end of the brake outer. The slide directly into the back of the shifter and at the other end they go directly into the rubber boot on the brake lever arm.
To hold the outer in place temporarily I used some cable ties. The forks (and frame) take hydraulic brake cables as well and have cable guides that you can tie the cable too. From pics online of other bikes it looks like you should be able to get some plastic "c" clips to hold the cable on, but I couldn't find anything at any of the online stores so it looks like plastic zip ties will need to be used.
Then it was time for the rear brake, JustJames if you are reading you will probably know what happened next
Threaded the rear brake cable, ran it over the frame and it managed to make it about 1/2 way down the seat stay
I added to rotors to the hubs then set about setting up the pads. The instructions that come with the BB7s are pretty easy to follow. You turn the inner and outer red adjuster dials to clamp the rotor, this sets the pads parallel to the rotor. Then the screws attaching the calliper to the frame are done up tight. Then you back off the pads using the adjuster dials until they don't rub on the rotor, voila discs setup, super easy!
-
Mulger bill

- Super Mod

- Posts: 29060
- Joined: Sun Sep 24, 2006 2:41 pm
- Location: Sunbury Vic
Re: Campagnolo Athena with Discs Commuter Build
Starting to look nice mate.
HERE yer go. Believe c r c have ano alloy versions in various colours (Token brand?)
Shaun
HERE yer go. Believe c r c have ano alloy versions in various colours (Token brand?)
Shaun
...whatever the road rules, self-preservation is the absolute priority for a cyclist when mixing it with motorised traffic.
London Boy 29/12/2011
London Boy 29/12/2011
-
MichaelB
- Posts: 14849
- Joined: Tue Feb 20, 2007 9:29 am
- Location: Adelaide, South Australia
Re: Campagnolo Athena with Discs Commuter Build
I set my didcs up on the hub like you did as it is much easier to eyeball everything and get access as well.
Needed more adjustment once wheel was built, but it was much easier.
Be interesting to see what the final weight it.
Will have to do something similar with my Volagi Liscio2 when it gets here
Needed more adjustment once wheel was built, but it was much easier.
Be interesting to see what the final weight it.
Will have to do something similar with my Volagi Liscio2 when it gets here
-
JustJames
- Posts: 501
- Joined: Sun Feb 06, 2011 1:50 am
Re: Campagnolo Athena with Discs Commuter Build
Yep!Reman wrote: Then it was time for the rear brake, JustJames if you are reading you will probably know what happened next
... Next day headed to Clarence St Cyclery where they were able to fix me up with 2m of cable and housing. So all was good with the brakes.
Ended up with a set of Avid Flak Jacket cables and outers, because I was offered a good deal on them. I was prepared to run un-branded brake outers, but couldn't have lived with Shimano outers when running Campagnolo Veloce.
My bike blog. Long on rumination, rambling and opinion. Why let facts ruin everything?
http://pedallingcharm.wordpress.com/" onclick="window.open(this.href);return false;
http://pedallingcharm.wordpress.com/" onclick="window.open(this.href);return false;
-
usernameforme
- Posts: 1032
- Joined: Thu Jul 14, 2011 7:01 pm
- Location: Canberra
Re: Campagnolo Athena with Discs Commuter Build
How does the disk brake effect the flange geometry of the rear hub?
-
Reman
- Posts: 242
- Joined: Mon May 28, 2012 8:15 pm
- Location: Inner West, Sydney
Re: Campagnolo Athena with Discs Commuter Build
There's slightly less dishing to be done, that's about it really.usernameforme wrote:How does the disk brake effect the flange geometry of the rear hub?
-
usernameforme
- Posts: 1032
- Joined: Thu Jul 14, 2011 7:01 pm
- Location: Canberra
Re: Campagnolo Athena with Discs Commuter Build
Does the front wheel need to be dished then? Do you still have the hub measurements?
-
Reman
- Posts: 242
- Joined: Mon May 28, 2012 8:15 pm
- Location: Inner West, Sydney
Re: Campagnolo Athena with Discs Commuter Build
Technically the front has to be dished, but there's a pooftenth in it.usernameforme wrote:Does the front wheel need to be dished then? Do you still have the hub measurements?
Front and rear hub schematics are on the BHS website, if you are interested in an exact replica PM me your email and I'll send you the Musson calculator output.
-
Reman
- Posts: 242
- Joined: Mon May 28, 2012 8:15 pm
- Location: Inner West, Sydney
Re: Campagnolo Athena with Discs Commuter Build
Next step was to install the crankset. After I had ordered the drive train parts I spent a few day researching the installation. First, there are heaps of videos and installation guides for Ultratorque components where the cranks are joined via a Hirth bolt, Powertorque conversely has very little. Second, there is a guy who had big problems with his Powertorque install where the cranks moved side-to-side, he surmised it was due to a weak wavy washer (seen in pics later). Fears ended up being unfounded, when cranks arrived I checked the wavy washer and it was hard to compress.
First to go on were the Powertorque external bottom bracket cups. They come with yellow thread locker already on and I must admit that I'm not a big fan of this, it can make it difficult to tell if you've cross threaded or just hit the thread locker and should apply more force. The other thing is that no instructions mention greasing threads, so my rule of thumb is that unless it specifically says no grease I grease it up. So I grease up the inside of the BB shell, the shell threads and the shell face, then grease the threads on the cups themselves. Getting the threads started correctly is quite tricky due to deep threads and a high TPI. After a few false starts they go in. The cups need to be tightened to 42Nm, which is massive. My torque wrench only goes up to 25Nm, so this one was by feel. Using a BB cup spanner about 40cm long I was guessing if I used that to get as tight as possible I'd be fine. One problem is the BB cups are an anodised dark grey and so the spanner scratched it, not enough to be obvious and it may be unavoidable.
Next was the crank itself. Before putting the crank in you need to place a little clip around the DS cup almost but not in the little holes, this clip is a little bugger and one of the tricker parts of installing the crank. The worse thing is that if you bump it, it can go flying off so be careful and don't work near open drains. Greased up the crank shaft, pushed it through and engaged the clip, this locates and holds the DS bearing which is attached to the crank (not the cups, NDS bearing is in cup in case you were wondering).
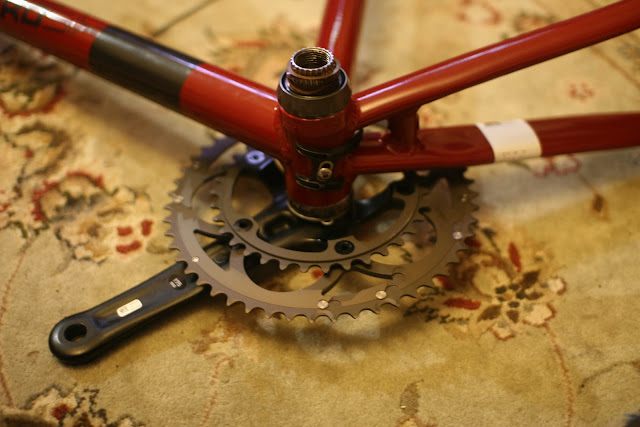
Once the crank is installed you add the wavy washer and the dust cap. The wavy washer makes up for BB shell width variances and compresses once you add the NDS crank and tighten it up. The NDS crank is held on by a bolt that needs a 14mm
  hex wrench. The largest I found at the hardware store was 10mm and I couldn't be bothered buying one from O/S, so I ended up getting a tube spanner. Only problem is the 42Nm needed for the crank bolt means that as it gets close the tube spanner ends up twisting! Once that happened I hoped I had enough torque.


First to go on were the Powertorque external bottom bracket cups. They come with yellow thread locker already on and I must admit that I'm not a big fan of this, it can make it difficult to tell if you've cross threaded or just hit the thread locker and should apply more force. The other thing is that no instructions mention greasing threads, so my rule of thumb is that unless it specifically says no grease I grease it up. So I grease up the inside of the BB shell, the shell threads and the shell face, then grease the threads on the cups themselves. Getting the threads started correctly is quite tricky due to deep threads and a high TPI. After a few false starts they go in. The cups need to be tightened to 42Nm, which is massive. My torque wrench only goes up to 25Nm, so this one was by feel. Using a BB cup spanner about 40cm long I was guessing if I used that to get as tight as possible I'd be fine. One problem is the BB cups are an anodised dark grey and so the spanner scratched it, not enough to be obvious and it may be unavoidable.
Next was the crank itself. Before putting the crank in you need to place a little clip around the DS cup almost but not in the little holes, this clip is a little bugger and one of the tricker parts of installing the crank. The worse thing is that if you bump it, it can go flying off so be careful and don't work near open drains.
Once the crank is installed you add the wavy washer and the dust
-
clydesmcdale
- Posts: 364
- Joined: Tue Jul 10, 2012 12:43 pm
Re: Campagnolo Athena with Discs Commuter Build
My advice after building up a super record bike. Get yourself a torque wrench capable of >40Nm. Just one from bunnings will do the job. You'll need it anyway for the cassette, so it's worth having around. Also get a 14mm hex. They're only a few bucks online (not the campy official ones of course)
Also did you use loctite on the cups? It's pretty important they don't come loose.
Also did you use loctite on the cups? It's pretty important they don't come loose.
-
find_bruce

- Moderator
- Posts: 10598
- Joined: Mon May 09, 2011 8:42 pm
- Location: Sydney
Re: Campagnolo Athena with Discs Commuter Build
Of course you could always borrow a suitable 1/2" drive torque wrench from someone nearby. Do I remember correctly that you live near 5 dock?
Can't help with the 14mm Allen key though - that's huge. Repco probably have one in a 1/2" drive for around $10
Can't help with the 14mm Allen key though - that's huge. Repco probably have one in a 1/2" drive for around $10
Anything you can do, I can do slower
-
Reman
- Posts: 242
- Joined: Mon May 28, 2012 8:15 pm
- Location: Inner West, Sydney
Re: Campagnolo Athena with Discs Commuter Build
Thanks for the tips guys. The tube spanner worked well enough and with my very large shifting spanner it is pretty easy to get up to 40-50Nm, similar to the cup spanner. As for loctite on the cups, I would be extremely surprised if they came undone at torqued up to spec and even if they unwound the crank would hold them on as you need a bearing puller to get them off
Next to go on was the front derailleur, Campy are nice in that they attach a little sticker to the derailleur which gives you a guide to match so that it is th correct distance (1.5-3mm) from the large chain ring. The trickiest part was getting it lined up parallel to the chain rings. I thought I had it pretty well aligned but then I looked from above and it was fairly crooked.

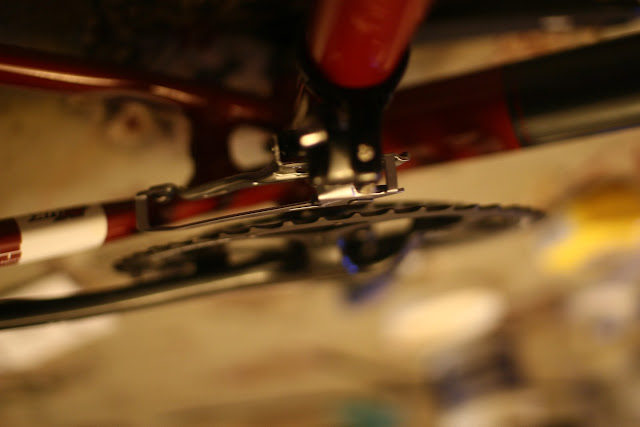
I ended up using the Campy cable guide for the front cable, instead of the one that came with the frame.

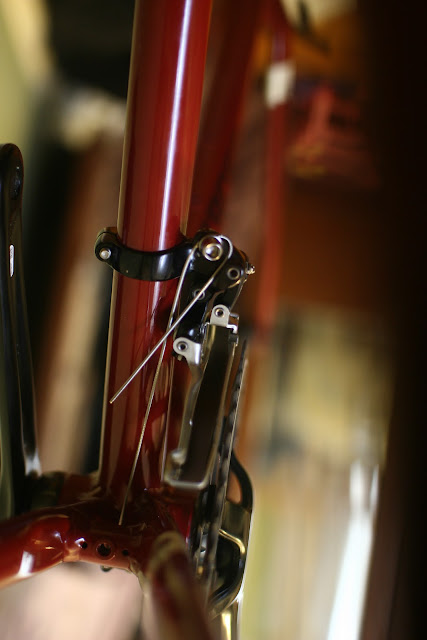
Naturally after the front went on I put the rear on. Now as a word of warning for those building a bike, I have not had the rear derailleur hanger aligned, I am a bad man (no seriously, I will eventually have to get it checked cos I'm sure it's slightly bent or twisted due to slightly off shift performance). Ok, I think I've complained about this before but the rear derailleur is attached via a torx screw that is a massive pain to get to and is specced to a massive 15Nm of torque. Lets just say I gave up after getting to about 10Nm, if it comes loose at that torque ill just shrug and do it tighter next time. To access this screw it's actually easier to get at it from the back side (like a pedal with a hex wrench).

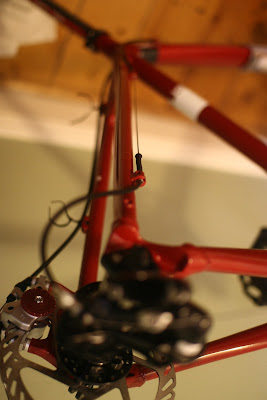
As this is a CX frame the rear derailleur cable runs along the top of the top tube and down the seat stays. I've actually now zip tied it just below the mounting eyelet otherwise the cable movement is restricted and you can feel the shift resistance at the lever.

Next to go on was the front derailleur, Campy are nice in that they attach a little sticker to the derailleur which gives you a guide to match so that it is th correct distance (1.5-3mm) from the large chain ring. The trickiest part was getting it lined up parallel to the chain rings. I thought I had it pretty well aligned but then I looked from above and it was fairly crooked.
I ended up using the Campy cable guide for the front cable, instead of the one that came with the frame.
Naturally after the front went on I put the rear on. Now as a word of warning for those building a bike, I have not had the rear derailleur hanger aligned, I am a bad man (no seriously, I will eventually have to get it checked cos I'm sure it's slightly bent or twisted due to slightly off shift performance). Ok, I think I've complained about this before but the rear derailleur is attached via a torx screw that is a massive pain to get to and is specced to a massive 15Nm of torque.
As this is a CX frame the rear derailleur cable runs along the top of the top tube and down the seat stays. I've actually now zip tied it just below the mounting eyelet otherwise the cable movement is restricted and you can feel the shift resistance at the lever.
Who is online
Users browsing this forum: No registered users