Got bored today

Pushy
Posts: 994
Joined: Wed Aug 15, 2007 1:02 am
Location: Freo WA

Got bored today

Postby Pushy » Fri Jun 13, 2008 5:36 pm

Can't help myself, have a need to tinker so I thought I'd try to reduce the size of my helmet lights.
Image
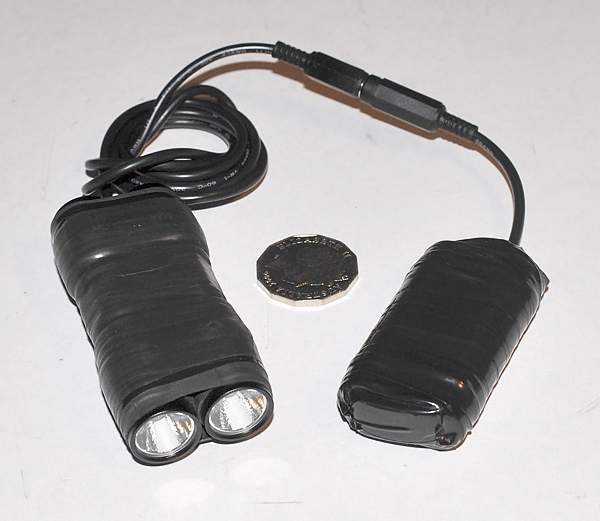
I have discarded the body of the torches, soldered wires to the head of the torch and filled with silicone. Just waiting for the silicone to dry. They do work, but my solderiing skills need improving. I thought I would cook the leds.
Image

Les

User avatar
HappyHumber
Posts: 5072
Joined: Wed Nov 14, 2007 11:48 pm
Location: Perth, (S.o.R.) W.A.

Postby HappyHumber » Fri Jun 13, 2008 6:17 pm

more nice work Les - thanks again for sharing.

You've obviously got more experience with these torches - but do you think there'll be any issues dissipating the heat from what's left of the torch casing? I read in some of those buyer reviews from DealExtreme some of the torches can get warm after a bit. I spose airflow at speed does a lot.

Got all the bits for my bar mounted setup. Hopefully assembling tonight/tomorrow. All going well helmet mounts will be the next project.
--
Hit me up via the BNA dm; I'll get an alert. If y'know, you know.

Pushy
Posts: 994
Joined: Wed Aug 15, 2007 1:02 am
Location: Freo WA

Postby Pushy » Fri Jun 13, 2008 6:46 pm

It was one of my earlier efforts and had it floating around as a spare. I don't think heat will be an issue although it may shorten the life of the led. So if it goes from 50,000 hours to 5,000 hours I'd still be happy and is cheap to replace.

Consider this method of mounting.
Image
Its cheap, easy and works.

Les

User avatar
HappyHumber
Posts: 5072
Joined: Wed Nov 14, 2007 11:48 pm
Location: Perth, (S.o.R.) W.A.

Postby HappyHumber » Fri Jun 13, 2008 7:47 pm

I probably would mount mine something like that - but it was after Graeme's posting with this coupla strips of 20mm Ally on an old vistalite clamp - I remembered I had an old vistalite clamp identical!

One thing I plan on doing a little different is the use of molex style connectors for the leads.

A-la Image

Possibly a little more expensive than the bullet connectors - I think they're a little more resilient to repeated connection/disconnection and there's still no risk of shorts.

Kym
--
Hit me up via the BNA dm; I'll get an alert. If y'know, you know.

User avatar
Kalgrm
Super Mod
Super Mod
Posts: 9653
Joined: Fri May 25, 2007 5:21 pm
Location: Success, WA
Contact:

Postby Kalgrm » Fri Jun 13, 2008 8:31 pm

I went with the connections already on my other lighting systems and chargers. I have a multi-charger for Li-ion batteries which plugs straight into this pack and the cords are standard bike light cords. The battery pack is two 18650 Li-ion cells in parallel (ie 3.7v)

Image

The $1 coin is for scale. The connections are about $1.80 at Dick Smith.

Cheers,
Graeme
Think outside the double triangle.
---------------------
Music was better when ugly people were allowed to make it ....

User avatar
HappyHumber
Posts: 5072
Joined: Wed Nov 14, 2007 11:48 pm
Location: Perth, (S.o.R.) W.A.

Postby HappyHumber » Fri Jun 13, 2008 9:05 pm

Ah, nice work Graeme.
they look the business - mine kinda look like they've pulled out of a PC. And you have both cores molded into one lead.

Did those connectors come as a pair - or could you by the genders seperately?
--
Hit me up via the BNA dm; I'll get an alert. If y'know, you know.

User avatar
Kalgrm
Super Mod
Super Mod
Posts: 9653
Joined: Fri May 25, 2007 5:21 pm
Location: Success, WA
Contact:

Postby Kalgrm » Fri Jun 13, 2008 9:38 pm

The genders are available separately. The one on the battery was very hard to find though: I ended up getting it in the Kalgoorlie Dick Smith store after failing to find any around Freo or Spearwood.

The cord closest to the coin is a pre-made cord from the VistaLite system.

The cord coming from the battery pack is scavenged from a phone charger which was surplus to requirements (dead phone ... :(). It actually has four wires in it, so two are soldered on one battery and two are on the other. They link at the socket.

Cheers,
Graeme
Think outside the double triangle.
---------------------
Music was better when ugly people were allowed to make it ....

Pushy
Posts: 994
Joined: Wed Aug 15, 2007 1:02 am
Location: Freo WA

Postby Pushy » Sat Jun 14, 2008 1:29 am

Good thinking people, like the connector options that both of you are using. Graeme yours certainly looks the part.

Les

Hawkeye

Postby Hawkeye » Sat Jun 14, 2008 6:26 pm

You could also try these:
Image

They're called Ultra Deans Plugs.

Very secure, would be very suitable for MTB use. Female end always goes on power supply to prevent shorts. Impossible to connect in reverse once fitted. The female tube conectors in the Tamiya-style connectors suggested by Happy Humber tend to get spread apart with repeated re-connections and become unreliable.

I used to use both types when I raced R/C cars and ended up getting rid of all my Tamiya style connectors in favour of the Ultra Deans type. They're also much more compact.

I've probably got a few spare pairs lying around somewhere if anyone wants to try them. They're available at hobby stores dealing in electric cars and aircraft.

User avatar
HappyHumber
Posts: 5072
Joined: Wed Nov 14, 2007 11:48 pm
Location: Perth, (S.o.R.) W.A.

Postby HappyHumber » Sat Jun 14, 2008 7:57 pm

Been playing with mine this afternoon. I might withdraw my earlier statement about those molex, or Tamiya, connectors. The crimps on the connectors certainly aren't very forgiving. I don't think there's enough anchorage/grip on the wire insulation for frequent or none-to-delicate handling.

I think I'll revert to the bullet type for the time being (only cos I have some at hand!) and explore the some other options...

The ultra-deans you've shown, J.R... I've googled them a bit just now. I can't quite grasp how the wire connects from the pics. Some descriptions mention solder - which sounds like the way to go.
--
Hit me up via the BNA dm; I'll get an alert. If y'know, you know.

Pushy
Posts: 994
Joined: Wed Aug 15, 2007 1:02 am
Location: Freo WA

Postby Pushy » Sat Jun 14, 2008 9:26 pm

El cheapo versionavailable at my favourite store (DX)

Les

Pushy
Posts: 994
Joined: Wed Aug 15, 2007 1:02 am
Location: Freo WA

Postby Pushy » Sun Jun 15, 2008 11:55 pm

Image

The finished product, almost. Just have to wait a few more days for the silicon to dry completely so I can trim it down with a Stanley trimmer. They get quite warm, but not too hot to hold. Heads are only about 35mm long and 20mm across.

Les

User avatar
Kalgrm
Super Mod
Super Mod
Posts: 9653
Joined: Fri May 25, 2007 5:21 pm
Location: Success, WA
Contact:

Postby Kalgrm » Mon Jun 16, 2008 12:09 am

Nice looking mod there Les. I've got some of those torches on the way but I think I'll stick with your earlier version. I'm not fitting an in-line switch to my setup because I want to retain independent switching on each light (ie a "low power" setting, if you like). But I do like the compact look of your ones - I'd say they are smaller than the Ay-up lights now.

Cheers,
Graeme
Think outside the double triangle.
---------------------
Music was better when ugly people were allowed to make it ....

User avatar
Kalgrm
Super Mod
Super Mod
Posts: 9653
Joined: Fri May 25, 2007 5:21 pm
Location: Success, WA
Contact:

Postby Kalgrm » Tue Jul 01, 2008 10:28 pm

Okay, I finally got my !! BAN ME NOW FOR SWEARING !! together and finished my helmet lights.

I've used two of these torches with the batteries removed and the wire from my cord soldered directly onto the contacts inside. The cord has four wires inside, so a pair goes to one torch and the other pair into the other torch. They are joined appropriately at the connector. The pair weigh 125g as shown below.

The pair of torches are held onto the helmet with Velcro and a Velcro strap. The cord is long enough to reach into a jersey pocket, where the small battery pack (constructed from these batteries) can be carried.

The four wires inside my cord are soldered to the terminals and joined at the connector. I have a 4.2v charger for the battery packs which plugs straight into the connection (from another light system). The battery theoretically provides 3 hours at full power, and I have three of them to run both these and my headlights. They weigh 100g each as shown below.

Total cost for 2 torches and 3 battery packs: US$70. (The four-core cord was recycled from a redundant phone charger.)

Image

Image

Image

Cheers,
Graeme
Think outside the double triangle.
---------------------
Music was better when ugly people were allowed to make it ....

Matty
Posts: 464
Joined: Mon Jun 11, 2007 11:34 pm
Location: Melbourne

Postby Matty » Wed Jul 02, 2008 2:04 am

Nice work Graeme. Looks really good. Tempted to do something similar to my setup...

Pushy
Posts: 994
Joined: Wed Aug 15, 2007 1:02 am
Location: Freo WA

Postby Pushy » Wed Jul 02, 2008 6:58 am

Top job Graeme, how are you liking riding with these lights compared to your previous hid setup.

Les

User avatar
uncle arthur
Posts: 1387
Joined: Tue Oct 02, 2007 9:45 pm
Location: Brisvegas
Contact:

Postby uncle arthur » Wed Jul 02, 2008 2:44 pm

I'm now watching this with interest - bought 2 of these last night and will see what sort of mounting setup I can come up with when they arrive.....
What is it with cycling? 30+ kmh and lycra???!!!

Hawkeye

Postby Hawkeye » Sun Jul 06, 2008 9:08 pm

HappyHumber wrote:The ultra-deans you've shown, J.R... I've googled them a bit just now. I can't quite grasp how the wire connects from the pics. Some descriptions mention solder - which sounds like the way to go.
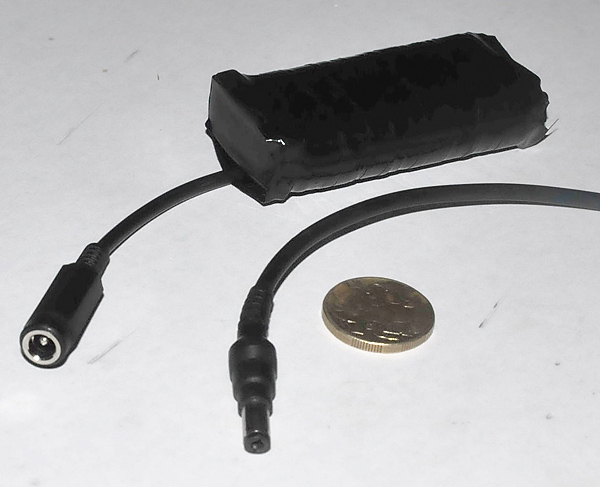
Yes, you solder to the short tabs that stick out the back of the plug. Just slide a short length of the supplied heatshrink tube on over the wire and an inch or so back first, then, once soldered, slide it back and warm it by holding the soldering iron close until it tightens up.

Much more secure than crushing the tube over the wire and corrosion from wet weather riding won't have a chance to inhibit the connection between wire and plug.

MountGower

Postby MountGower » Wed Jul 09, 2008 10:00 am

I am curious as to how one decides which torches they buy. Kalgrm and Uncle Arthur have bought different torches. When you follow either of the links, the page has several different options at the bottom of the page. Are the beams different? Is the output different? They all seem to use the same lamp. Are there other benefits or reasons for choosing one over the other?

Also a link to the prefered rechargeable batteries and prefered charger would be great.

User avatar
m@
Posts: 5112
Joined: Tue Apr 15, 2008 12:20 pm
Location: Wurundjeri Country
Contact:

Postby m@ » Wed Jul 09, 2008 10:11 am

Don't mean to hijack this thread, but is anyone else concerned that the heat of this kind of setup, mounted directly on a helmet, might be damaging it?

Just a thought... ;)

User avatar
Kalgrm
Super Mod
Super Mod
Posts: 9653
Joined: Fri May 25, 2007 5:21 pm
Location: Success, WA
Contact:

Postby Kalgrm » Wed Jul 09, 2008 11:40 am

MountGower wrote:Are the beams different? Is the output different? They all seem to use the same lamp. Are there other benefits or reasons for choosing one over the other?

Also a link to the prefered rechargeable batteries and prefered charger would be great.
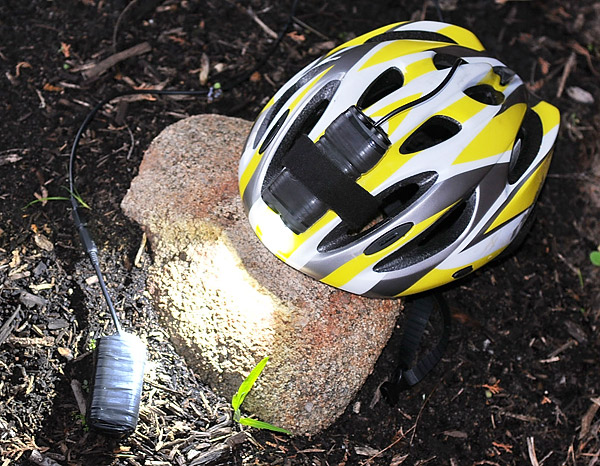
I've got three different types of torch. One is a single mode, tight beam. Another is a five mode tight beam and the two on my helmet are five mode torches with small housings (= light weight on my helmet).

I'll let Pushy link to the batteries and charger, since I'm not at home and don't have my own computer. They have been linked in one of those other threads though.*
m@ wrote: .... is anyone else concerned that the heat of this kind of setup, mounted directly on a helmet, might be damaging it?
They don't generate much heat at all. Don't expect to be able to warm your hands on a cold morning by holding them. LEDs are very efficient at converting electricity into visible light, rather than heat.

Cheers,
Graeme

* The other threads:

http://bicycles.net.au/forums/viewtopic.php?t=6256

http://bicycles.net.au/forums/viewtopic.php?t=5877
Think outside the double triangle.
---------------------
Music was better when ugly people were allowed to make it ....

Pushy
Posts: 994
Joined: Wed Aug 15, 2007 1:02 am
Location: Freo WA

Postby Pushy » Wed Jul 09, 2008 3:11 pm

MountGower wrote:I am curious as to how one decides which torches they buy. Kalgrm and Uncle Arthur have bought different torches. When you follow either of the links, the page has several different options at the bottom of the page. Are the beams different? Is the output different? They all seem to use the same lamp. Are there other benefits or reasons for choosing one over the other?

Also a link to the prefered rechargeable batteries and prefered charger would be great.
Generally its a matter of trial and error. If you are going for a handlebar mounted light then go for one with a larger lens and reflector assembly and these will usually accept an 18650 battery. With a larger lens and reflector assembly you will usally get a good combination of light spread and throw with about 3 hours of run time. If you are looking for a helmet mounted light then go for something that accepts AA or 14500 batteries. The smaller reflector and lens means less throw but their size means that they are better suited to the helmet application.These only have a runtime of around an hour unless you use an external battery pack.

This is where the Ay-ups come into thier own. They are bike specific, every led used will produce the same light output and colour and you know what you're getting in terms of beam pattern. They are also waterproof.

Charger 1st choice
Charger 2nd choice a little slower to charge
Batteries

As far as heat is concerned, you'll probably get more heat on the helmet on a hot summers day.

Les

MountGower

Postby MountGower » Thu Jul 10, 2008 12:31 pm

Thanks fore these replies everyone

Kalgrm

Did you modify your charger to acommodate the charging of the battery pack you bound up? What exactly did you do to it?

User avatar
Kalgrm
Super Mod
Super Mod
Posts: 9653
Joined: Fri May 25, 2007 5:21 pm
Location: Success, WA
Contact:

Postby Kalgrm » Thu Jul 10, 2008 1:15 pm

MountGower wrote:Did you modify your charger to acommodate the charging of the battery pack you bound up? What exactly did you do to it?
Ooh - good point MG. I forgot that I'm not using that charger any longer. I'm using the charger that came with my HID light, which is a universal Li-ion battery charger with different voltage selections. It's like one of these.

My plan, before I worked out I could use this charger, was to use the one linked to above with a "false battery" substituted for the 18650, running a wire off that onto my battery pack's connection. It was to be like Pushy's substitute battery that he used to connect an external battery pack.

Cheers,
Graeme
Think outside the double triangle.
---------------------
Music was better when ugly people were allowed to make it ....

User avatar
m@
Posts: 5112
Joined: Tue Apr 15, 2008 12:20 pm
Location: Wurundjeri Country
Contact:

Postby m@ » Thu Jul 10, 2008 1:18 pm

Kalgrm wrote:They don't generate much heat at all. Don't expect to be able to warm your hands on a cold morning by holding them. LEDs are very efficient at converting electricity into visible light, rather than heat.
Good-o, thanks :)

I think I know what my next project/money sink will be after I sort out some clipless shoes & pedals ;)

Who is online

Users browsing this forum: The Great Boffo