The cup remover, what diameter and gauge tube is it? My efforts to date have crumpled on the second or third use
Thanks
Shaun


The OD is 25mm, but I'm not sure what the wall thickness is, probably 1.2-1.5mm. I'm not exactly a power user if it, but it has removed a few 1" and 1,1/8" cups without any sign of failure. I based it on an example I found on the internet that had used 1" copper pipe. That's probably a better material for the job, but 1" copper pipe is not to be found at Bunnings (maybe a plumping supplier might have it?).Mulger bill wrote:Nice work on the crown race setter Jean.
The cup remover, what diameter and gauge tube is it? My efforts to date have crumpled on the second or third use
Thanks
Shaun
I tried a similar sort of press the other week with narrower rod (about 5/8" - not sure exactly - what I had lying around) and some blocks of wood, without much success. The narrower rod started to curve in tacking up the slack, something the softish wood facilitated. So I'd say don't try it with anything less than 1/2" rod and either hardwood or washers to do the pressing.tedsbikes wrote:I've used a length of gal pipe about 40 cm 33.9 mm OD and 27.5 mm ID for installing fork crown races. And for installing the head fittings in a frame a length of 1/2 inch threaded rod and a couple of 1/2 inch nuts and old bottom bracket cups, one at each end, plus some assorted washers, should do the job.
Cheers Ted

My tool for the same fits Jean's description a bit more. I have some short chunks of old skirting timber - no more than about 80mm square about 20mm thick with a hole through the middle. They're square bits of hard wood - but they act as big soft washers-come-pressure plates.Jean wrote:similar sort of press the other week with narrower rod (about 5/8" - not sure exactly - what I had lying around) and some blocks of wood, without much success. The narrower rod started to curve in tacking up the slack, something the softish wood facilitated. So I'd say don't try it with anything less than 1/2" rod and either hardwood or washers to do the pressing.

I'm about to build a Musson truing stand, I'm fine with making all the MDF parts, but I don't have much in the way of metalworking kit. I'm interested to know how you went about making the two metal pieces that the axle drops into.Jean wrote:And my wheel truing stand - MDF made to Roger Musson's plans
+1, I used construction ply for the timber bits but have had poor results using either hacksaw or angle grinder to cut the steel, always been hopeless at metalworkingRobertFrith wrote:I'm about to build a Musson truing stand, I'm fine with making all the MDF parts, but I don't have much in the way of metalworking kit. I'm interested to know how you went about making the two metal pieces that the axle drops into.Jean wrote:And my wheel truing stand - MDF made to Roger Musson's plans
Thanks
Rob
Mulger bill wrote:Chain hook is a great idea, been using one for years.
I made my chain whip out of some 1" wide flat bar steel and 50cm of old chain, drill 3 holes in the right spot and you're nearly done. Total cost about 5" labour.


punk_rob wrote:A bolt, washer, wingnut and a small wheel (with the rubber tyre cut off) = less than $5 from Bunnings

My dad is a frustrated metal worker/engineer and tinkers with metal in his workshop. I asked him to do it, but if I had to do it again on my own I'd get a short bit of suitable steel bar stock and drill as required, and cut and trim with a grinder. It might be a bit rough, but would do the job.RobertFrith wrote:I'm about to build a Musson truing stand, I'm fine with making all the MDF parts, but I don't have much in the way of metalworking kit. I'm interested to know how you went about making the two metal pieces that the axle drops into.Jean wrote:And my wheel truing stand - MDF made to Roger Musson's plans
Thanks
Rob
Just a thought...Jean wrote:Having just gone down the 15mm though axle route I need to modify my stand soon so I can build a front wheel.
After posting that yesterday I had a quick Google and found this guy (aka - mtbtools) and his machined hub adapters on Ebay:Mulger bill wrote:Thanks Jean, might give a fabricator a go.
Just a thought...Jean wrote:Having just gone down the 15mm though axle route I need to modify my stand soon so I can build a front wheel.
Take a suitable QR axle and some heatshrink to give it a smooth surface, feed it through the hub, add a QR and voila. The heatshrink should prevent damage to the inner axle surface of the hub and the QR will hold it nicely in place in the existing Musson bracket.
Shaun
Awesome idea!punk_rob wrote:A bolt, washer, wingnut and a small wheel (with the rubber tyre cut off) = less than $5 from Bunnings
Instant chain keeper! Keeps the RD tensioned while transporting and washing with the rear wheel off. No more chain slapping around and leaving greasy marks.
Hooray for mankind
Ignore Musson's directions and use aluminium instead of steel, it's much easier to work. It's also a closer approximation to your dropout width.Mulger bill wrote:
+1, I used construction ply for the timber bits but have had poor results using either hacksaw or angle grinder to cut the steel, always been hopeless at metalworking
Mark Kelly wrote:Ignore Musson's directions and use aluminium instead of steel, it's much easier to work. It's also a closer approximation to your dropout width.
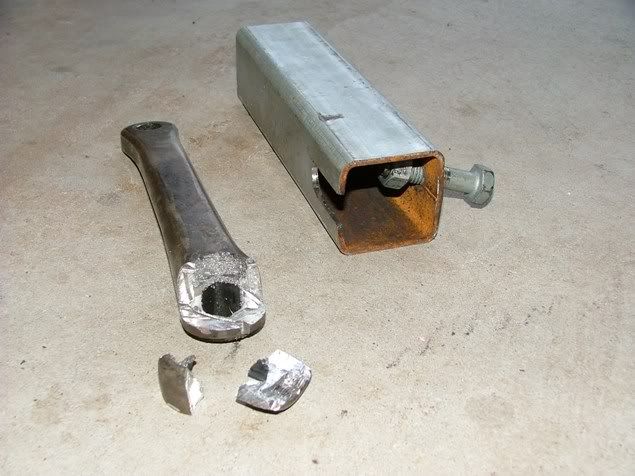
Bychosis,bychosis wrote:Crank Remover for square taper cranks. Standard Crank puller stripped the thread on the crank, bashing/levering wouldn't work.
Enter Homemade crank remover
Unfortunately Homemade crank remover stripped the thread on the bolt (hi-tens next time?). Slot tube over crank, spanner on nut in device, tighten bolt to push out the crank (in theory)
Effective method=hacksaw to crank (as pictured)
I've got one chain whip with wide enough chain for 1/8" cogs, and one that's not. I keep not being able to find the right one. That's a great idea. I can have one of each size (Thick for 1/8", medium for 6/7/8 speed, and a thin one) nailed to the tall stumps under the house. The wife and Heritage Vic (who have an interest in our house) would have my hide if I tried the verandah post. Wish I'd seen this when it was first posted.cooperplace wrote:Mulger bill wrote:Chain hook is a great idea, been using one for years.
I made my chain whip out of some 1" wide flat bar steel and 50cm of old chain, drill 3 holes in the right spot and you're nearly done. Total cost about 5" labour.
for a chain whip I just nailed a 1-foot length of chain to one of the verandah posts, and whenever I need it, it's there.