"Oooh, this I gotta see. :)" Brooks: reshaped and new cover

User avatar
Clydesdale Scot
Posts: 2254
Joined: Tue Mar 03, 2009 12:55 pm
Location: Adelaide, SA

"Oooh, this I gotta see. :)" Brooks: reshaped and new cover

Postby Clydesdale Scot » Mon Oct 21, 2013 5:27 pm

at the end of the thread about the reproduction Shockstop 'honking rubbers' was this
Mulger bill wrote:
Clydesdale Scot wrote:
ghostpoet wrote:Definite signs of insanity there....
The current project is to custom make copper rivets, to go on custom formed leather which will go on a Brooks saddle frame which will have the cantleplate custom reshaped. The rivets need to be longer than the Brooks ones as I use thicker leather than the thickest Brooks. And the rivet heads may be a little larger than the largest of the Brooks. 8)
Oooh, this I gotta see. :)
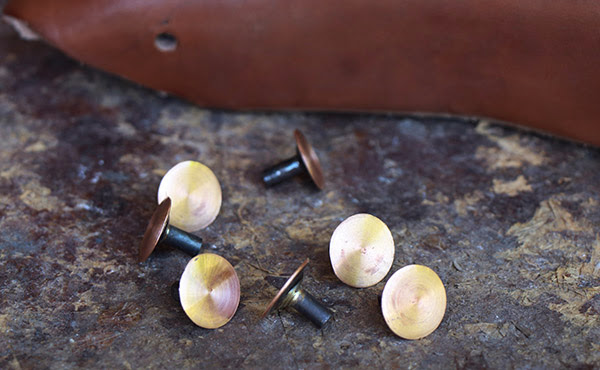
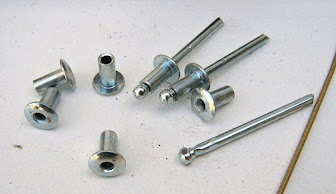
Mulger Bill:It has all been in good time.
Holidays to Tasmania in Feb, then Tibet and Nepal in May, and India and Bhutan in Sept have delayed me.
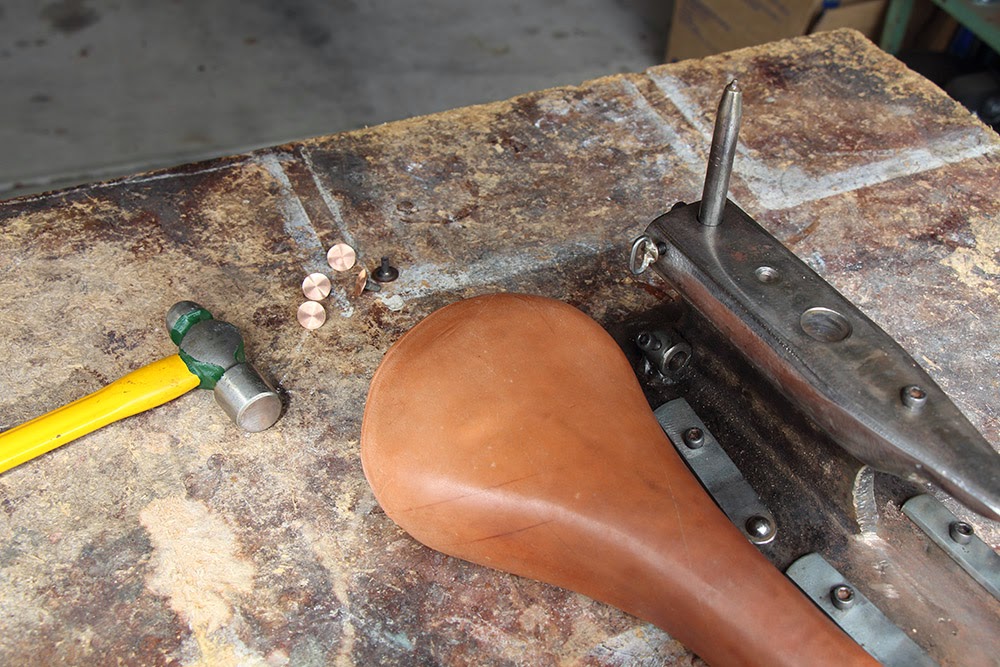
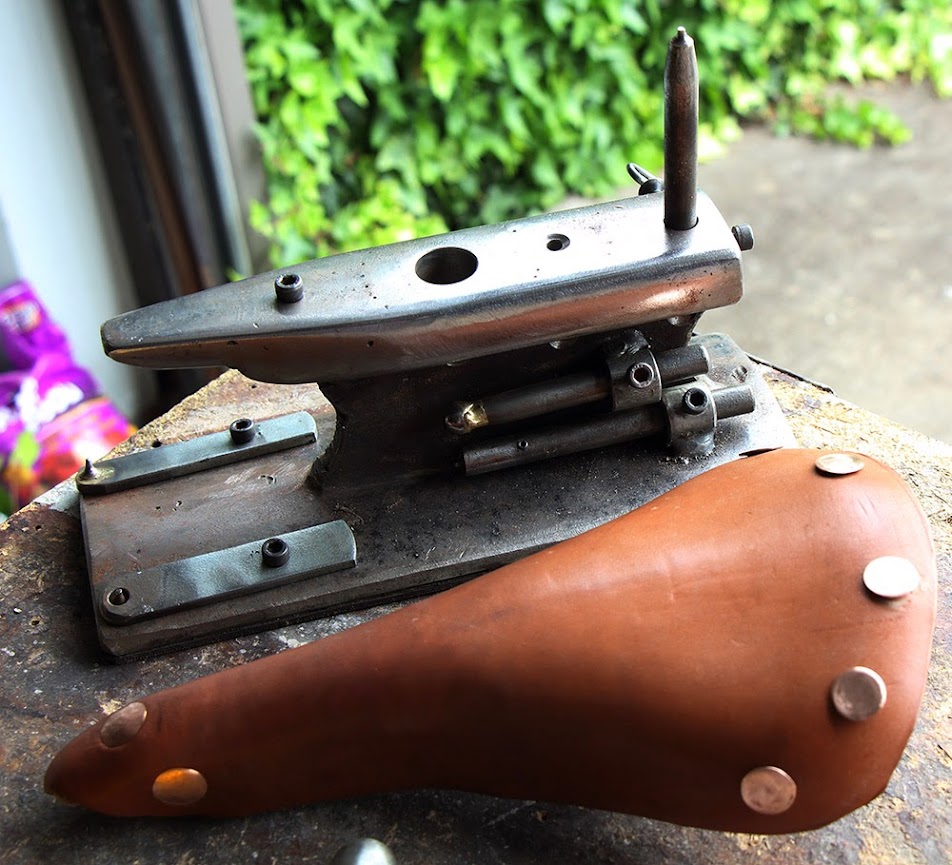
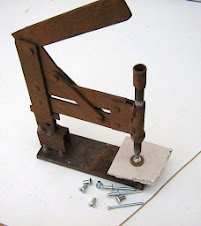
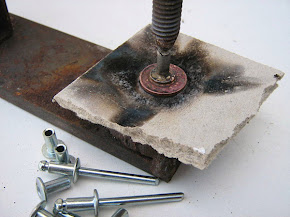
I will put the finished saddle first then describe the workflow I used.

Image
Image
Image
Image
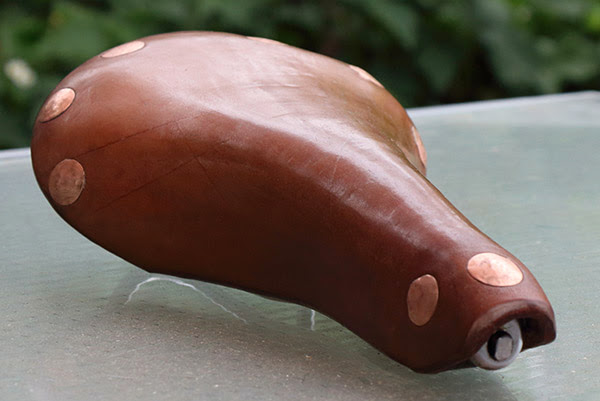
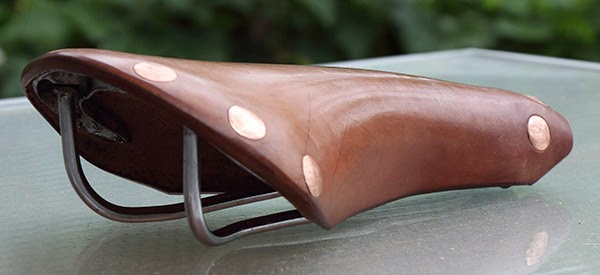
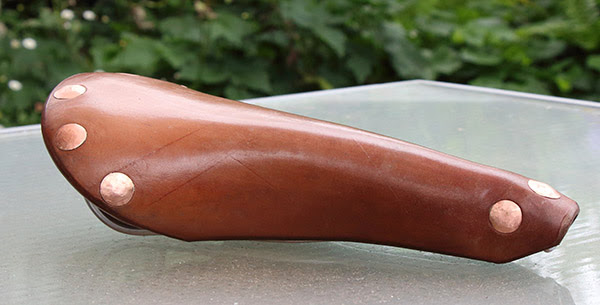
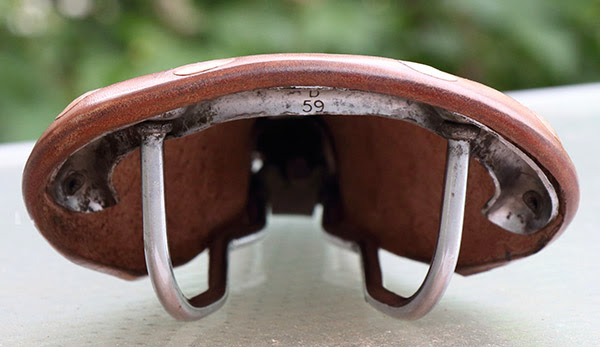
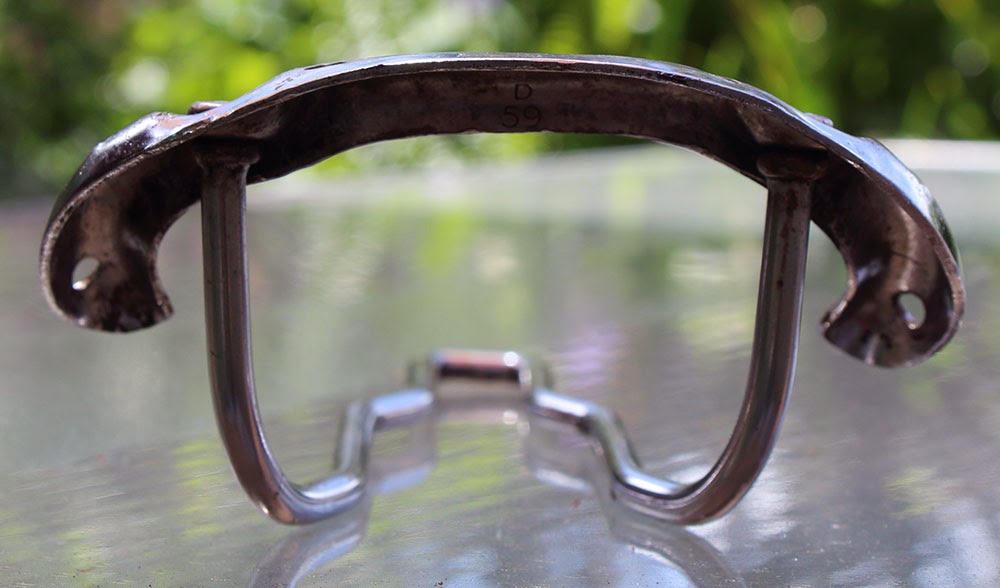
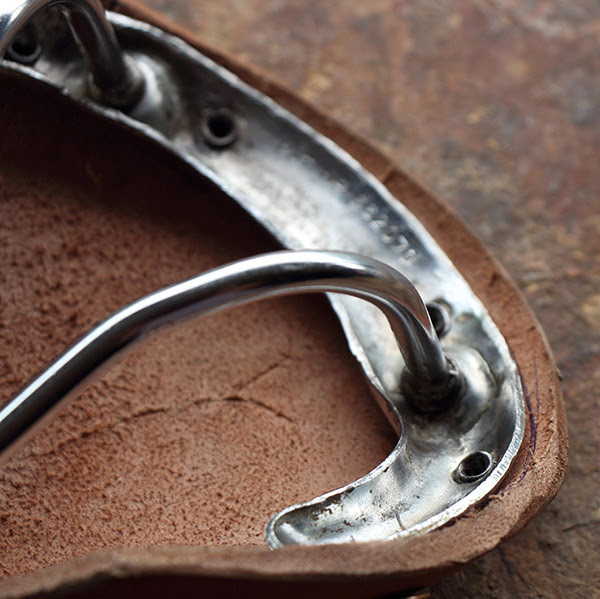
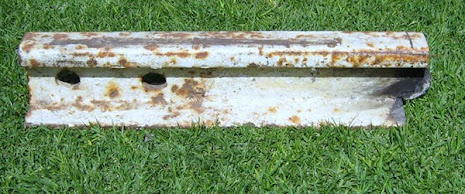
It is a 1959, last quarter Brooks saddle frame which has had the cantleplate narrowed, arched and the rear flattened, in a style now largely forgotten.
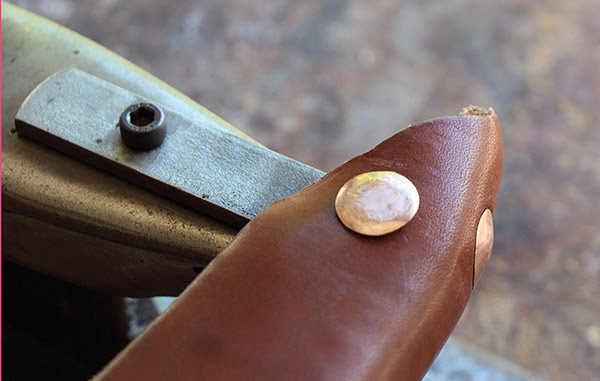
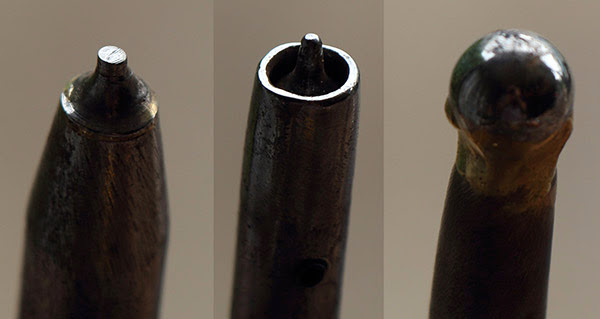
It has had a custom leather cover fitted with homemade copper-headed rivets.
If you want to know more on the process read on.

User avatar
Clydesdale Scot
Posts: 2254
Joined: Tue Mar 03, 2009 12:55 pm
Location: Adelaide, SA

"Oooh, this I gotta see. :)" Brooks: reshaped and new cover

Postby Clydesdale Scot » Mon Oct 21, 2013 5:32 pm

The saddle frame was bought with its leather cover split and totally unusable.
After some gentle hammering on the anvil I produced this
Image
It had the shape I was after and the width was arrived at after using this guide.

User avatar
Clydesdale Scot
Posts: 2254
Joined: Tue Mar 03, 2009 12:55 pm
Location: Adelaide, SA

"Oooh, this I gotta see. :)" Brooks: reshaped and new cover

Postby Clydesdale Scot » Mon Oct 21, 2013 5:37 pm

The leather cover was made using a new fibreglass mould and vacuum forming the leather into the mould.
I use a 6.2mm thick vegetable tanned leather, and this piece appears to have had its previous owner rubbing along some barbed wire.
Image

User avatar
Clydesdale Scot
Posts: 2254
Joined: Tue Mar 03, 2009 12:55 pm
Location: Adelaide, SA

"Oooh, this I gotta see. :)" Brooks: reshaped and new cover

Postby Clydesdale Scot » Mon Oct 21, 2013 5:43 pm

The rivets and the installation process has seen various incarnations until my ever resourceful brother-in-law came up with the ultimate in home riveting anvils and home made rivets
the anvil is a feature of this work; it is multi-purpose.
It started out as piece of railway line. I can only assume it came into Peter's possession by lawful means.
Image
I will try to do it justice with my explanation.

User avatar
Clydesdale Scot
Posts: 2254
Joined: Tue Mar 03, 2009 12:55 pm
Location: Adelaide, SA

"Oooh, this I gotta see. :)" Brooks: reshaped and new cover

Postby Clydesdale Scot » Mon Oct 21, 2013 5:54 pm

The anvil helps form the rivets.
A steel pop rivet with its shaft removed is bronze welded to a convenient sized piece of copper (think one cent coin size).
This raw rivet has been beaten thinner in the counter sunk section of the anvil (the process is repeated a few photos down)
The flattened rivet is placed in the punch to get an approximate size
Image
note the guide drillings to ensure the shaft of the rivet is located over the hole in the anvil top. The top of the punch with its locating pins is in the background.

the top is placed into position and the tool shaft is hit firmly with a hammer
Image

to get this
Image
the rivet with its shaft in the bottom section (to the right) with the surplus copper on the top section of the punch tool (to the left)
Last edited by Clydesdale Scot on Mon Oct 21, 2013 8:16 pm, edited 1 time in total.

User avatar
Clydesdale Scot
Posts: 2254
Joined: Tue Mar 03, 2009 12:55 pm
Location: Adelaide, SA

"Oooh, this I gotta see. :)" Brooks: reshaped and new cover

Postby Clydesdale Scot » Mon Oct 21, 2013 6:06 pm

The punching has deformed the head of the rivet, so it is placed back into the counter sunk hole in the anvil and given a few light taps with a smooth faced hammer.
Image
to get this
Image

Getting close.
The rivet is then placed into the chuck of a cheap drill clamped in a bench vice.
With the drill running, metal files and coarse sandpaper are used to cleanup the edges and finish the top. A vernier gauge is used to check the rivet head diameter.

Image
The thin head is seen with the bronze welded steel shaft.

I couldn't use Brooks rivets as the shaft is too short for the thickness of the leather I use.
Plus it is satisfying to work on the frame, the leather and the rivets.

LG
Posts: 1879
Joined: Sat Nov 08, 2008 10:46 am
Location: Southeast Tasmania

Re: "Oooh, this I gotta see. :)" Brooks: reshaped and new co

Postby LG » Mon Oct 21, 2013 6:08 pm

Wow, that is brilliant! I hope we can send our knackered brooks saddles to you for recovering now :lol:
LG = Low Gear

User avatar
Clydesdale Scot
Posts: 2254
Joined: Tue Mar 03, 2009 12:55 pm
Location: Adelaide, SA

"Oooh, this I gotta see. :)" Brooks: reshaped and new cover

Postby Clydesdale Scot » Mon Oct 21, 2013 6:25 pm

now to put the pieces together.
This is the fun part.

the nose piece is done first
The anvil has a number of tools and mounting points.
there are three tools for each side of the nosepiece
Image
they are mounted on the thin end of the anvil and used to (1) start to flare the shaft of the rivet, then (2) continue the flare and (3) the finish setting the rivet. I will describe these further below. What is important is that the nosepiece has to be done using its own tools mounted in their own position on the anvil.

The heads of the tools look like this
Image
the heads are replicated on thin flat sections for the nosepiece and on long shafts for the centre of the nosepiece and the cantleplate rivets.
I will repeat the earlier image to show the tool in place for the work on the centre of the nosepiece and the cantleplate rivets.
Image

User avatar
Clydesdale Scot
Posts: 2254
Joined: Tue Mar 03, 2009 12:55 pm
Location: Adelaide, SA

"Oooh, this I gotta see. :)" Brooks: reshaped and new cover

Postby Clydesdale Scot » Mon Oct 21, 2013 6:33 pm

assemble the saddle frame parts and then get your good drill (not the $20 Supercheap drill which lives in the bench vise) and drill the remaining holes in the cantleplate.
Place the first tool in and start setting the rivets
Image
when finished the rivets should look like this
Image
work on the rivets with the remaining tools, and once fully set then tap around the head of the rivet to mount it flush with the leather so it won't rip your knicks. This also gives the characteristic hand beaten finish of the top Brooks saddles.

User avatar
Clydesdale Scot
Posts: 2254
Joined: Tue Mar 03, 2009 12:55 pm
Location: Adelaide, SA

"Oooh, this I gotta see. :)" Brooks: reshaped and new cover

Postby Clydesdale Scot » Mon Oct 21, 2013 6:41 pm

Now is time to trim the leather to its final shape (I use a brother-in-law made sanding disk in a bench grinder), then burnish the edges, dampen the leather and burnish out any errant hammer marks, give it two coats of Proofide, and then I polish with pure beeswax.
I haven't shown the vacuum forming the leather cover using the new fibreglass moulds. That will come.
A near identical version of this has been placed on an American Forum because they get excited when one of their American members posts on his recovered saddles.

As always, my thanks go to Peter, my brother-in-law and his resourcefulness.

Any questions from the audience?
Philip

User avatar
HappyHumber
Posts: 5072
Joined: Wed Nov 14, 2007 11:48 pm
Location: Perth, (S.o.R.) W.A.

Re: "Oooh, this I gotta see. :)" Brooks: reshaped and new co

Postby HappyHumber » Mon Oct 21, 2013 6:48 pm

Damn impressive.
--
Hit me up via the BNA dm; I'll get an alert. If y'know, you know.

User avatar
Clydesdale Scot
Posts: 2254
Joined: Tue Mar 03, 2009 12:55 pm
Location: Adelaide, SA

"Oooh, this I gotta see. :)" Brooks: reshaped and new cover

Postby Clydesdale Scot » Mon Oct 21, 2013 6:48 pm

LG wrote:Wow, that is brilliant! I hope we can send our knackered brooks saddles to you for recovering now :lol:
or buy a new frame and components from Brooks

User avatar
Mulger bill
Super Mod
Super Mod
Posts: 29060
Joined: Sun Sep 24, 2006 2:41 pm
Location: Sunbury Vic

Re: "Oooh, this I gotta see. :)" Brooks: reshaped and new co

Postby Mulger bill » Mon Oct 21, 2013 7:21 pm

And well worth the wait. :D
Absolutely amazing work CS, thanks for remembering.
It's so great to see the results of a craftsman at work. :D

Shaun
...whatever the road rules, self-preservation is the absolute priority for a cyclist when mixing it with motorised traffic.
London Boy 29/12/2011

LG
Posts: 1879
Joined: Sat Nov 08, 2008 10:46 am
Location: Southeast Tasmania

Re: "Oooh, this I gotta see. :)" Brooks: reshaped and new co

Postby LG » Mon Oct 21, 2013 8:02 pm

Clydesdale Scot wrote:
LG wrote:Wow, that is brilliant! I hope we can send our knackered brooks saddles to you for recovering now :lol:
or buy a new frame and components from Brooks
Your work is very impressive! Sadly brooks don't appear to sell the leather portion of the saddle.
LG = Low Gear

User avatar
Kermit TF
Posts: 370
Joined: Fri Jan 06, 2012 8:52 pm
Location: Canbrrra

Re: "Oooh, this I gotta see. :)" Brooks: reshaped and new co

Postby Kermit TF » Mon Oct 21, 2013 8:07 pm

That anvil is awesome.. Top work.
Just waiting on a coyote and roadrunner to somehow appear :mrgreen:
When in doubt......mumble.

User avatar
Clydesdale Scot
Posts: 2254
Joined: Tue Mar 03, 2009 12:55 pm
Location: Adelaide, SA

Re: "Oooh, this I gotta see. :)" Brooks: reshaped and new co

Postby Clydesdale Scot » Mon Oct 21, 2013 8:32 pm

LG wrote: Sadly brooks don't appear to sell the leather portion of the saddle.
I think you can send your saddle back and they will recover it at the factory.
Postage costs will be a deal breaker. Cheaper to buy a new one in a lot of cases than posting to and from England.
PM me if you are interested in getting a special recover done. Or I can supply the moulded leather.

For historically significant Brooks saddles, Tony Colegrave recovers them with Brooks factory stamps. (contact details here and scroll down to bottom of page)

User avatar
Clydesdale Scot
Posts: 2254
Joined: Tue Mar 03, 2009 12:55 pm
Location: Adelaide, SA

Re: "Oooh, this I gotta see. :)" Brooks: reshaped and new co

Postby Clydesdale Scot » Fri Oct 25, 2013 6:56 pm

Peter, my brother-in-law has provided the following workflow and photos on the welding of the rivets.

The pop rivet used is a plain steel rivet 4.7mm OD x 11mm long. (about 5 cents each)
Image
With the inner shaft removed a small dob of silversolder flux is applied to the pop rivet head, and the rivet positioned close to centre over the copper blank.
A homemade jig clamp was used to hold the pop rivet whist bronze welding.
Image
Image

The copper blank is heated with oxy torch till the bronze would melt and flow around the rivet head. (the weld can be done with Mapp gas but not as quick and easy as a oxy torch)
Image
Job done!

Note:- silver solder was tried, but it was not strong enough and the weld broke during the pounding of the rivet head with the rivet setting process, this is why we went to bronze welding, and as yet have not broken a bronze welded rivet.

The hollow stem rivet makes it very easy to drill out should you mess up during the rivet process of attaching the saddle.

As for the source of railway iron, well thats why Adelaide trains are rough to ride in, mainly because of me out late at night with a hacksaw collecting anvil material.
Joking, the anvil was hacked out of a section of scrap that was once used as a fence post salvaged from a job, it don't look so pretty in its original form.
Image
No i am not a tool maker or even an engineer for that matter, and the tools are little more than ball bearings and the heads of burgle head screws cut and bronze welded to various sections of steel.

It was nice to read the kind comments about the tools, but really its not much more than a few bits of scrap junk made to do a job, and the real skill is what Philip is doing with the complete fabrication and assembly of the saddles, and his attention to detail.

I dont even like push bikes, much prefer a grinder and welder anyday!

Peter.

pirateandy
Posts: 9
Joined: Wed Oct 23, 2013 5:51 pm
Location: Warwick Queensland

Re: "Oooh, this I gotta see. :)" Brooks: reshaped and new co

Postby pirateandy » Sun Oct 27, 2013 11:25 pm

impressive,

koshari
Posts: 908
Joined: Mon Sep 09, 2013 5:33 pm

Re: "Oooh, this I gotta see. :)" Brooks: reshaped and new cover

Postby koshari » Mon Feb 20, 2017 7:40 pm

Great work. May i ask where you sourced the leather? Iam looking for a piece for a saddle frame i have.
Image

User avatar
Clydesdale Scot
Posts: 2254
Joined: Tue Mar 03, 2009 12:55 pm
Location: Adelaide, SA

Re: "Oooh, this I gotta see. :)" Brooks: reshaped and new cover

Postby Clydesdale Scot » Mon Feb 20, 2017 10:09 pm

Leather retailers are reluctant to sell less than a major piece of leather, enough to do many saddles.
One place I used to get a smaller piece from was a supplier to the bootmakers. They would stamp out of a large piece of leather a piece suitable for the resoling of boots.
I just bought it by the weight.
https://www.yellowpages.com.au/sa/hindm ... sting.html

Now I buy double butts from http://www.dshorne.com.au/
Remember you want to get vegetable tanned leather at least 5mm thick.
What sort of saddle are you looking to recover?

None of these places will help you much if you live out of Adelaide, as postage is not an option.
The leather in this form is very rigid.

koshari
Posts: 908
Joined: Mon Sep 09, 2013 5:33 pm

Re: "Oooh, this I gotta see. :)" Brooks: reshaped and new cover

Postby koshari » Mon Feb 20, 2017 10:24 pm

Clydesdale Scot wrote: What sort of saddle are you looking to recover?
Image
Image

User avatar
Thoglette
Posts: 6627
Joined: Thu Feb 19, 2009 1:01 pm

Re: "Oooh, this I gotta see. :)" Brooks: reshaped and new cover

Postby Thoglette » Tue Feb 21, 2017 12:45 am

Thanks for the necrothreading - I have two Brooks saddles that had the inevitable leather failure at the nose of the saddle. Now I have half a clue as to how to work out the effort (and cost) involved.

doubleplusgood
Stop handing them the stick! - Dave Moulton
"People are worthy of respect, ideas are not." Peter Ellerton, UQ

User avatar
Clydesdale Scot
Posts: 2254
Joined: Tue Mar 03, 2009 12:55 pm
Location: Adelaide, SA

Re: "Oooh, this I gotta see. :)" Brooks: reshaped and new cover

Postby Clydesdale Scot » Tue Feb 21, 2017 6:54 am

koshari,
the saddle you have is a 'mattress' saddle not the tensioned leather saddle.
Mattress because it has some padding underneath, and the riders weight is taken on the springs, not the tensioned leather.
Details on it construction are found at
https://www.loopframelove.com/2009/11/l ... er-part-1/

These saddles generally have two pieces sewn together to form a hinge as they move differently.

I had a new leather top sewn onto the original heavy vinyl base for the Malvern Star 'New Look' see
viewtopic.php?t=76199#p1169554
and
viewtopic.php?f=23&t=76199&start=25#p1192596
I had the original top to use as the cutting pattern.

but only because I wanted that colour.

I see that someone has recovered a mattress saddle with vegetable tanned leather.
http://www.instructables.com/id/Reuphol ... /?ALLSTEPS
The saddle was converted from a mattress saddle to a tensioned saddle.

I note that two sources for inspiration were my threads, firstly on LFGSS and this one, together with Flickr photos where that recover was as a result of my LFGSS thread

You could always buy this (if you were happy with black)
http://www.ebay.com.au/itm/Vintage-Retr ... SwyQtVqCXv

User avatar
grantw
Posts: 1792
Joined: Mon Nov 09, 2009 11:22 am
Location: Wollongong

Re: "Oooh, this I gotta see. :)" Brooks: reshaped and new cover

Postby grantw » Tue Feb 21, 2017 7:16 am

I'm impressed and I'd like an anvil :-)
Image

koshari
Posts: 908
Joined: Mon Sep 09, 2013 5:33 pm

Re: "Oooh, this I gotta see. :)" Brooks: reshaped and new cover

Postby koshari » Tue Feb 21, 2017 7:56 am

Thanks a lot for the detailed reply and the detailed explanation of the mattress saddle.this thread is fast becoming sheldon like due to your input. Also thanks for the link which i think i will ultimately go with.
Image

Who is online

Users browsing this forum: No registered users